Offer assignment
Introduction
The Offer Management feature is an optional module that allows marketeers to store commercial offers, associate unique vouchers codes to an offer, and assign this offer to the relevant selection of profile, either automatically or in bulk.
It enables you to use all the interactions stored in Actito and the behavior of the profiles in your scenarios to determine who should be assigned which specific offer. This ensures that the right profiles receive the right offer, at the right time!
Thanks to the unique code management, the Offer module now also helps you minimize the data flows required between Actito and your central system.
If you are interested in the Offer Management optional module, we invite you to contact your account manager.
Data Model
Offer Management make use of the standard data model. 2 custom tables are automatically created when this module is activated:
- An 'Offers' repository table, which acts as a catalog of all available commercial offers.
- An 'Assignment' interaction table, in which a new interaction is created when an offer (and optionally a unique code) is assigned to a profile.
The name of each table can be customized when the module is activated.
For clarity, we'll always talk about the 'Offers' repository and the 'Assignment' interaction tables.
Offers repository table
The 'Offers' table is a repository table, which means that it contains a catalog of offers that are common to all profiles. Each line of the 'Offers' table contains the general information of 1 specific offer. This table can be populated like any other custom table: through API, ETL synchronizations, or even creating new offers directly in the interface.
The offers it contains should be known by your POS system.
Point Of Sales system, E-shop, dedicated commercial offer engine, even your CRM directly... there are many ways to manage offers for your daily commercial business.
For brevity, this document will always refer to POS system when speaking about the centralized offer management on your side.
The repository table contains the following attributes:
- name: the name of the offer (mandatory)
- description: a description of the offer (optional)
- toSynchronize: this parameter defines whether the assignment of an offer to a profile must be validated by your POS system. It determines the default synchronization status of each interaction created after an offer assignment.
If set toYes, each assignment will be created with a 'synchronized' status offalse, which means that the assignment must be validated by your POS system.
If set toNo, each assignment will be created with a 'synchronized' status oftrue, which means that no synchronization is required and the offer is ready to be used. - requireVouchers: this parameter defines whether a pre-generated voucher code must be associated to the interaction when a profile is assigned the offer.
If set toYes, profiles will be assigned a voucher code from the bank of codes imported in the offer.
If set toNo, profiles won't be associated with a unique voucher code.
See Use cases below for practical examples depending on the 'toSynchronize' and 'requireVouchers' values.
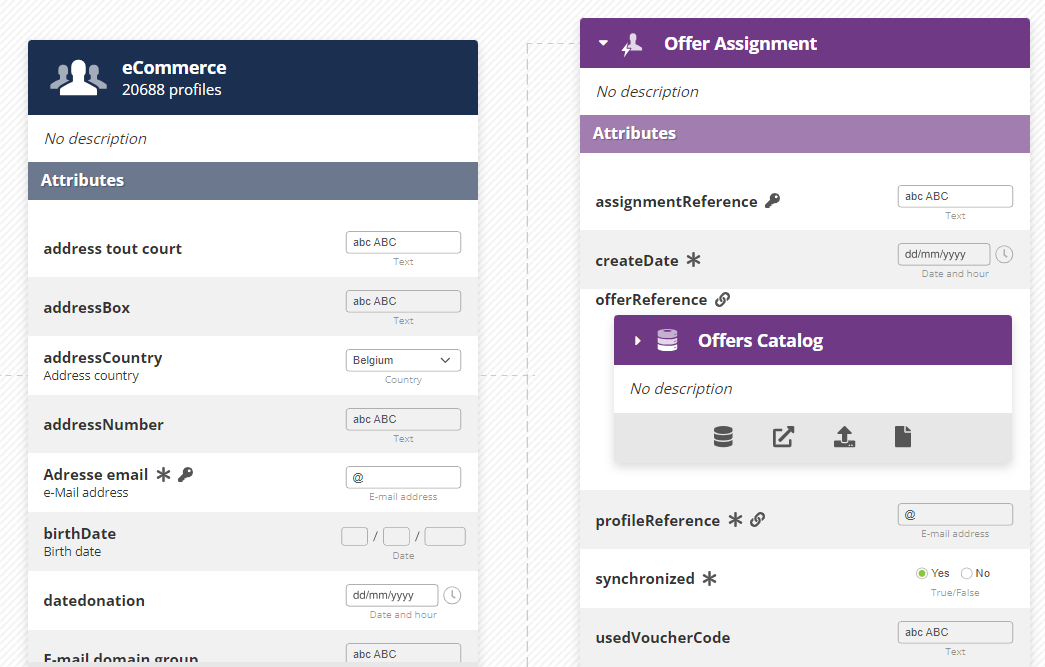
- offerReference: ID of the offer. This is the key of the table (mandatory).
- imageUrl: can be used to display a picture related to the offer, like a promotional banner. This is the global image of the offer, not a unique image per assignment (optional).
- webPageUrl can be used to associate the offer to a link, like the page of your website explaining your offer (optional).
Like all custom tables, it also contains the id, updateMoment and creationMoment, that are automatically generated by Actito.
Assignment interaction table
The 'Assignment' table is an interaction table, which means that each record in this table is directly linked to a profile. Each record also references an existing offer from the 'Offers' repository table.
It contains the following attributes:
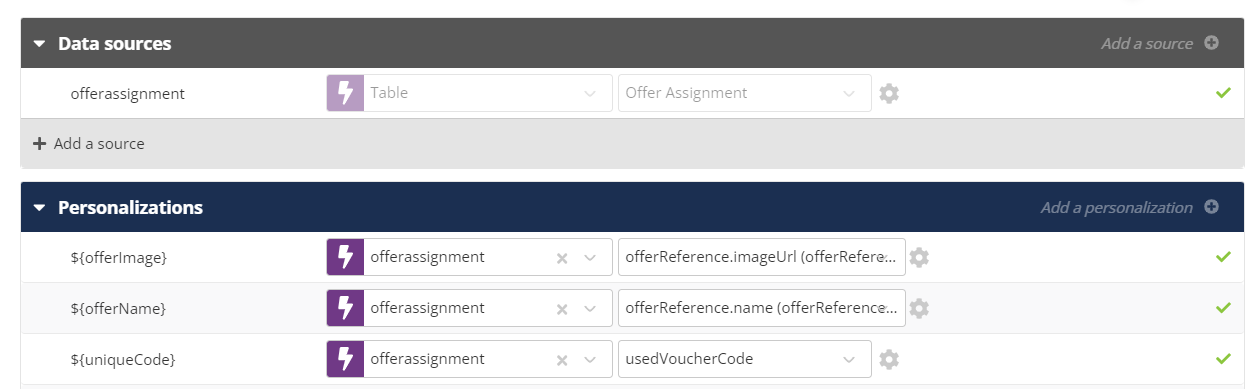
- usedVoucherCode: the unique voucher code that was assigned to this specific interaction, from the list of vouchers imported in the offer. This attribute is only populated if the 'requireVouchers' of the repository table is set to
Yes. - synchronized: this parameters specifies whether the assignment must be validated by your POS system. Its default value can be true or false depending of the value of the 'toSynchronize' field of the repository table (see above).
- profileReference: the ID of the profile, depending on the unique key of the profile table to which it makes the link
- assignmentReference: the unique key of the interaction. It is a random string of characters automatically generated by Actito after an assignment.
- offerReference: the reference of the offer. This is a link to the 'Offers' repository table, allowing to use attributes of the repository table in personalizations and targetings.
- createDate: the moment of the assignment.
Like all custom tables, it also contains the id, updateMoment and creationMoment, that are automatically generated by Actito.
These fields are the default attributes present automatically when the Offer Management module is activated. They cannot be deleted or modified (except their display name).
However, new fields can be added to the model! For instance, an 'offerValidity' attribute in the repository table, or a 'voucherBurned' boolean field in the interaction table, to be updated when the voucher has been used in your POS system.
Use cases
The richness of the Offer Management module allows it to fulfill many use cases: generic offer identical for all profiles, predefined voucher codes or unique codes generated on the fly with a lot of exchanges with your POS system... all that is possible!
The usage you make of the Offer Management module will mainly depend on whether you use pre-generated voucher codes and whether each assignment needs to be validated by your POS system.
Let's review the different use cases:
-
Generic offer (requireVoucher =
falseand toSynchonize =false): the offer does not require any unique code and any identification.
It is valid for everyone, and you are using the Offer Management module mainly to target the profiles most likely to be interested by the offer.
It allows you to automate your offer communications thanks to personalization based on the Offer repository table, without requiring further synchronization. -
Code generated after assignment (requireVoucher =
falseand toSynchonize =true): the offer is validated through a unique voucher code that is generated after the assignment.
When a new assignment line is created (with synchronized =false), the information is pushed to your POS system (through a webhook, for instance) and a voucher code is generated on the fly by your system.
Then, you update the assignment line (through an API call, for instance) to push the unique code and update the synchronized field totrue. -
Code pre-generated before assignment without validation (requireVoucher =
trueand toSynchonize =false): the offer is associated with a list of unique voucher codes that pre-generated beforehand by your POS system.
When the offer is assigned to the profile, an existing code is automatically assigned to the interaction.
It does not require any validation because the code is already known to your POS system and you don't validate the identity of the profile benefitting from this specific unique code. There are therefore no further synchronization required.
Thanks to the pre-generated list of unique voucher codes, this option minimizes the need of further data synchronization.
- Code pre-generated before assignment with validation (requireVoucher =
trueand toSynchonize =true): the offer is associated with a list of unique voucher codes pre-generated beforehand by your POS system.
When the offer is assigned to the profile, an existing code is automatically assigned to the interaction but the synchronized field of the interaction is set tofalse.
Even if the code is pre-generated, you want to validate it and the information is pushed to your POS system (through a webhook, for instance).
Once this information has been acknowledged, your can update the interaction and set the synchronized field totrue(with an API call, for instance).
This option is relevant if you want to validate the identity of the profile who can use this code and therefore your POS needs to know which code is associated to which profile. Or if you simply need to know which codes have been assigned and are expected to be used.
Importing unique vouchers
If an offer is set up to automatically assign unique voucher codes, a list of existing codes must be provided and associated to this offer.
Actito does not generate any voucher code. They must be generated externally by your voucher management system, then imported into Actito. This means that the codes can be synchronized with your POS system immediately, and that a synchronization after an offer is assigned to a profile is not mandatory.
Actito only generates a random 'assignmentReference' for each successful assignment.
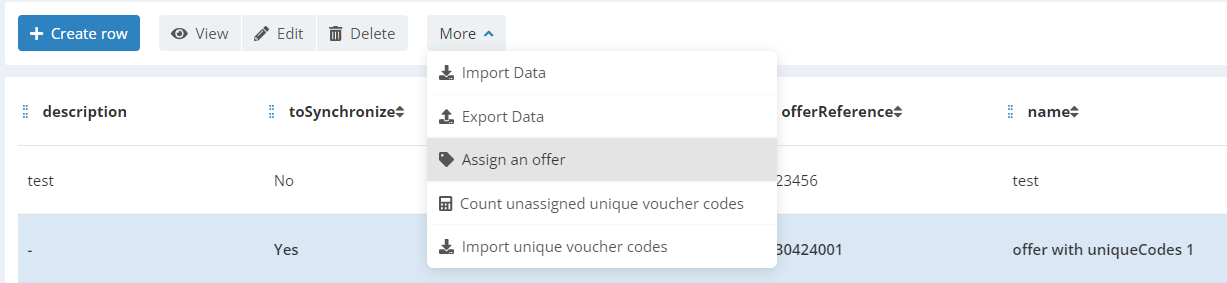
To import vouchers codes, go to Manage tables data in the interface, select your 'Offers' repository table, then select the Offer line to which you want to associate codes.
Click on 'More' then 'Import unique voucher codes'.
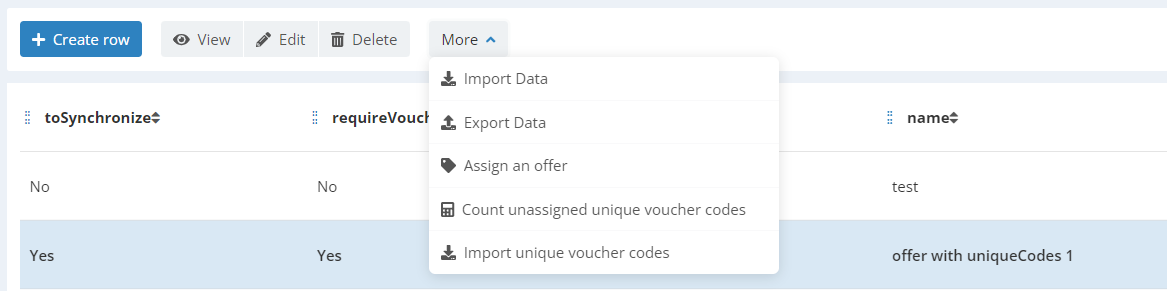
This option is only available if the 'requireVouchers' attribute of the offer is set to Yes.
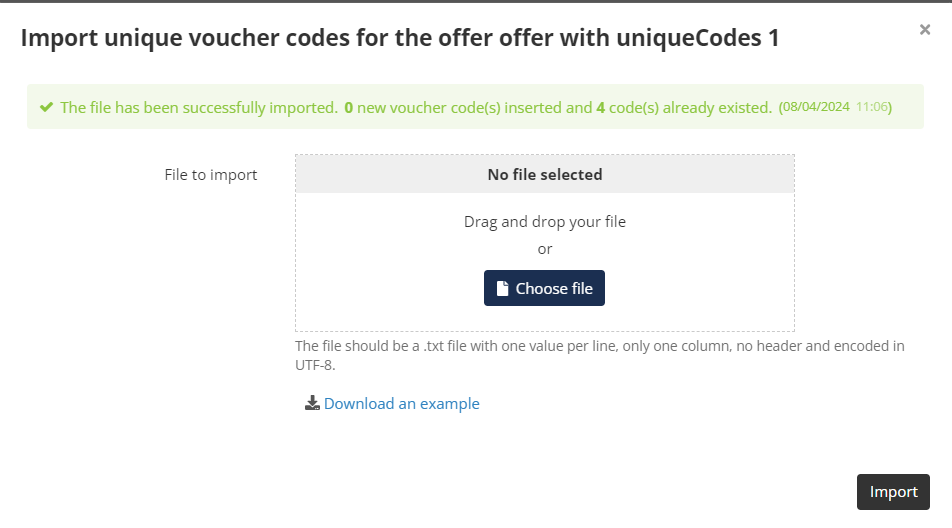
You can now import a file containing unique voucher codes.
- Format: .txt file with one value per line, only one column, no header and encoded in UTF-8.
- A voucher code is limited to max 100 characters
- Max size of the file: 25MB (this amounts to 250 000 codes of 100 characters or 500 000 codes of 50 characters, for instance)
- The file cannot contains blank rows
- Duplicate codes are ignored
Only one file can be imported at once. Once successful, a message sums up the result of the import. A new file can now be imported.
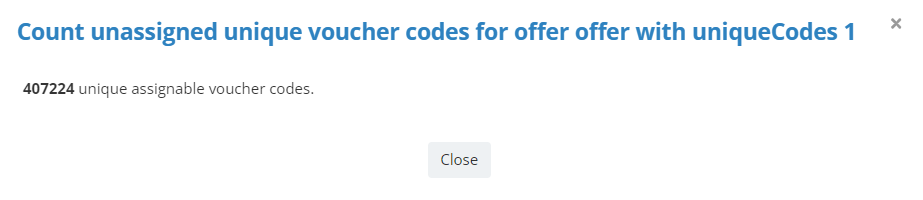
Counting unassigned vouchers
After importing codes into the offer, you can check how many codes remain available for assignment. Select the offer, click on 'More', then 'Count unassigned unique voucher codes'.
You obtain the number of unassigned voucher codes.
Assigning an offer
There are two ways to assign an offer:
- manually with a targeting
- automatically through the scenario module
Manually assigning an offer
This option is best to assign an offer to a bulk of profiles at once, based on targeting criteria. To do so, go to 'Manage table data', view the 'Offers' repository table, select the relevant offer, then click on 'More' and 'Assign an offer'
This opens a modal window where you can build a targeting with criteria on all the data available in Actito to select the profiles who will be assigned this offer.
This operation creates an assignment interaction for each profile who belong to the target. Scenarios can be triggered by the creation of an interaction. You should therefore make sure your target is correct and check the disclaimer.
To count the number of profiles that match the offer criteria and to be able to re-ruse these criteria, you should use a saved targeting.

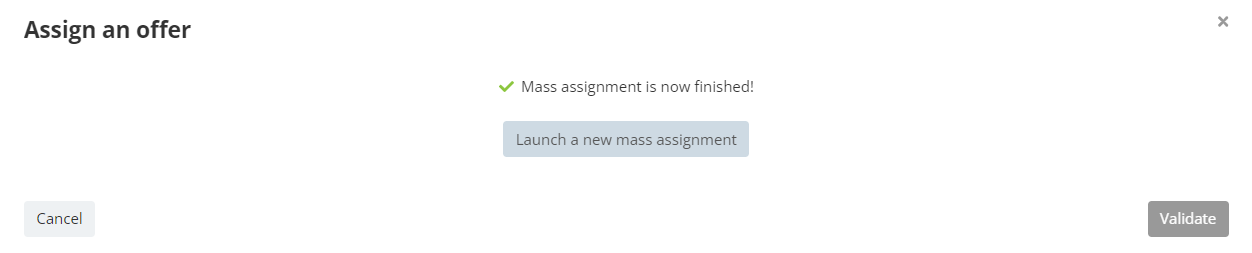
After launching a mass assignment, the targeting will be calculated and assignment lines will be created. Once you see the 'Mass assignment is now finished!', you can close the window.
Depending on whether your Assignment required to be validated by your POS system, this can trigger either synchronization data flows, or directly a scenario to share your offer through the Actito communication channels.
If you are assigning pre-generated vouchers, the mass assignment will fall in error if there aren't enough unique codes associated with the offer. Please import new codes before re-launching the assignment.

Assigning an offer through scenarios
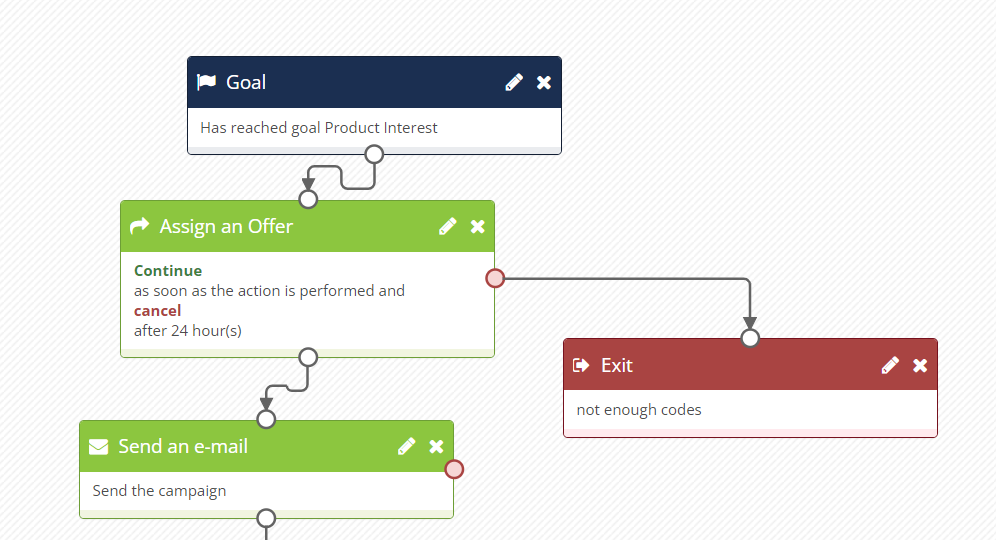
This option is best to include offer management in your automation scenario and automatically assign offers to your profiles depending on their behavior, such as when they open an e-mail, reach a webpage visit goal, or any Start event available in scenarios.
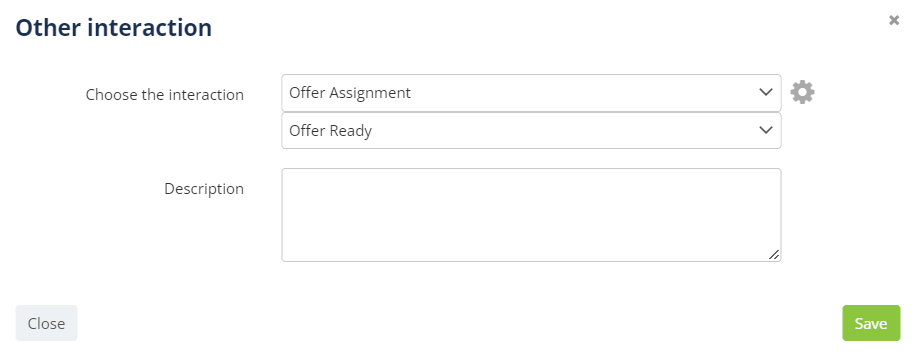
To do so, a new action block is available when the Offer Management module is activated.
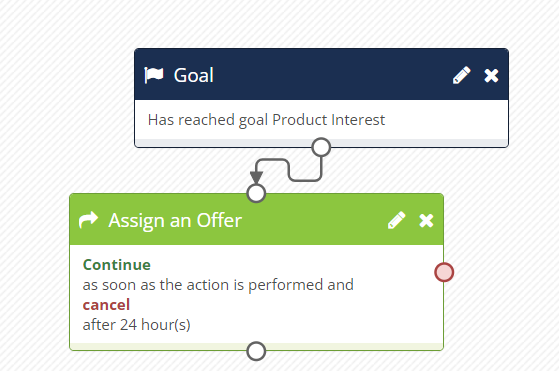
Select the relevant offer from the dropdown displaying your repository of offers, then save it.
If your offer is defined to assign unique vouchers from the imported list, and there not enough unique codes available for assignment, the interaction will fall in the error exit of the block.
Make sure to put an 'Exit' block after the error node of the Offer block, otherwise it will be treated as a success even if codes are missing.
Setting up data flows
If an offer assignment needs to be validated by your POS system (meaning that the offer is defined with toSynchonize = true in the repository table), it means that data flows needs to be implemented between Actito and said POS system.
It can be:
- to generate a unique voucher code and update the assignment interaction (if you don't use the pre-generated list of voucher codes).
- to validate which code has been assigned to which profile (if you do use the pre-generated list of voucher codes).
Acknowledging the offer assignment to a profile
In any case, it means that when an offer is assigned to a profile, you need to receive information about this new interaction. The best way to get this information in real-time is through a webhook.
By setting a webhook on 'new creations' in the 'Assignment' interaction table you will receive all the information required to acknowledge this assignment.
Please follow the developers documentation on how to set up a webhook
For this use case, it should be defined as follows:
- "on":
CUSTOM_TABLE - "onElementId" : the id of the 'Assignment' interaction table
- "eventType":
CREATE - "onFields": the fields of the interaction that you need to know to validate the offer, such as the identifier of the profile and the usedVoucherCode if using the pre-generated codes
This information will be pushed to your "targetUrl".
If you do not need to receive this information in real-time, it is also possible to use an incremental interaction data export to receive a csv file of all new creations in the 'Assignment' table once per day.
This export can also be useful if you don't need to validate an assignment in your POS system but simply want to acknowledge which codes have been assigned and are ready to be used.
Validating the assignment in Actito
Once you receive information about an offer assignment, this should trigger a process in your POS system, to either generate a unique code (if you don't use pre-generated ones) or validate the association between a profile and an existing code.
This step will depend on your commercial offers engine and your use cases, and is entirely managed on your side.
Once this step has been accomplished, you need to push the information back to Actito and update the 'Assignment' interaction.
This implies:
- pushing the personalized information (such as a unique code generated by the POS system)
- updating the synchronized field to
true
The easiest way to do that in real-time is with an API call to update the interaction record whose ID you received through the webhook (or export).
If real-time is not required, it is also possible to use daily or one-shot ETLs to push the data in bulk.
After this API call, the assignment interaction is now complete, and can trigger scenarios, for instance.
Sharing your offer
Once the offer has been assigned to the relevant profiles, you can now use it in your communications, to inform these profiles that they benefit from a special offer!
You can:
- Send an e-mail immediately after the offer assignment. If you assign your offer through the scenario module, you can follow up immediately with the communication part of your offer management strategy.
This immediate follow-up is best used if the offer assignment does not need to be validated by your POS system ('toSynchronize'= false).
- Start a new scenario on an interaction block for the 'Assignment' table. The 'Assignment' table is created with 2 trigger events that can be used to start a new scenario:
- at interaction CREATION with the field 'synchronized' =
true - at the UPDATE of an existing interaction when 'synchronized' changes to
true
- at interaction CREATION with the field 'synchronized' =
This makes it the best option if the offer assignment does need to be validated by your POS system.
Regardless of the trigger of the communication, your offer can be shared through all the Actito communication channels (e-mail, SMS, push) and the details of the offer or the unique code can be displayed through personalization on the 'Assignment' table.