DMA templates
The creation of personalized campaigns with the DMA module is a two-step process:
- First, it is necessary to configure campaign templates within the Actito interface (alone or with the help of Actito teams).
- Then, DMA users customize the content of these templates in the DMA module
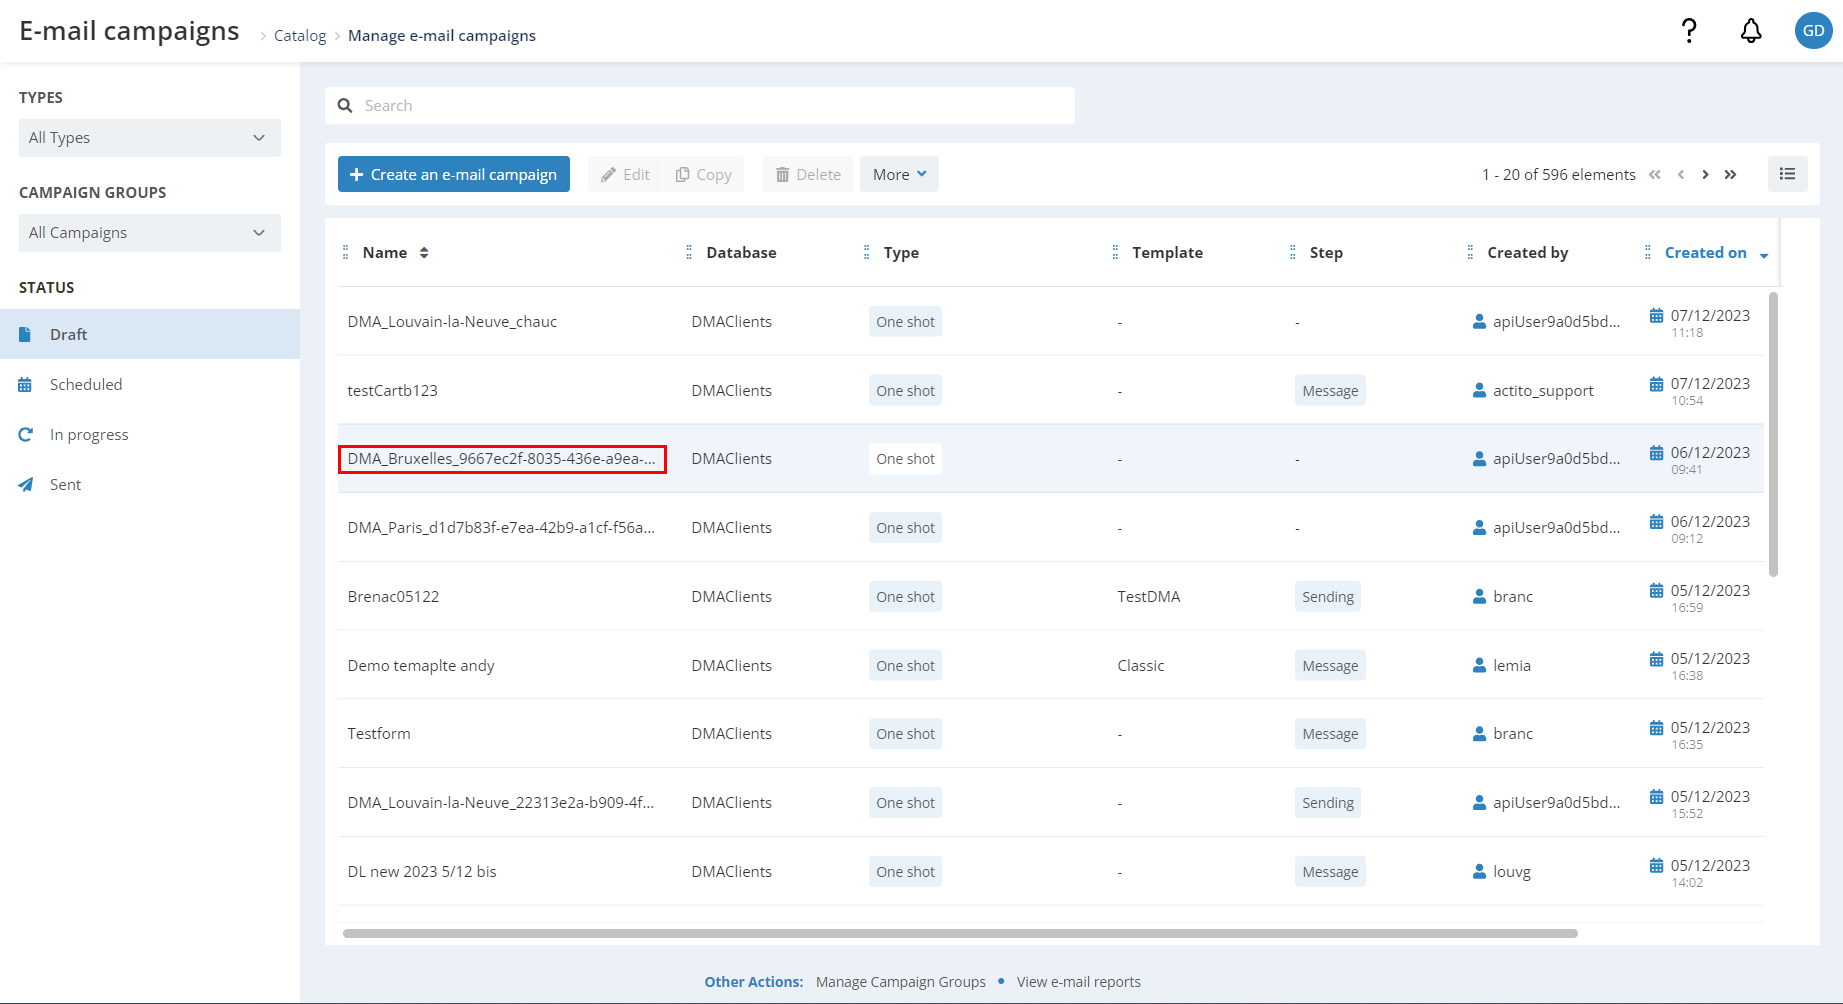
Every email and SMS campaigns, whose routing is triggered by the DMA, are sent via the Actito license. These campaigns will therefore be visible in the campaign lists on the Actito interface via e-mail/SMS campaign management apps.
Actito users will therefore be able to find all the 'In progress' and 'Sent' campaigns in the Actito interface (in the 'Draft' tab if it is a test campaign, or in the 'Sent' tab if it is the final sending of the campaign).
If you wish to restrict the access to these DMA campaigns to some Actito users in your organization (and prevent them from copying and routing DMA campaigns), you can manage your users access rights.
You can easily identify campaigns from the DMA module thanks to their nomenclature: 'DMA_<'scope name'>_...'
You can create and manage e-mail templates, available for DMA users, on your own in the Actito interface or with the help of Actito teams.
Creation of DMA templates by Actito teams
For each template, you need to define :
- Standard parameters of the template :
- A name (technical and display)
- A short description of the the template (maximum 1 phrase)
- A preview of the template
- The sender name
- The e-mail subject
- The reply address
- The subscriptions linked to the templates
- The display orders of the templates
- The template body
- The HTML
- The images
- The personalized variables
- The editable text blocs by the DMA users
- The editable images by the DMA users
Manage DMA templates in the Actito interface
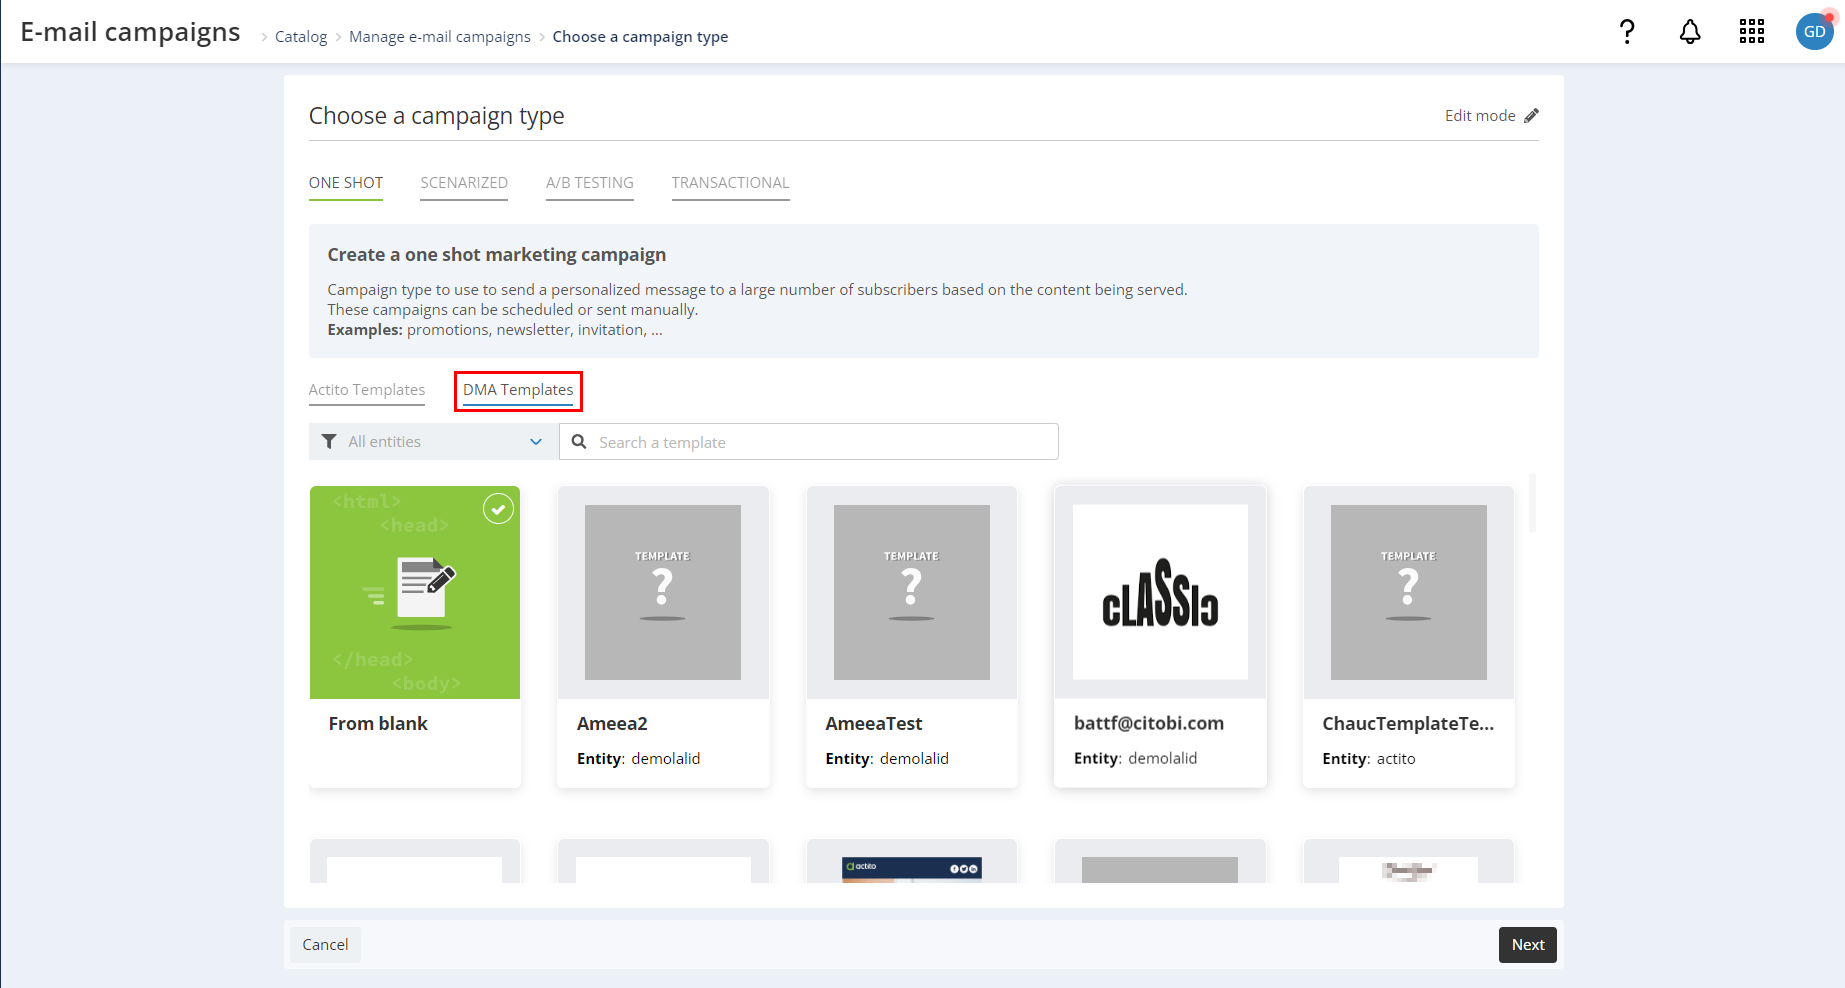
To create and/or modify a DMA template, go to the 'E-mail campaigns' app and click on 'Create an e-mail campaign'.
At the step of creation mode, go in the 'DMA Templates' tab.
All users have no longer access the the DMA templates tab by default. If you want to activate this right for your some of Actito users, please contact your account manager.
This tab gives access to all the templates defined for the DMA. You can either create a new template by selecting 'From blank', or edit an existing template, by choosing the template you wish to modify.
Step 1
General Data
Campaign name: the campaign name will not be the template name. You will be able to define the name in the last step of the creation of your template.
If you edit an existing template, we advise you to name your campaign with the name of the template for clarity.
Language: within the DMA, the campaign language depends on the language used in the campaign content.
DMA campaigns cannot be multilingual. Please select only one language.
Message headers
To move on to step 2 of your campaign creation, you need to define at least a subject and a sender.
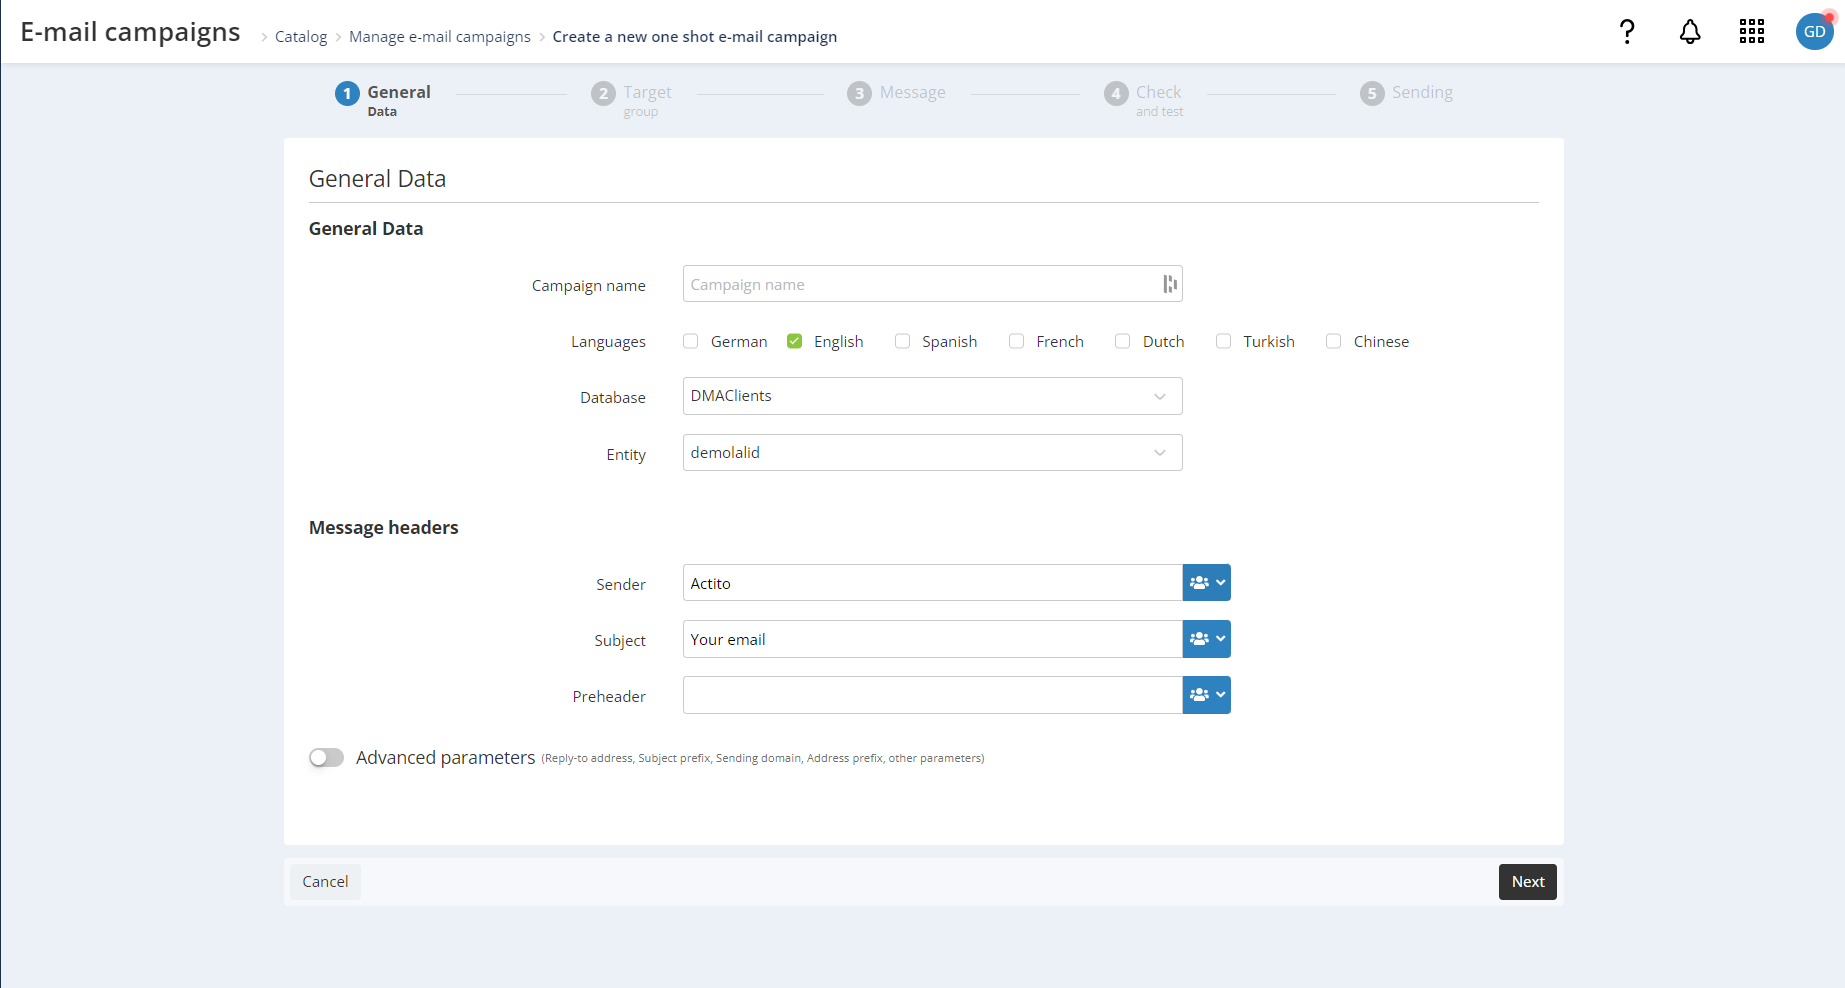
- The sender is fixed and cannot be modified in the DMA by local users.
- The subject will take the default value, which you define, but can be edited by DMA users.
- Preheader, this field is not taken into account in the DMA, so you do not need to fill it in.
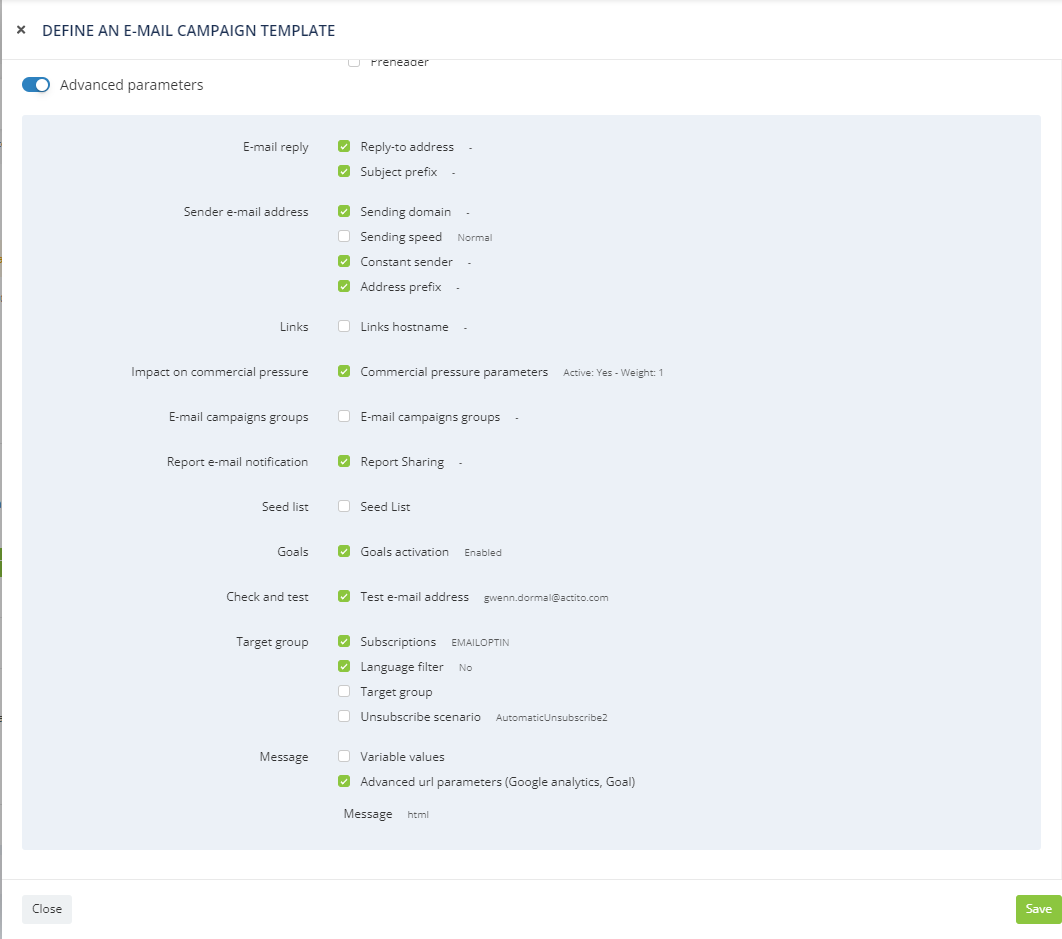
Advanced Parameters
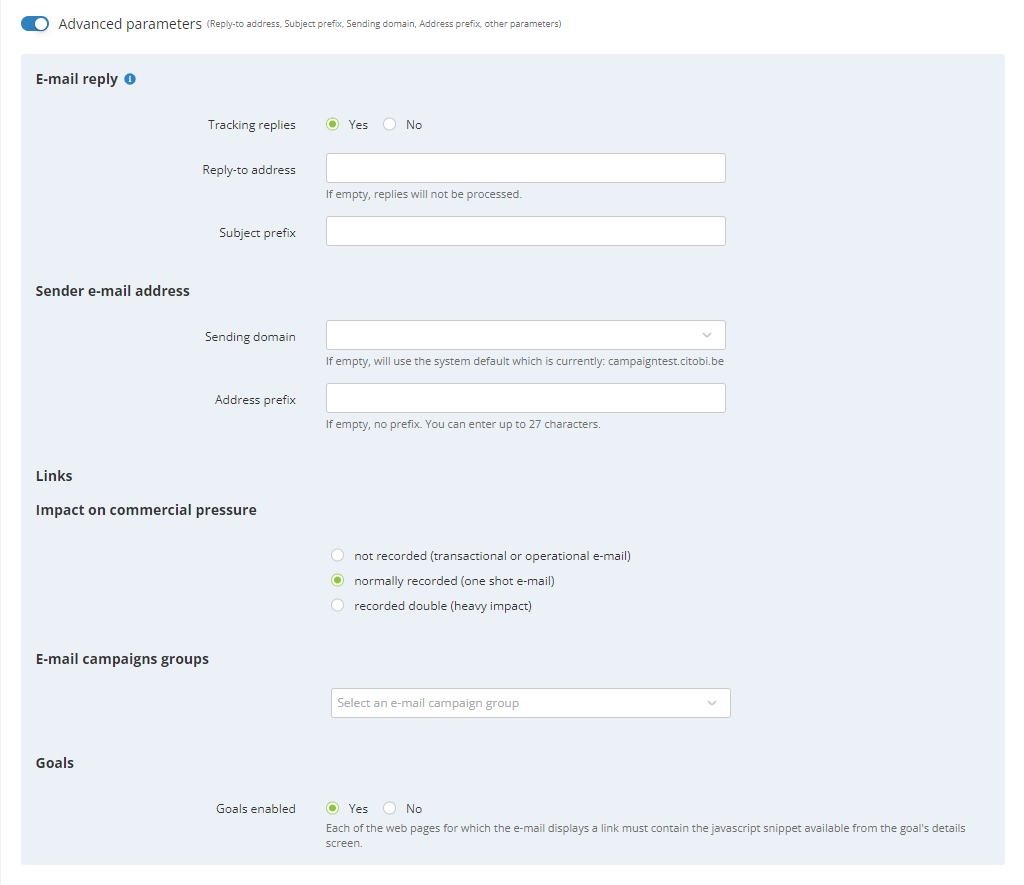
- Email reply: you can define a default reply-to address, the tracking of the replies by Actito and the prefix that will be added to the replies. DMA users can only update the reply-to address.
- Sender e-mail address & Links domain: the values you define for the sending domain, the sender and the links hostname will be fixed in the template and cannot be updated by DMA users.
- Impact on commercial pressure: the rule you define here will be linked to the template and cannot be modified by DMA users. As a result, all campaigns sent with this template will have the same pressure rule (the one you define here).
- E-mail campaign groups: By default, all e-mail sent by DMA are tied to a campaign group linked to the scope. However, you can define extra campaign groups in the template. They will be applied in addition to the scope campaign group.
- Goals: you can choose whether or not Goal tracking will be added to links of the template. This cannot be updated by DMA local users.
Once you have defined the template general data and advanced parameters, you can move on to step 2.
Step 2
At this step, you must link your campaign to a subscription.
Although the association of one or more subscriptions to your template is done in the last step of your template creation. You must link it to a subscription in step 2 in order to proceed to the next steps of the creation of your template.
You do not need to define a targeting as it will be overwritten by the DMA segment.
Step 3
At this step, you will be able to define the content of your e-mail template.
Which means you can arrange and modify content blocks just as you would when creating an e-mail campaign in Actito. Then you can define fixed and customizable content for the DMA users.
Just like a classic campaign, you can use personalization based on all the sources available in Actito (profiles tables, custom tables, etc.). However, please make sure to map and save them.
In the Actito campaign editor, you can use several text styles within a single block (font, text size, etc.). These styles cannot be updated in the DMA. Therefore, each customizable block in the DMA can only contain one style. Any block containing more than one style will not be compatible with the DMA module.
Therefore, to modify the style of a text, you must NOT use the classic editor toolbar, except to assign one style to the text block.

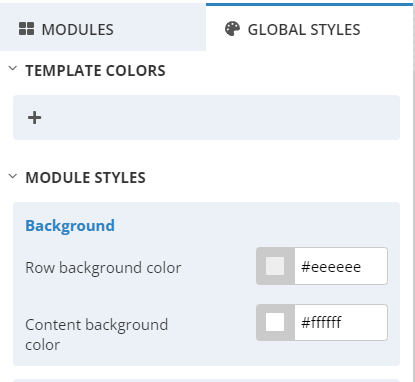
It is also possible to modify the format of these styles in the 'Global Styles' tab.
It is also not possible to use bullet points as they are not compatible with the DMA module
Note on the use of links in your template
In your template, it is not possible to put editable links by the DMA users behind a text. You can, however, include fixed links behind a text in the template.
If you want to add links editable by DMA users in your template, we advise you to use the 'Call to Action' buttons, for which, it is possible to use editable links.
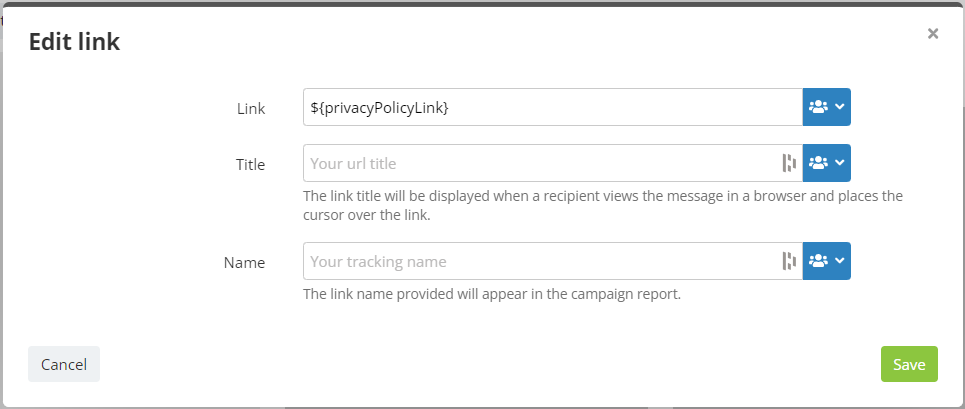
If you want to set up a link, behind a text that differs according to the language of your profiles. This is possible with personalization for which you can apply a transformation function. This function will enable you to display a different text depending on the language of the targeted profiles.
For example, if you want to add a link to your privacy policy, you will need to add a personalization instead of the URL link.
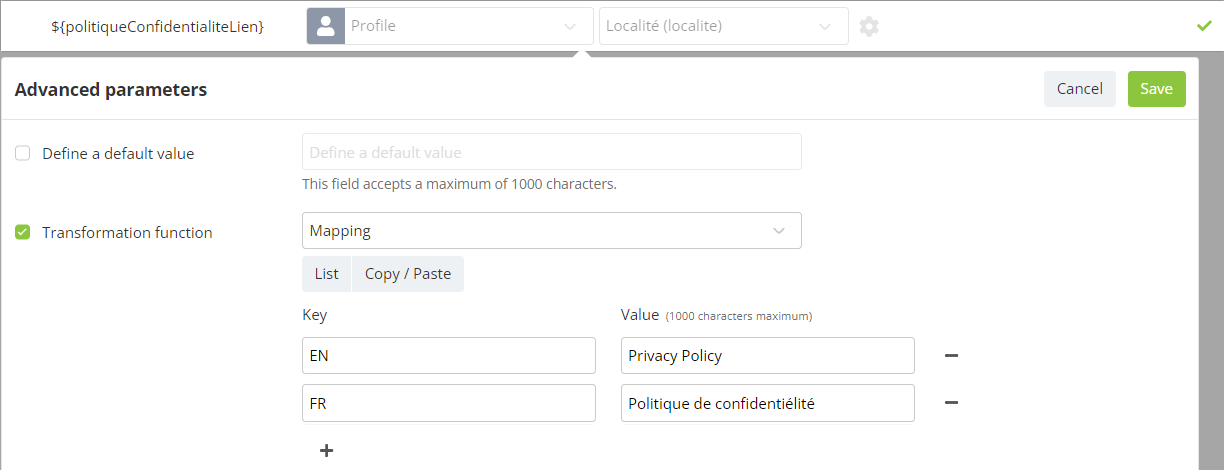
Then, in the personalization tab, you will need to link the personalization to an attribute in the customer profile table (the profiles country, for example).
Finally, click on the gear icon next to your personalization and apply a transformation function, which will display a different text depending on the language of the profile.
Once you have written the content and arranged the blocks of the e-mail, click on 'DMA form editor'.
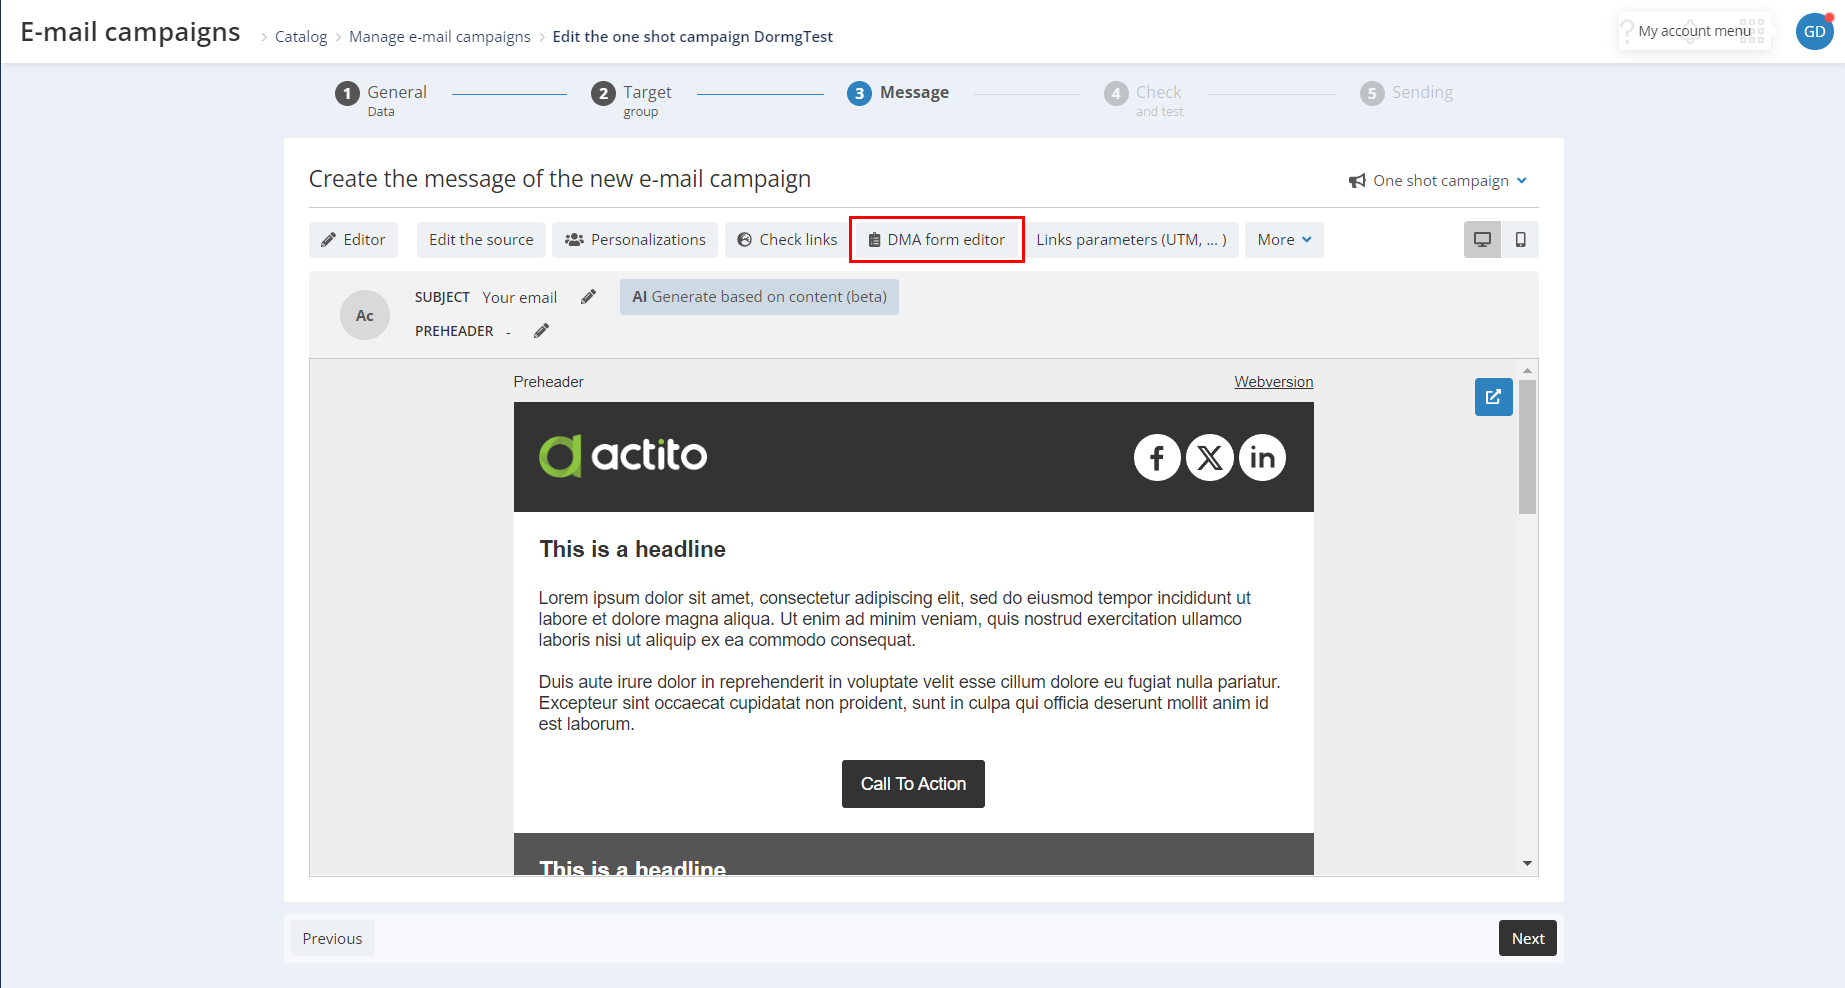
You will then have access to a dedicated editing menu for the creation of DMA templates.
- On the left, you will have access to a menu, that contains the fields that will be editable in the DMA.
- On the right, you will see the preview of the e-mail, where you can choose which elements can be customized by DMA users.
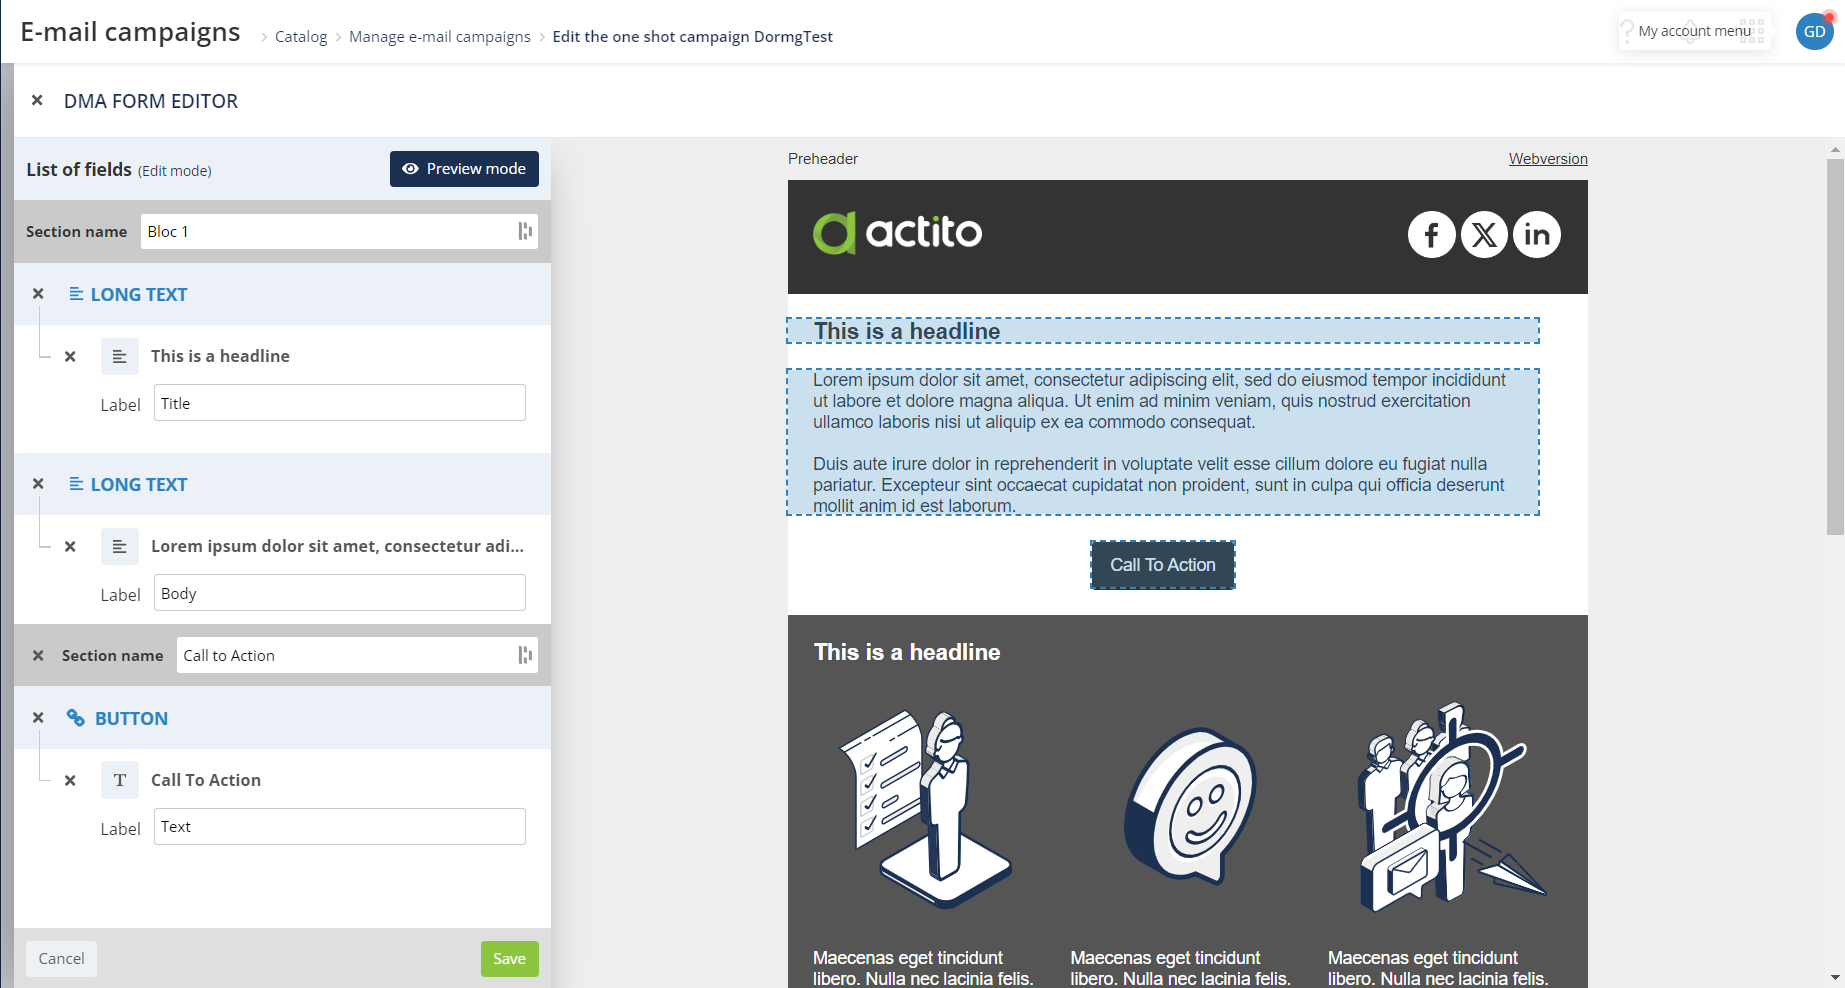
The menu on your left is divided into sections. By default, a section corresponds to an element.
For example, when you add an image. On the menu, it will appear under an 'image' section in which you will find the image, the replacement text and possibly a link.
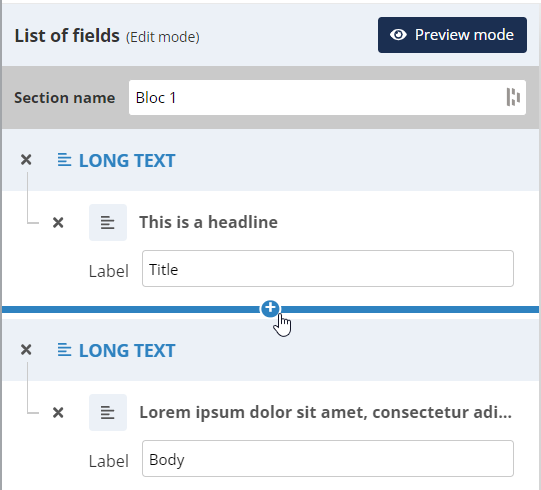
If needed, you can add sections. To do so, you have to move the mouse between sections and a '+' icon will appear. Simply click on it to add the section. Then, you will have to name it.
To add an element to the left-hand menu and make it customizable, simply move your mouse over it in the preview and click on the '+' button.
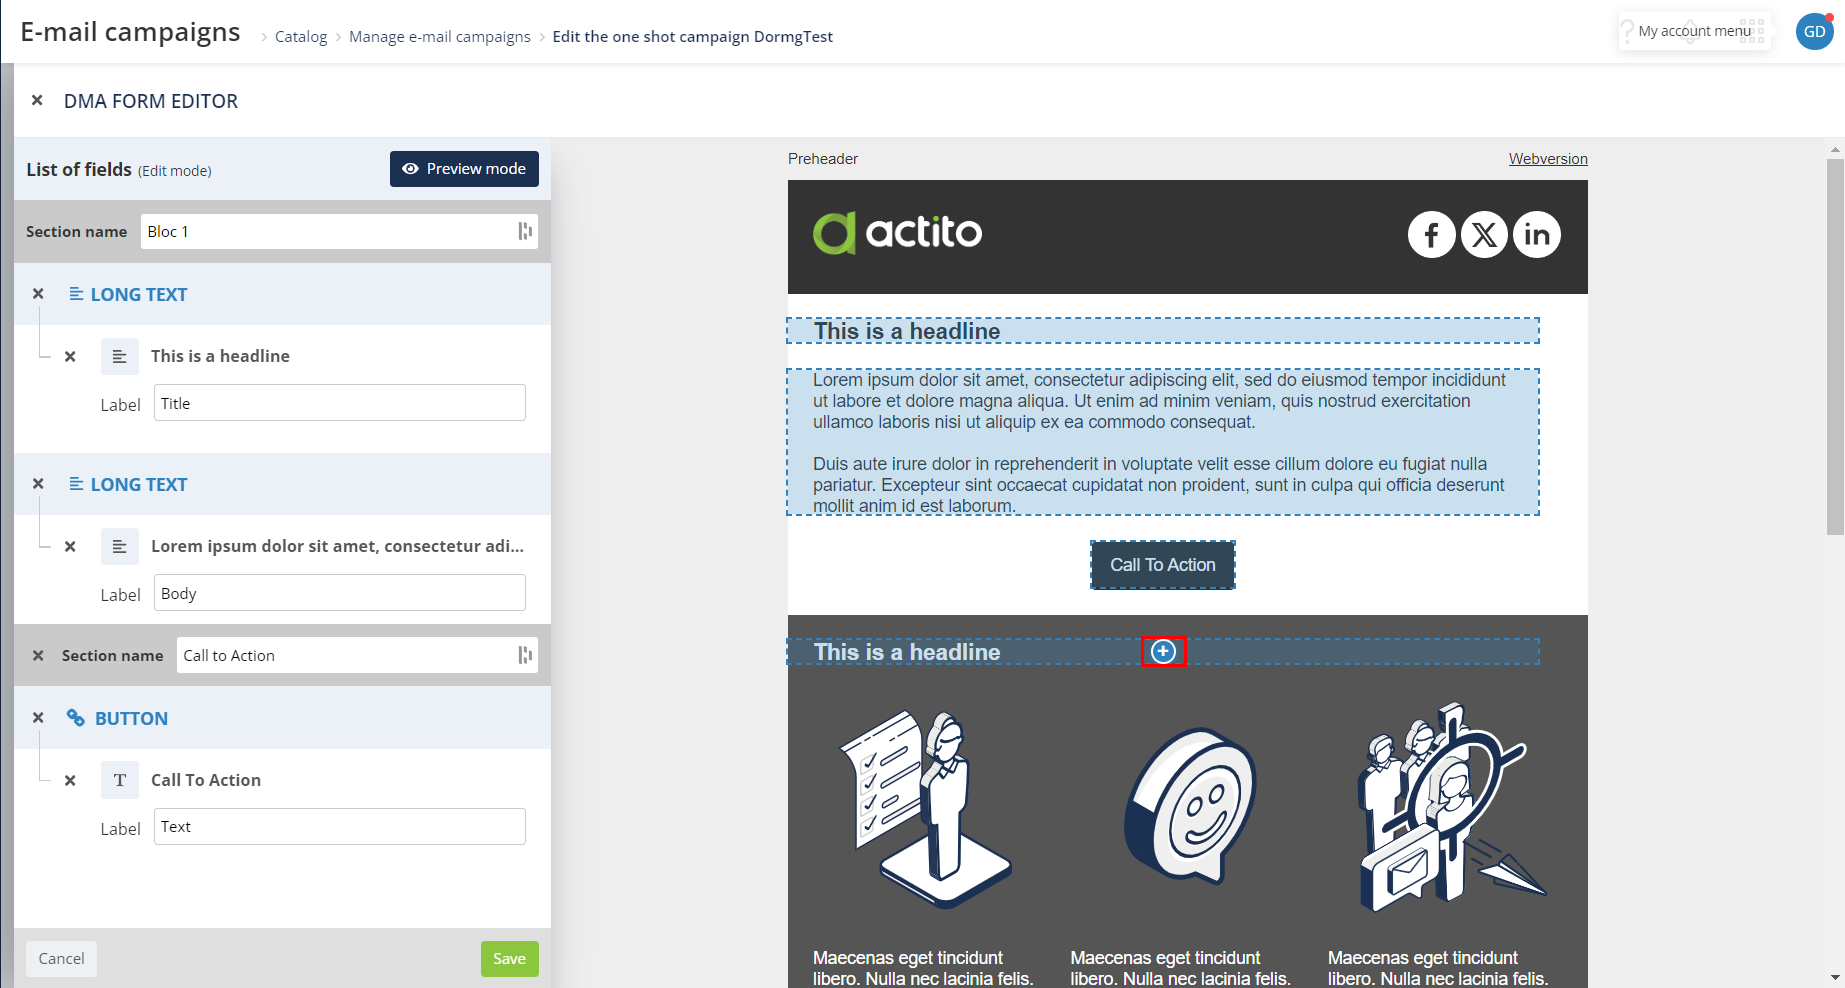
The element will be highlighted in blue and will appear in the form of a section in the left-hand panel.
For each added element, you need to define a label that will be visible for DMA users. Therefore, we advise you to use shorts and precise labels.
By default, when you add a block to your e-mail, all the elements in that block will be defined as editable . You must then label those you wish to keep and remove from the left-hand menu those you wish to leave fixed.
In the DMA, local users must use images hosted on Cloudinary. Therefore, if you want to add editable images in your template, you must use an image hosted on Cloudinary for compatibility reason. Images uploaded from your computer can be selected in Actito but will lead to errors in the DMA. Images that will not be editable in the DMA can be hosted on any source.
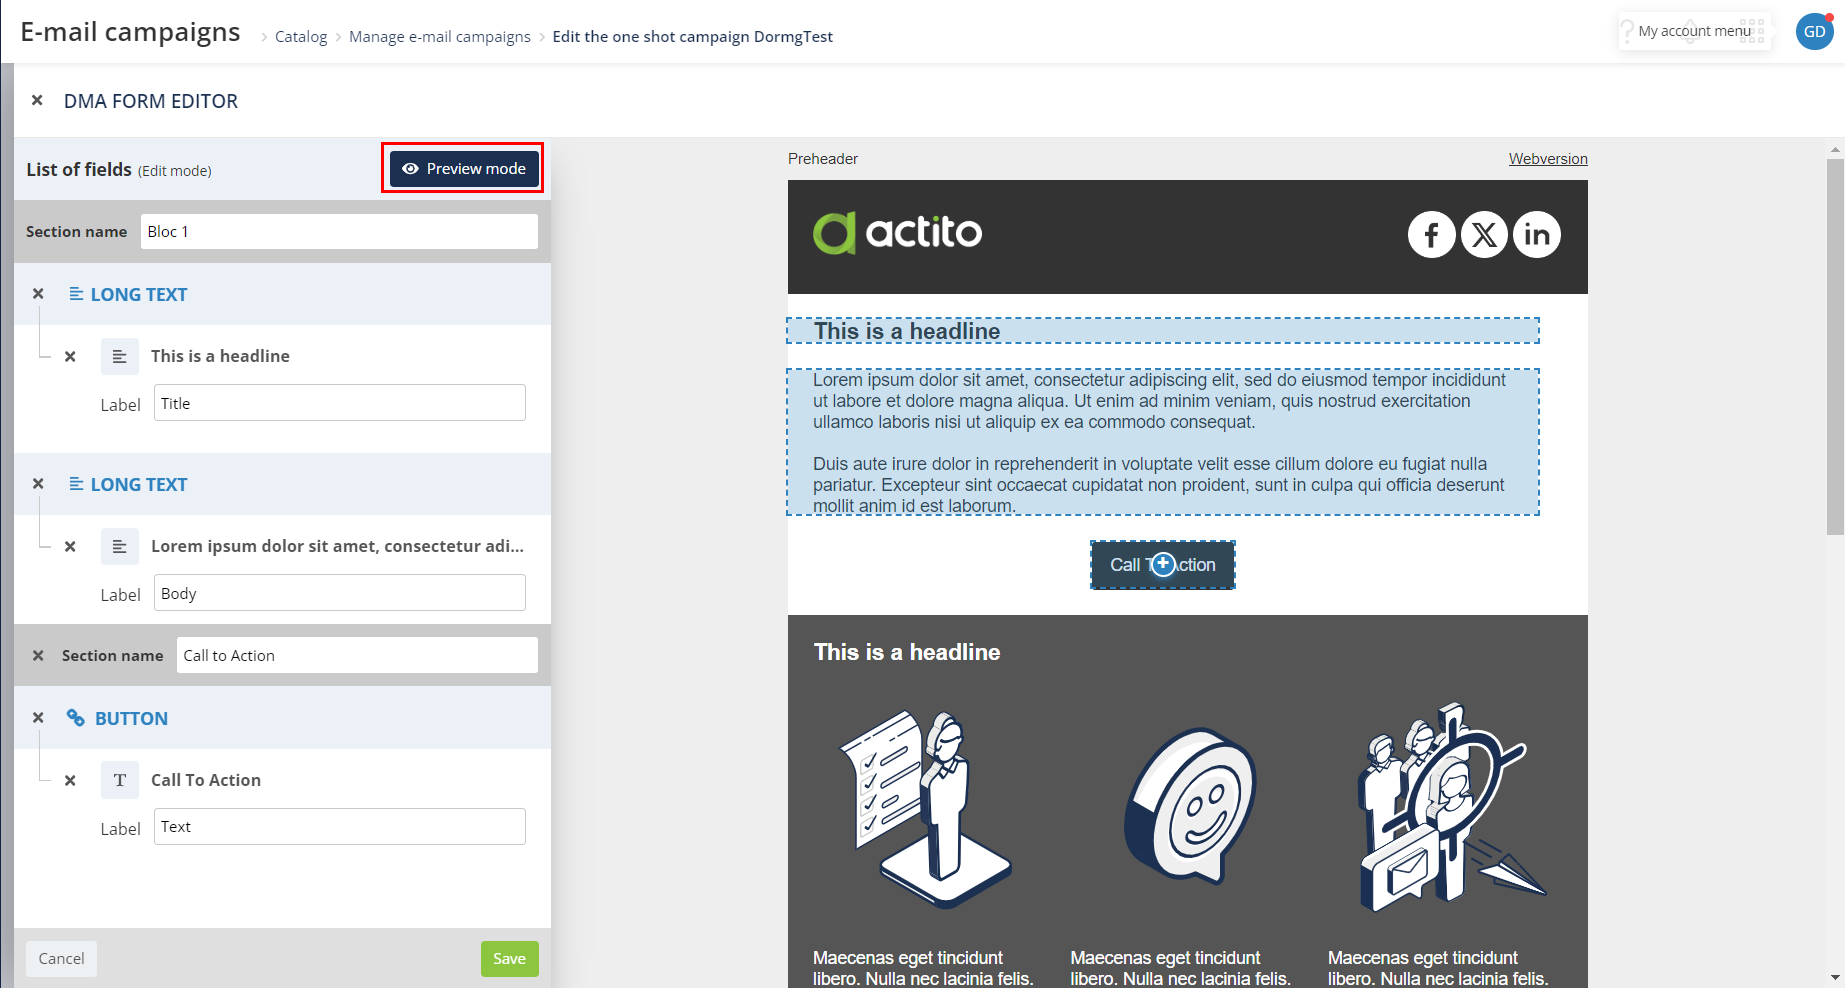
The Edit mode is not very practical to check exactly which elements are editable or not by DMA users. Make sure to use Preview mode to get a clearer view of your elements.
Once you are satisfied with the content of your e-mail, have clearly defined the fixed and editable content and saved your work, you can move on to the next step.
There is no autosave of your modifications. Make sure to click on 'Save' before exiting the 'DMA form editor' app.
Step 5
You can test the template in step 4 of the campaign creation process to check the rendering of your template.
If you are satisfied with the look of your campaign, click on 'Save as template'.
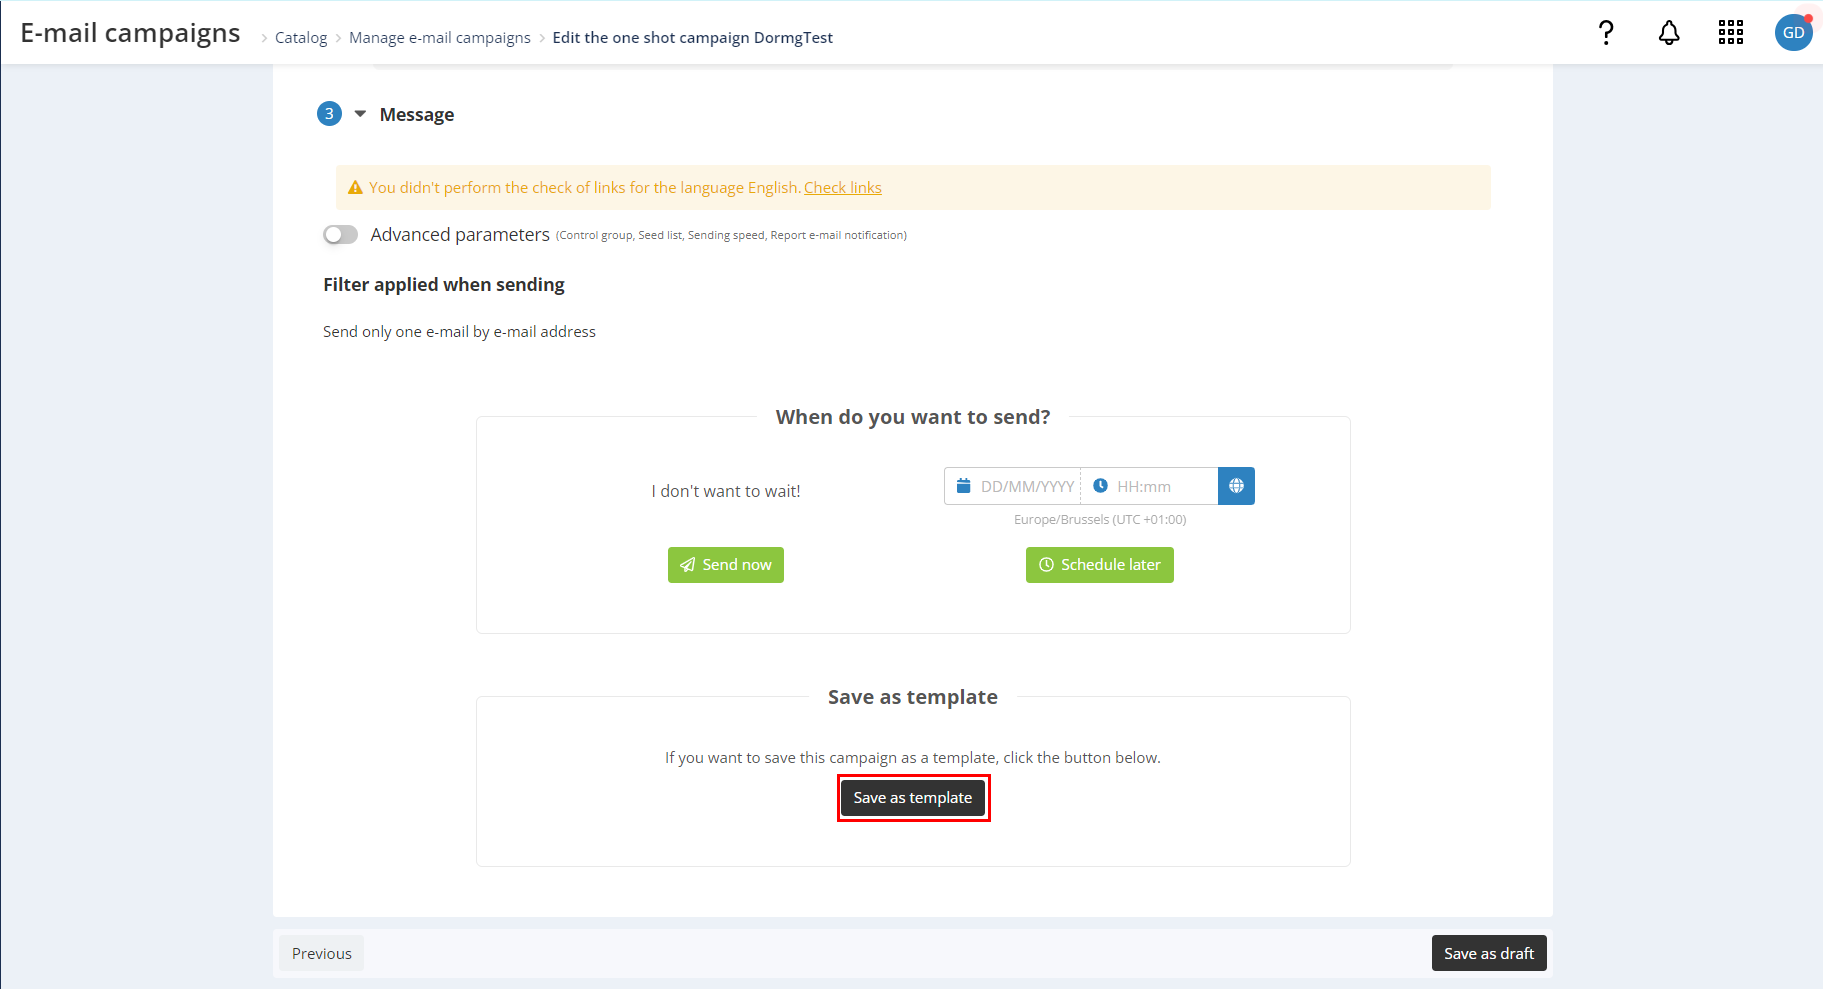
A side panel will open on the right of your screen with the template parameters to be saved.
Template data
Template data parameters vary depending on whether you want to create a new template or edit an existing one.
Create a new template
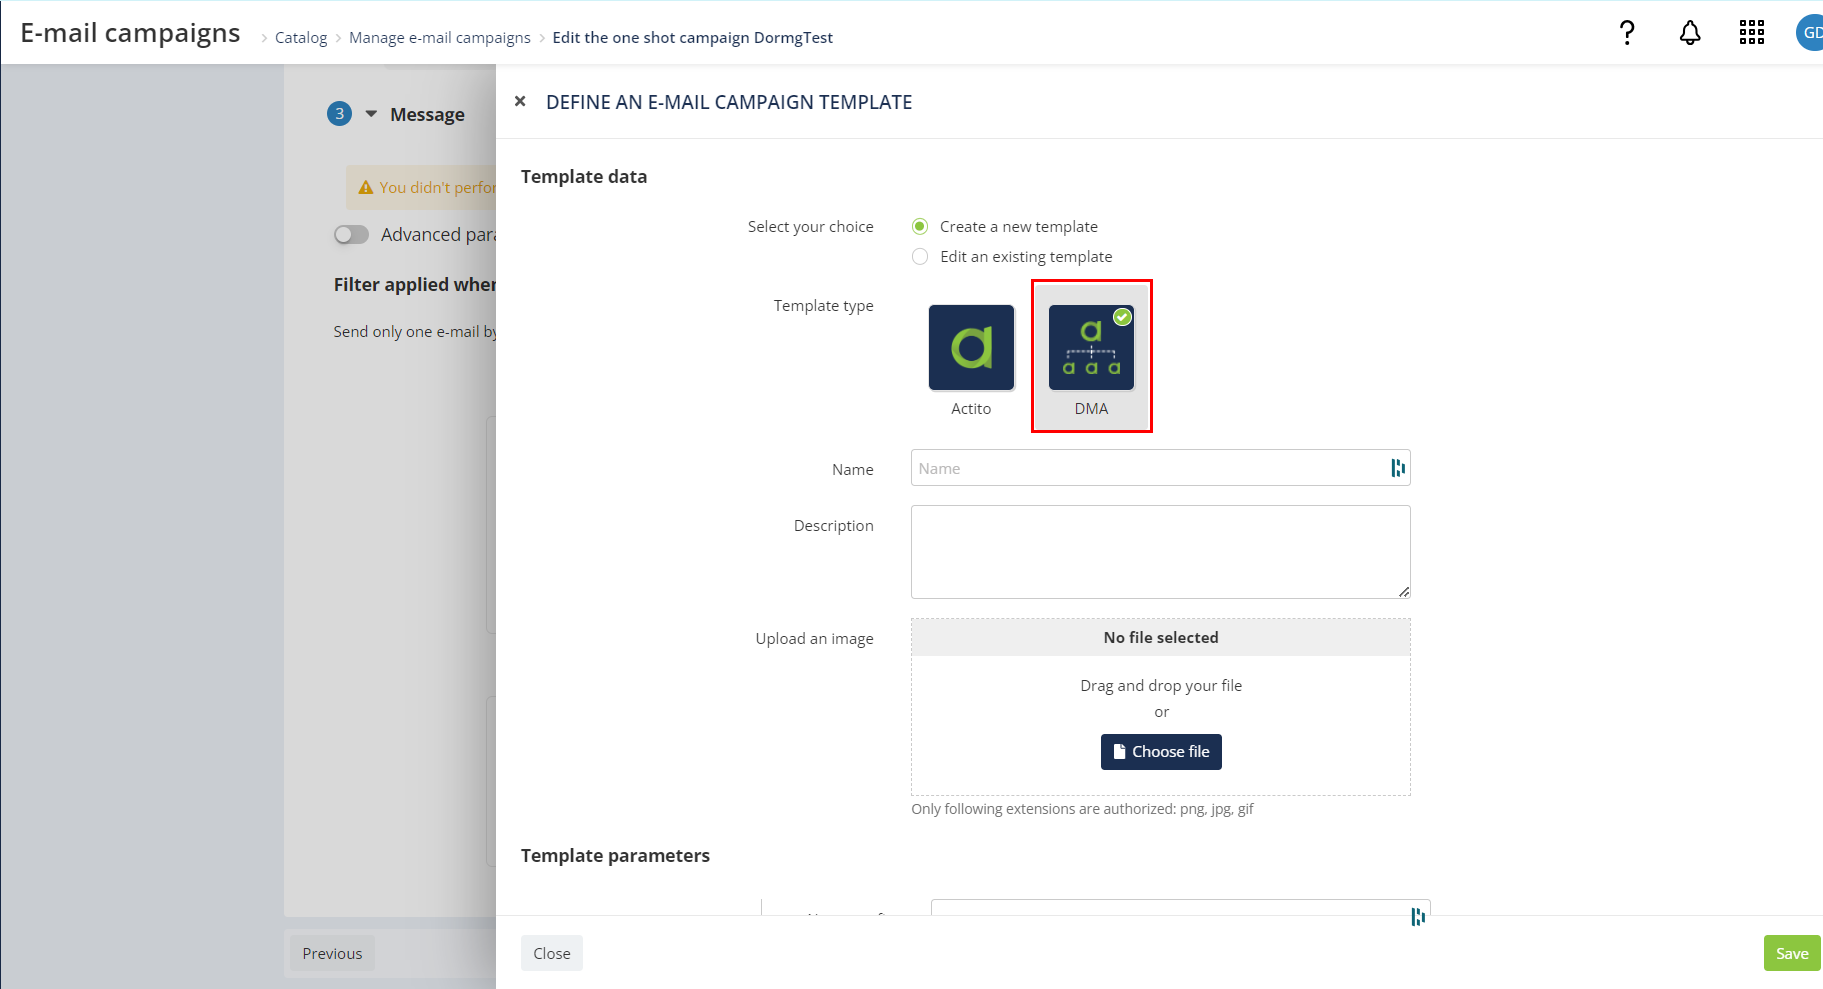
After checking the option to create a new template, you need to select the template type. In this case, you need to select the 'DMA' type.
Then, you must give your template a name and add a description and image if you want.
Edit an existing template
Once you have checked the option to edit an existing template, select the template you wish to modify from the drop-down menu.
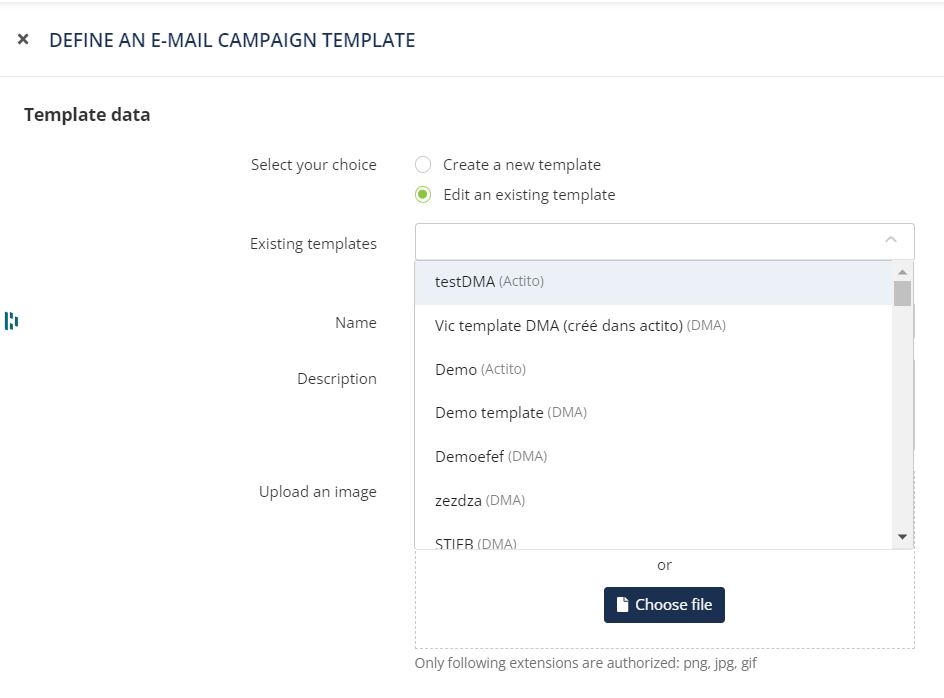
The template name and description fields are pre-filled with the name and description of the template to be edited.
If you wish to change the template image, you can upload a new image. Otherwise, leave the field empty. The image used for this template will then be the image used previously.
Template Parameters
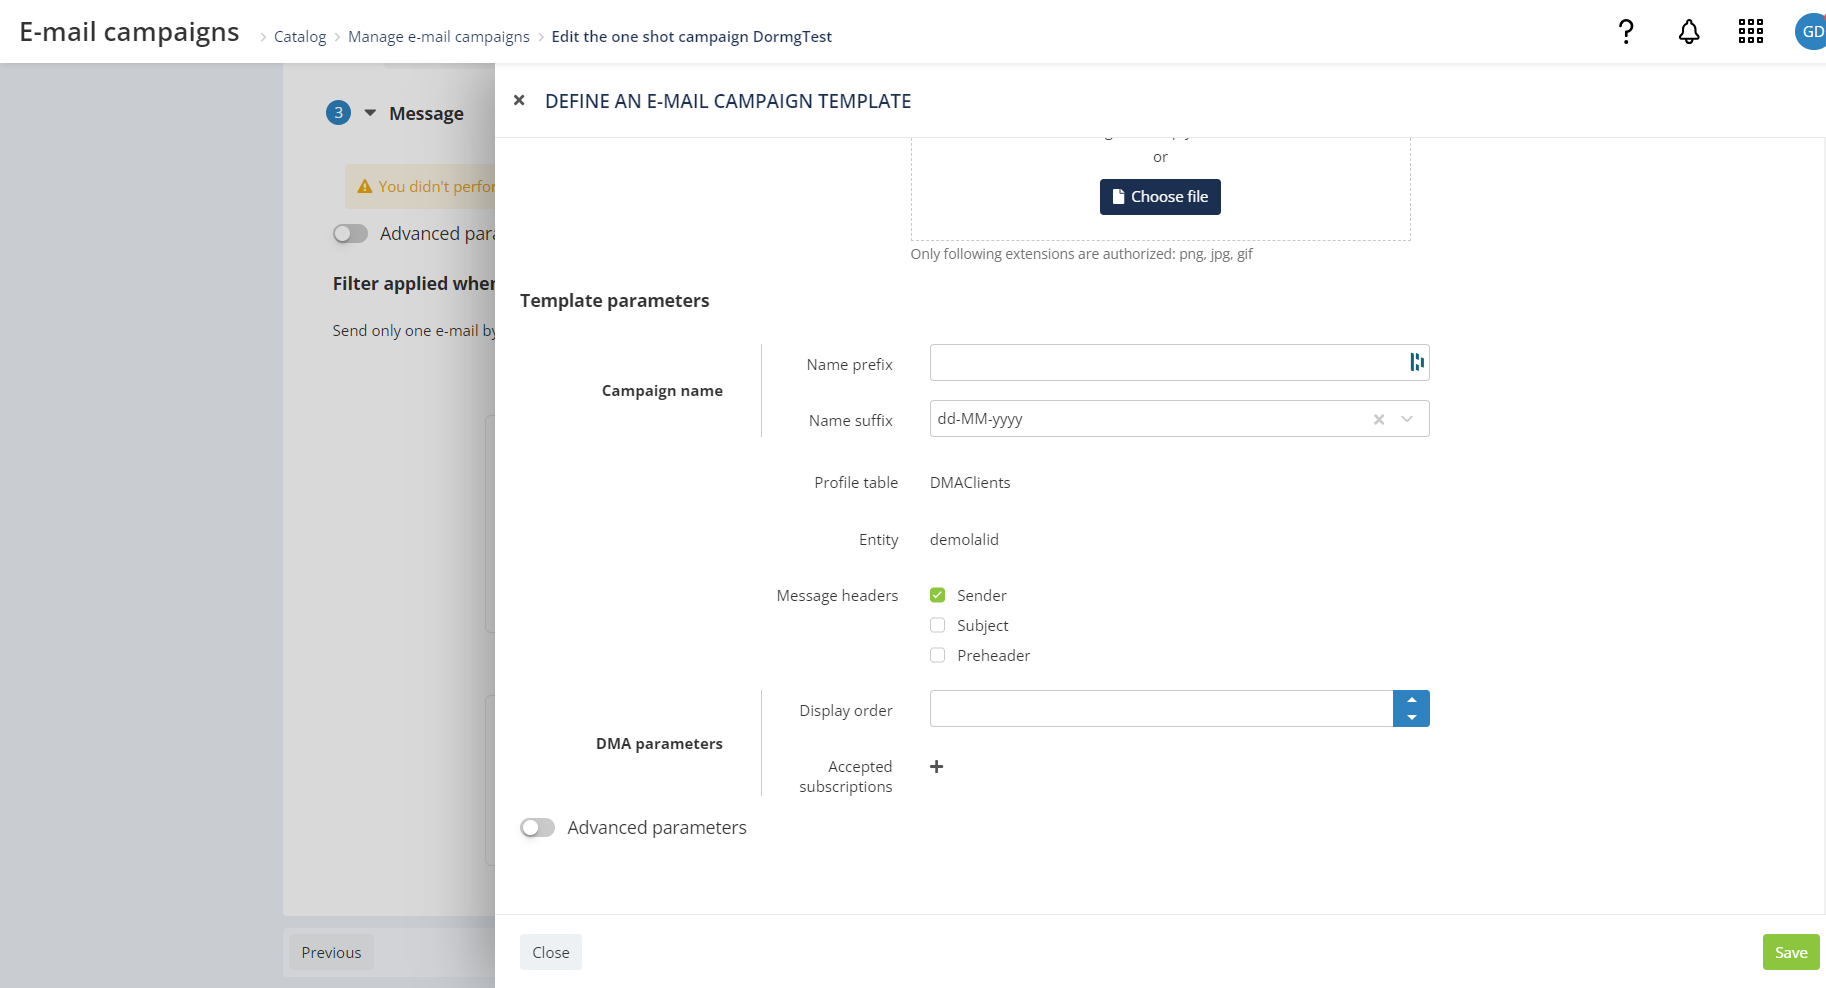
You can define the prefix and suffix to be used in the name of campaigns created in the DMA.
- Campaign name: you will need to define a prefix and suffix (consisting in a date pattern) for your campaign name. This template name will be visible in the DMA module.
The template name is not reflected in the campaign name sent from the DMA, which will have the following nomenclature "DMA*{Scope}*{DMA campaign name}", where the campaign name takes the campaign name defined by DMA users in the DMA module.
- Message header: check both Sender and Subject of your campaign
The preheader is not taken into account by the DMA, you do not have to check it.
The sender cannot be modified by DMA users. Therefore, you need to define it in step 1 of your campaign, and do not forget to check 'Sender' at this step. Otherwise, the campaign will not be generated as it lacks of a sender.
- DMA parameters:
- Display order: allows you to choose the order in which templates will appear in the DMA interface. The order is relative to the number of templates present in the DMA (if you indicate 10 but only have templates, this one will take the fourth place).
- Accepted suscriptions: you can select one or more subscriptions to add to your template. DMA users, will then be able to choose among one of these subscriptions when creating the campaign.
The subscriptions you select here replaces the subscription chosen in step 2 of campaign creation.
Among the list of advanced parameters, you can check off the advanced parameters you have defined for your campaign and which you wish to preserve in the DMA template.
- E-mail reply: The reply-to parameters defined in step 1 are used by the DMA campaign, but the reply-to address is always editable by DMA users.
- Sender e-mail address: the sending domain saved in the template is used in the DMA campaign. It is not editable nor visible by the DMA local user.
- Links: the links domain saved in the template is used in the DMA campaign. It is not editable nor visible by the DMA local user.
- Impact on commercial pressure: the impact on commercial pressure saved in the template is used in the DMA campaign. It is not editable nor visible by the DMA local user.
- E-mail campaigns groups: By default, all e-mail sent by DMA are tied to a campaign group linked to the Scope (defined in the Scope table). You can register extra campaign groups in the template. They will be applied in addition to the club campaign group.
- Report e-mail notification: the report notification is saved at step 5 in the advanced parameters. The value defined in the template (if applicable) is used in the DMA campaign. It is not editable nor visible for DMA local users.
- Seed list: the seed list is saved at step 5 in the advanced parameters. The value defined in the template (if applicable) is used in the DMA campaign. It is not editable nor visible for DMA local users.
- Goals: this box determines whether the value saved at step 1 of the template will be used in the DMA campaign. It is not editable nor visible for DMA local users.
- Check and test: this is irrelevant as the DMA has its own test engine. Checking it or not has no impact.
- Target group: all these parameters are overridden by DMA parameters and do not need to be checked off.
- Message: the message content is automatically saved and customizable based on the DMA form parameters.
- Variables values: variables values must be saved if you are using personalization based on anything else than profile table attributes (custom tables, files, value transformations,…). This is especially important if you define hypertext links based on personalization.