iOS - Customisations
Dans cet article, nous allons approfondir plusieurs aspects de notre bibliothèque iOS qui peuvent être personnalisés en fonction de vos besoins.
Environnements multiples
Par défaut, nous créons deux applications distinctes dans Notificare, en utilisant des environnements séparés pour le développement et la production. Cela est justifié pour plusieurs raisons, notamment la différence entre les serveurs APNS en mode débogage et en mode production.
Dans ce contexte, vous disposerez d’au moins deux fichiers de configuration : un pour votre application en développement (DEV) et un autre pour la production (PROD).
Vous avez une totale liberté sur la manière de configurer votre processus de build, mais une exigence reste incontournable : le fichier NotificareServices.plist doit être présent dans l’application générée.
Nous vous expliquons notre méthode recommandée dans cet article disponible ici.
Définir les clés dans le code
Au lieu de s'appuyer sur le fichier de configuration déposé dans votre TransferBox, il est possible de définir ces paramètres directement dans le code.
Pour configurer Notificare, vous devez exécuter le code suivant avant toute autre interaction avec la bibliothèque.
class AppDelegate: UIResponder, UIApplicationDelegate {

    func application(_: UIApplication, didFinishLaunchingWithOptions _: [UIApplication.LaunchOptionsKey: Any]?) -> Bool {
        // Override point for customization after application launch.

        Notificare.shared.configure(
            servicesInfo: NotificareServicesInfo(
                applicationKey: "",
                applicationSecret: ""
            ),
            options: nil
        )

        // more code ...
    }
}
La méthode configure() doit être appelée avant l’appel à Notificare.shared.launch() afin de s’assurer que les bonnes clés sont utilisées.
Après avoir défini les clés directement dans le code, vous pouvez supprimer en toute sécurité le fichier NotificareServices.plist.
De plus, vous devez indiquer à Notificare de ne pas se configurer automatiquement après le lancement de l’application.
Pour cela, définissez la clé AUTO_CONFIG à NO dans votre fichier NotificareOptions.plist.
Désactiver le method swizzling
Notre bibliothèque utilise le method swizzling afin de gérer automatiquement les méthodes APNS pertinentes dans votre AppDelegate.
Si vous préférez ne pas utiliser cette fonctionnalité, vous pouvez définir la clé SWIZZLING_ENABLED à NO dans votre fichier NotificareOptions.plist.
Cependant, en procédant ainsi, vous devrez manuellement rediriger les méthodes concernées vers notre bibliothèque.
Voici un exemple illustrant comment le faire.
class AppDelegate: NSObject, UIApplicationDelegate {
    // ...

    func application(_ application: UIApplication, didRegisterForRemoteNotificationsWithDeviceToken deviceToken: Data) {
        Notificare.shared.push().application(application, didRegisterForRemoteNotificationsWithDeviceToken: deviceToken)
    }

    func application(_ application: UIApplication, didFailToRegisterForRemoteNotificationsWithError error: Error) {
        Notificare.shared.push().application(application, didFailToRegisterForRemoteNotificationsWithError: error)
    }

    func application(_ application: UIApplication, didReceiveRemoteNotification userInfo: [AnyHashable : Any], fetchCompletionHandler completionHandler: @escaping (UIBackgroundFetchResult) -> Void) {
        Notificare.shared.push().application(application, didReceiveRemoteNotification: userInfo, fetchCompletionHandler: completionHandler)
    }
}
Désactiver le délégué de UNUserNotificationCenter
Par défaut, notre bibliothèque s’assigne comme délégué du UNUserNotificationCenter, prenant automatiquement en charge toute l’implémentation nécessaire.
Si vous souhaitez un comportement différent, vous pouvez désactiver cette fonctionnalité et l’implémenter vous-même dans votre application.
Pour cela, il suffit de définir la propriété USER_NOTIFICATION_CENTER_DELEGATE_ENABLED à NO dans le fichier NotificareOptions.plist.
Une fois cette option désactivée, vous devrez implémenter vous-même les méthodes suivantes :
extension AppDelegate: UNUserNotificationCenterDelegate {
    func userNotificationCenter(_ center: UNUserNotificationCenter, didReceive response: UNNotificationResponse, withCompletionHandler completionHandler: @escaping () -> Void) {
        // More code ...

        // Pass the event to Notificare.
        Notificare.shared.push().userNotificationCenter(center, didReceive: response, withCompletionHandler: completionHandler)
    }

    func userNotificationCenter(_ center: UNUserNotificationCenter, willPresent notification: UNNotification, withCompletionHandler completionHandler: @escaping (UNNotificationPresentationOptions) -> Void) {
        // More code ...

        // Pass the event to Notificare.
        Notificare.shared.push().userNotificationCenter(center, willPresent: notification, withCompletionHandler: completionHandler)
    }

    func userNotificationCenter(_ center: UNUserNotificationCenter, openSettingsFor notification: UNNotification?) {
        // More code ...

        // Pass the event to Notificare.
        Notificare.shared.push().userNotificationCenter(center, openSettingsFor: notification)
    }
}
NotificareOptions.plist
Vous pouvez personnaliser plusieurs mécanismes, apparences et options via le fichier NotificareOptions.plist.
Toutes les propriétés sont facultatives, vous pouvez donc choisir uniquement celles que vous souhaitez adapter à vos besoins.
Ci-dessous se trouve le code source contenant toutes les propriétés disponibles.
<?xml version="1.0" encoding="UTF-8"?>
<!DOCTYPE plist PUBLIC "-//Apple//DTD PLIST 1.0//EN" "http://www.apple.com/DTDs/PropertyList-1.0.dtd">
<plist version="1.0">
<dict>
    <key>DEBUG_LOGGING_ENABLED</key>
    <true/>
    <key>AUTO_CONFIG</key>
    <true/>
    <key>SWIZZLING_ENABLED</key>
    <true/>
    <key>USER_NOTIFICATION_CENTER_DELEGATE_ENABLED</key>
    <true/>
    <key>PRESERVE_EXISTING_NOTIFICATION_CATEGORIES</key>
    <false/>
    <key>CRASH_REPORTING_ENABLED</key>
    <true/>
    <key>HEADING_API_ENABLED</key>
    <true/>
    <key>VISITS_API_ENABLED</key>
    <true/>
    <key>URL_SCHEMES</key>
    <array>
        <string>com.example.app</string>
    </array>
    <key>CLOSE_WINDOW_QUERY_PARAMETER</key>
    <string>notificareCloseWindow</string>
    <key>IMAGE_SHARING_ENABLED</key>
    <true/>
    <key>SAFARI_DISMISS_BUTTON_STYLE</key>
    <integer>0</integer>
    <key>THEMES</key>
    <dict>
        <key>LIGHT</key>
        <dict>
            <key>BACKGROUND_COLOR</key>
            <string>#000000</string>
            <key>ACTION_BUTTON_TEXT_COLOR</key>
            <string>#000000</string>
            <key>TOOLBAR_BACKGROUND_COLOR</key>
            <string>#000000</string>
            <key>ACTIVITY_INDICATOR_COLOR</key>
            <string>#000000</string>
            <key>BUTTON_TEXT_COLOR</key>
            <string>#000000</string>
            <key>TEXT_FIELD_TEXT_COLOR</key>
            <string>#000000</string>
            <key>TEXT_FIELD_BACKGROUND_COLOR</key>
            <string>#000000</string>
            <key>SAFARI_BAR_TINT_COLOR</key>
            <string>#000000</string>
            <key>SAFARI_CONTROLS_TINT_COLOR</key>
            <string>#000000</string>
        </dict>
        <key>DARK</key>
        <dict>
            <key>BACKGROUND_COLOR</key>
            <string>#FFFFFF</string>
            <key>ACTION_BUTTON_TEXT_COLOR</key>
            <string>#FFFFFF</string>
            <key>TOOLBAR_BACKGROUND_COLOR</key>
            <string>#FFFFFF</string>
            <key>ACTIVITY_INDICATOR_COLOR</key>
            <string>#FFFFFF</string>
            <key>BUTTON_TEXT_COLOR</key>
            <string>#FFFFFF</string>
            <key>TEXT_FIELD_TEXT_COLOR</key>
            <string>#FFFFFF</string>
            <key>TEXT_FIELD_BACKGROUND_COLOR</key>
            <string>#FFFFFF</string>
            <key>SAFARI_BAR_TINT_COLOR</key>
            <string>#FFFFFF</string>
            <key>SAFARI_CONTROLS_TINT_COLOR</key>
            <string>#FFFFFF</string>
        </dict>
    </dict>
</dict>
</plist>
Vous pouvez consulter le code source ici, où toutes les propriétés disponibles sont présentées.
Textes localisables
Notre bibliothèque est livrée avec un support multilingue que vous pouvez personnaliser ou étendre si nécessaire.
Pour cela, il vous suffit d’ajouter les clés de traduction dans votre fichier Localizable.strings et d’y associer les textes souhaités.
Vous trouverez toutes les clés de traduction disponibles ici.
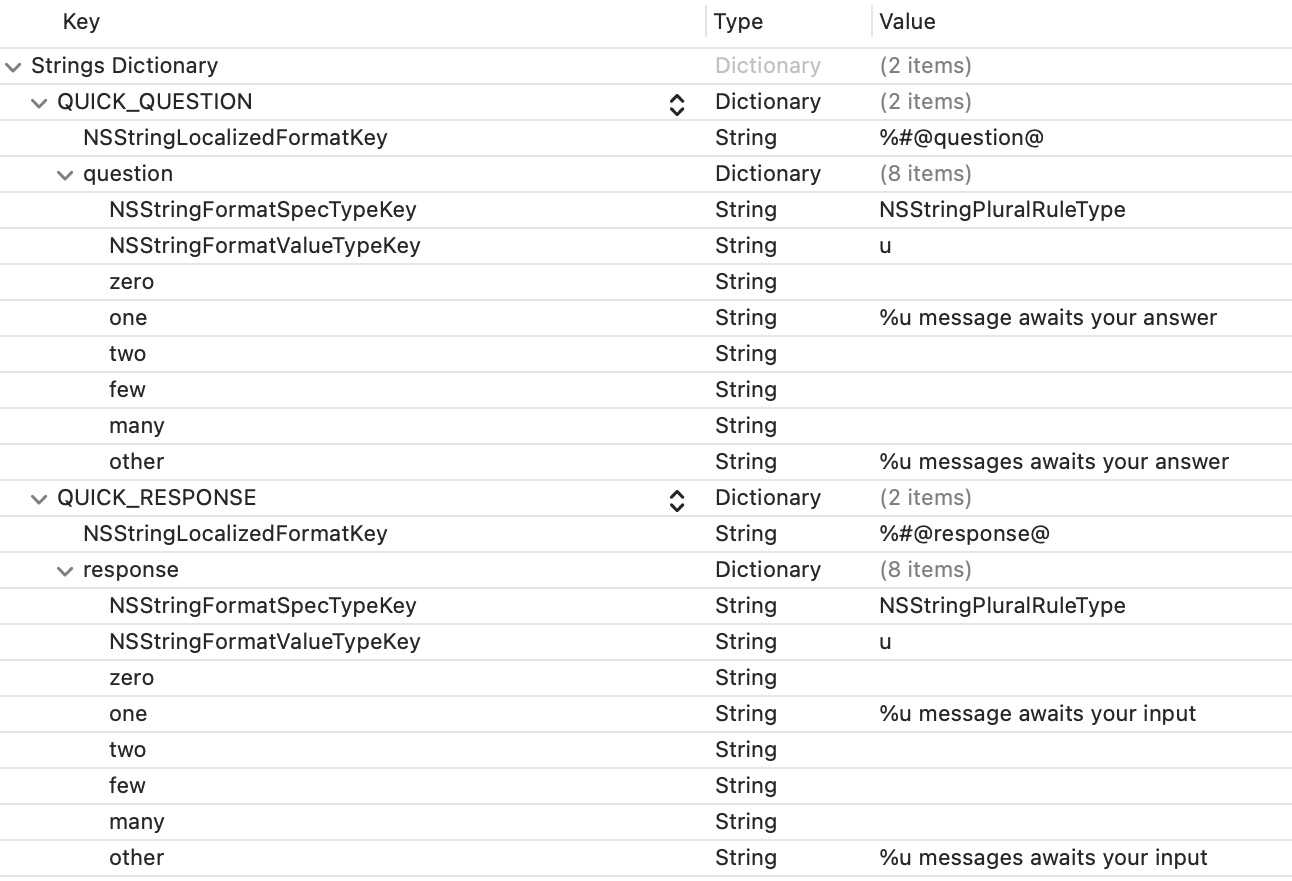
Utilisation d’un dictionnaire de chaînes pour les modèles de Push enrichis
Depuis iOS 11, Apple permet d’afficher un texte prédéfini lorsque l’utilisateur choisit de masquer le contenu d’un aperçu de notification (sur l’écran verrouillé ou dans le centre de notifications).
Pour gérer correctement ces textes, incluez un fichier Localizable.stringsdict dans votre projet, comme dans l’exemple ci-dessous.
<?xml version="1.0" encoding="UTF-8"?>
<!DOCTYPE plist PUBLIC "-//Apple//DTD PLIST 1.0//EN" "http://www.apple.com/DTDs/PropertyList-1.0.dtd">
<plist version="1.0">
<dict>
    <key>MY_RICH_PUSH_TEMPLATE_TITLE</key>
    <dict>
        <key>NSStringLocalizedFormatKey</key>
        <string>%#@question@</string>
        <key>question</key>
        <dict>
            <key>NSStringFormatSpecTypeKey</key>
            <string>NSStringPluralRuleType</string>
            <key>NSStringFormatValueTypeKey</key>
            <string>u</string>
            <key>zero</key>
            <string></string>
            <key>one</key>
            <string>%u message awaits your answer</string>
            <key>two</key>
            <string></string>
            <key>few</key>
            <string></string>
            <key>many</key>
            <string></string>
            <key>other</key>
            <string>%u messages awaits your answer</string>
        </dict>
    </dict>
</dict>
</plist>
Si votre application prend en charge plusieurs langues, répétez l’opération pour chaque fichier de localisation.
Cela vous permettra de personnaliser l’affichage de vos notifications sur l’écran verrouillé lorsque les aperçus masqués sont activés.