Push campaign creation
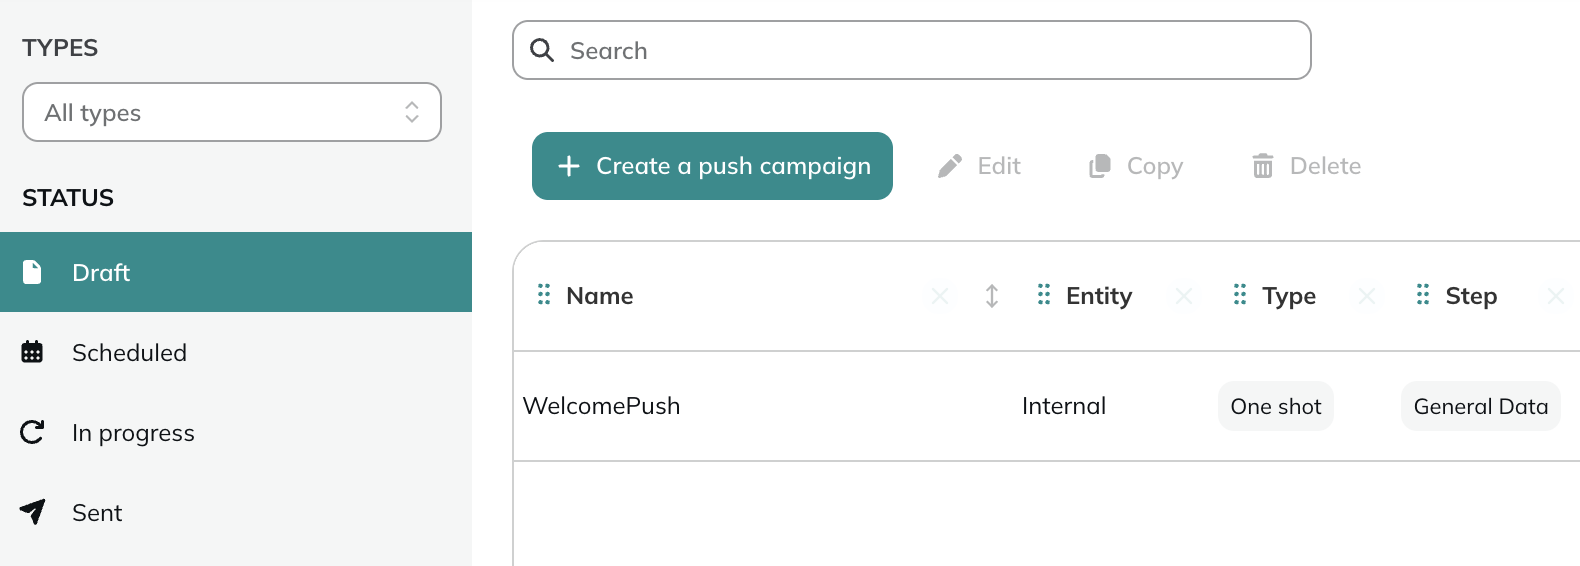
In order to create a Push Notification campaign, go to the Push campaigns module (Hub > Push campaigns > Push campaigns).

This application can be reached directly via the quick menu on the side bar, under the "Push campaigns" tab.
Push campaigns are an optional module that requires the creation of an Actito app and an implementation on your website/native app.
If this channel is not active in your license but you are interested by this option, please contact your account manager.
Click on Create a push campaign.
Choose a campaign type
There are three types of push campaigns:
- One shot campaigns, that will be triggered to a selection of profiles all at once at a given time.
- Scenarized campaigns, that will be triggered when a profile goes through a scenario
- Transactional campaigns, that is expected by the profile after taking a specific action
- A/B testing campaigns, which allow you to test several versions of your Push campaign on the same target audience in order to determine which one performs best.
The transactional push campaign type comes with some natural limitations. By design, push notifications (whether app or web) can only be delivered as remote notifications to profiles who are opted-in. Therefore, it will only be possible to contact profiles through remote notifications if they have opted in.
For profiles who are not opted in, communication is still possible through the inbox (if this feature is enabled on your website or app). Unlike remote notifications, inbox messages do not require opt-in and remain accessible to the user whenever they open the app or website.
Select the app to which your push campaign will be associated.
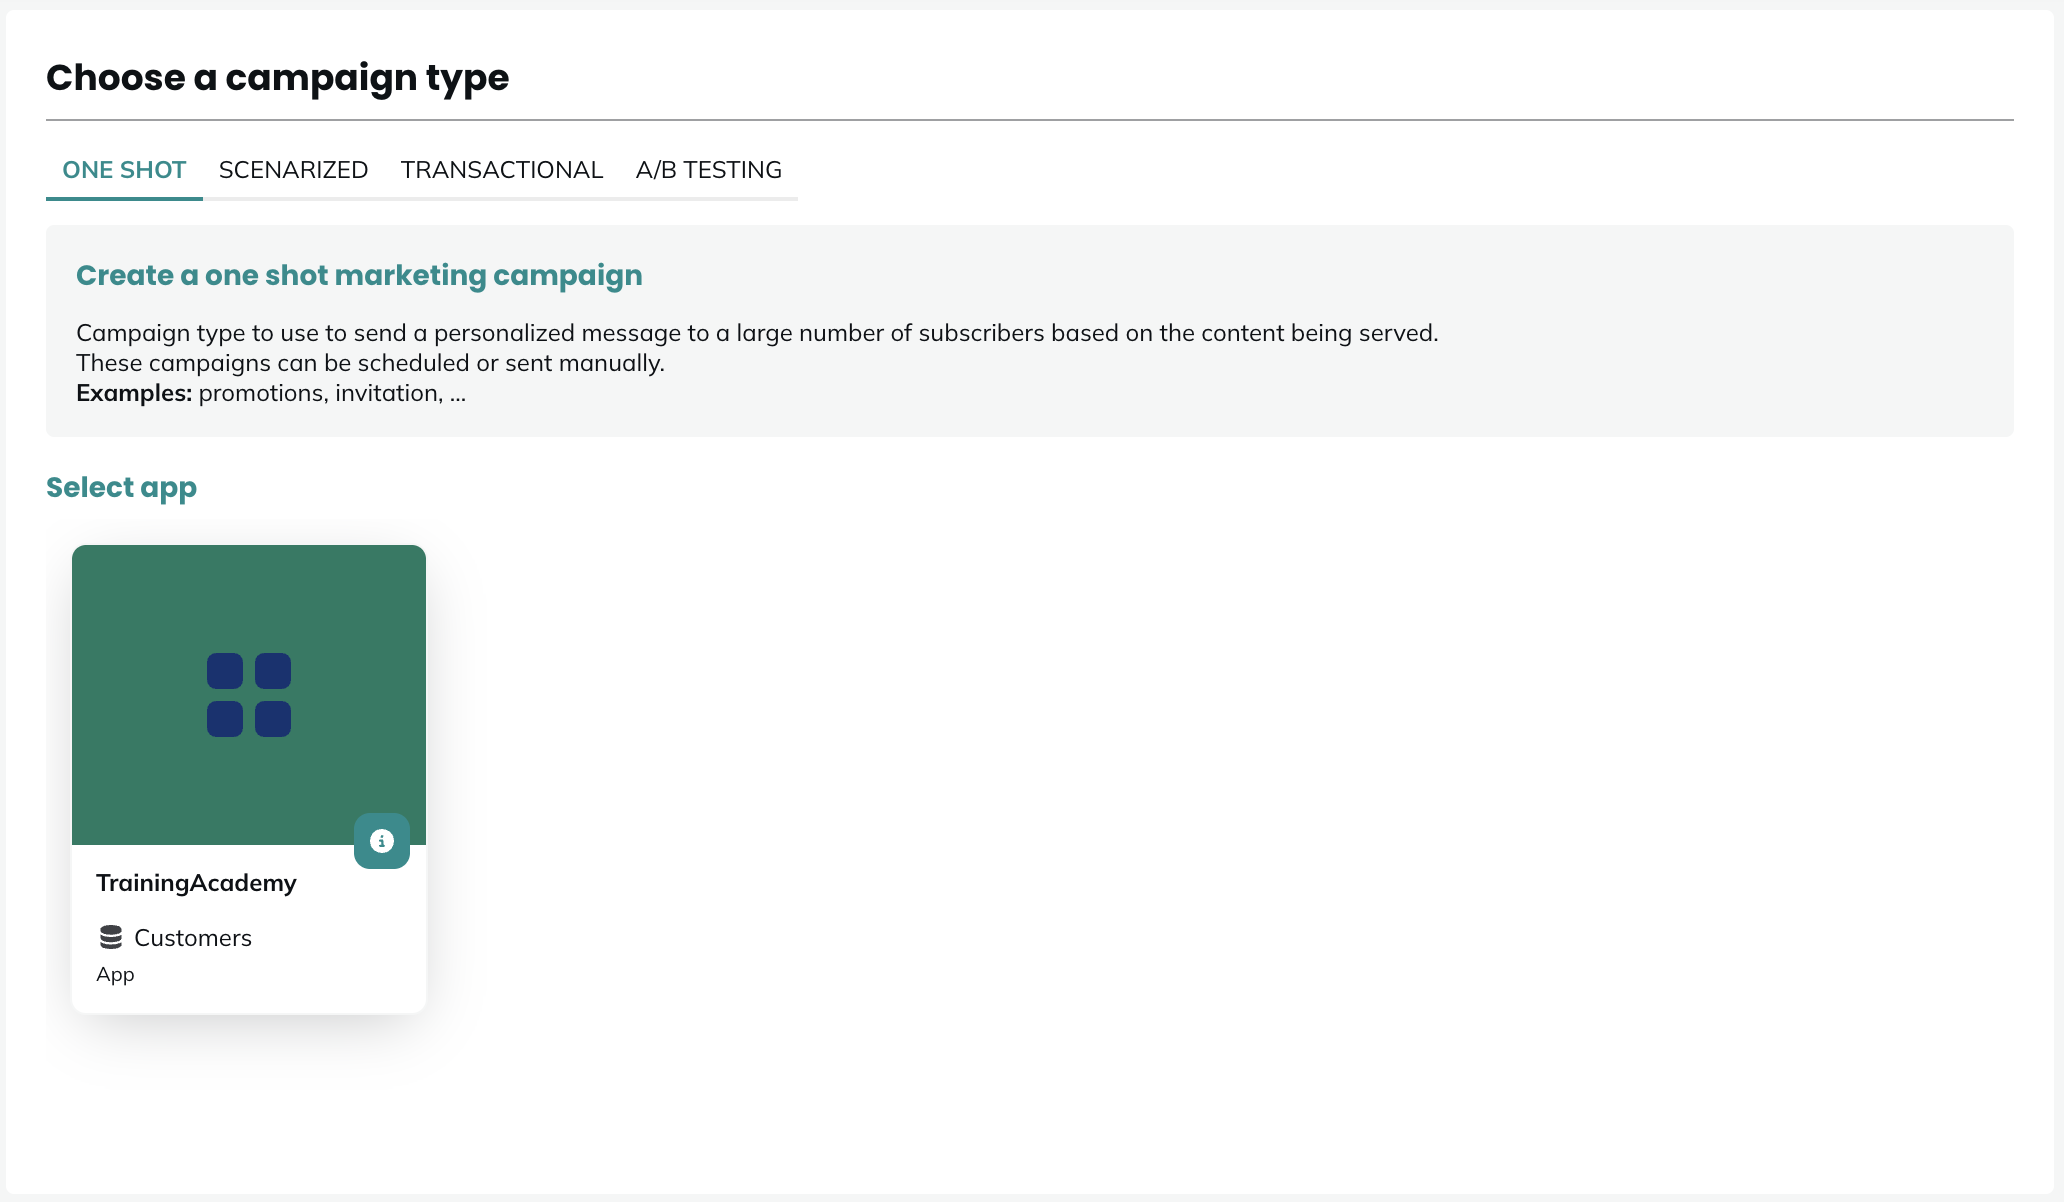
An app is the link between one Actito profile database and one website and/or one native app.
If you have several brands, and therefore several websites or native apps, it means you need to have several apps configured in your license.
You can see the information about your apps' configurations, in My Apps.
Step 1 - General Data
At the first step, give a name to your Push campaign.
Like in every Actito channel, your push notification campaign can be created in different languages at once, and displayed in the mother language of the profile.
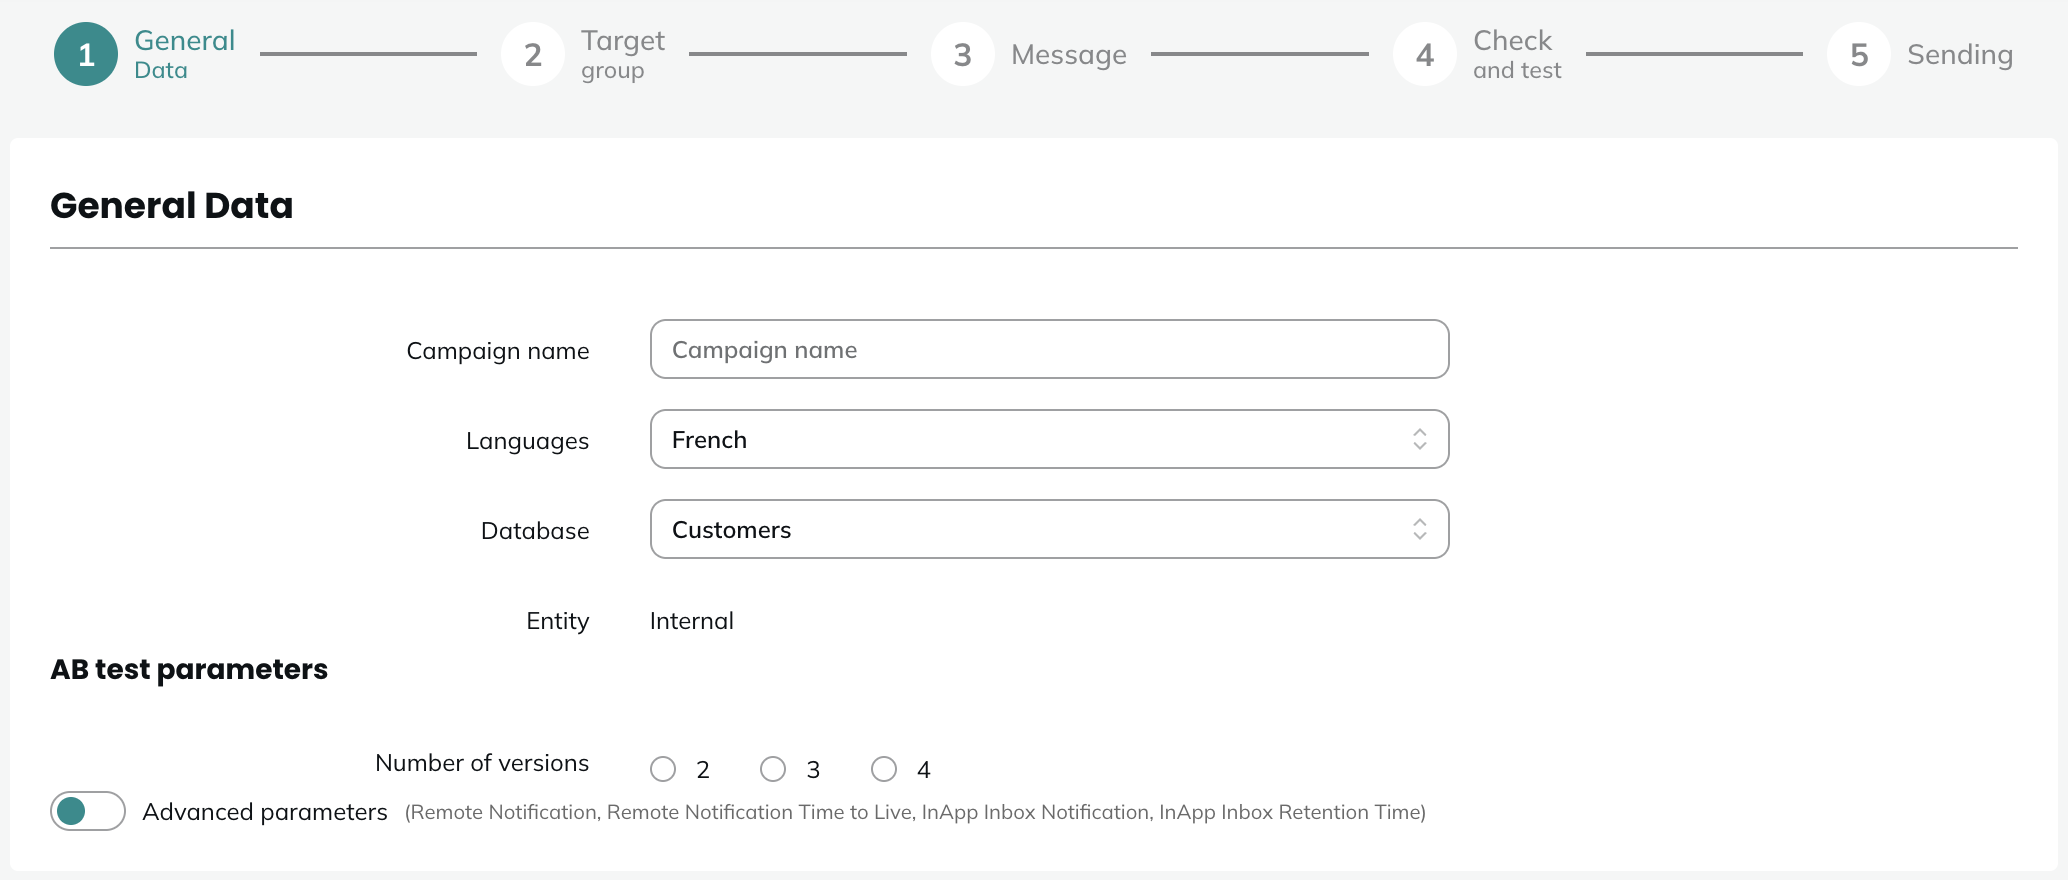
Choose the database on which you are going to send the push campaign. Each app is tied to two databases:
- Your main database that stores identified profiles
- The anonymous database, created specifically for anonymous profiles
If you have chosen the A/B test campaign type, you will also need to choose the number of versions you want to create.
In Actito, a campaign is always linked to only one database.
If you want to target both your identified and anonymous profiles, you can create two campaigns, one on each profile table.
Advanced parameters
In the advanced parameters, you will have the opportunity to define if your push campaign should be:
- A remote notification: the notification will be sent to the user's device (on the lockscreen or in the notification center if the device is unlocked)
- An in-app inbox notification: the notification will be sent in the inbox of the app. The in-app inbox is a messaging feature integrated directly within a mobile app or web application that allows users to receive and view notifications. It complements remote push notifications, which by nature disappear as soon as they are consumed.
The inbox feature must be configured in your app to be used. If the in-app inbox notification is set to "Yes", but the inbox feature is not configured in your app, the notification cannot be delivered. You can find more information on how to configure this feature in your SDK here.

In the advanced parameters, you will also be able to define:
- The remote notification Time-to-Live (TTL): the maximum duration for the remote notification to be delivered. If the remote notification is not delivered before the end of the TTL, it will not be delivered anymore. Note that if no TTL is set (0 day, 0 hour and 0 minute), the maximum TTL will be used. This maximum TTL is 28 days.
- The in-app inbox retention time: the maximum duration for which the notification will be available in the inbox. Once the retention time is reached, the notification will disappear from the inbox. Note that if no retention time is set (0 day, 0 hour and 0 minute), the notification will stay in the inbox forever.
If one of the two push notifications type is set to "No", you will not have the possibility to set the other one to "No" as well. Otherwise, no push notification will be sent at all.
Step 2 - Target group
This step is not available if the transactional campaign type was chosen, because a transactional campaign is sent to a profile following a specific action, and therefore does not need to be filtered.
Push type
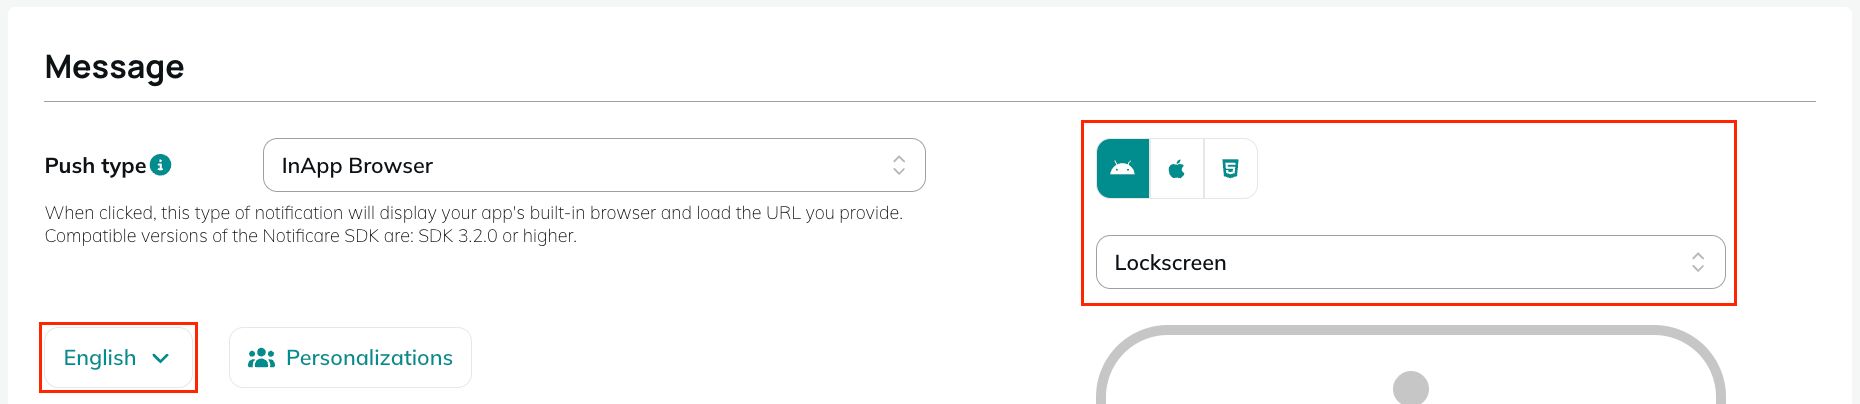
At the second step, you first need to choose the type of device to which you will send the campaign. It can be:
- Web push notifications to trigger the campaign to profiles subscribed to website notifications on their browser.
- App push notifications to trigger the campaign to users of your mobile application on their smartphone.
- Both: If you have set up notifications on both media and want to target profiles regardless of their device, you can select the 2 options at once.
When selecting both Web and App, this is understood as an OR operator between them: profiles subscribed to only one type (Web or App) will still be targeted on the relevant device. They do not need to be subscribed to both types to be targeted.
Push campaigns are tied to the subscriptions defined as Web subscription and App subscription in your Integration. They are automatically synchronized between your website/your app and Actito when a profile opts into receiving push notifications.
Therefore, the Type selected at step 2 will apply a targeting filter: only profiles with a Web or App subscription (depending on your choice) will be targeted.
Push notifications are based on the device used, which means that the same profile could be subscribed to both app and web push notification on their browser and on their smartphone. If you select both types, profiles with the 2 types of subscription would receive a notification on both devices at the same time.
While not necessarily an issue, with scenarized campaigns you can use the filters of the Actito scenario app to create different paths and prioritize device types depending on the subscriptions of the profiles.
In fact, a profile can be subscribed on multiple devices of the same type (2 different browsers on the same computer, for instance, both linked to the Web subscription). In such case, they will receive the notification on each opted-in device linked to the targeted subscription.
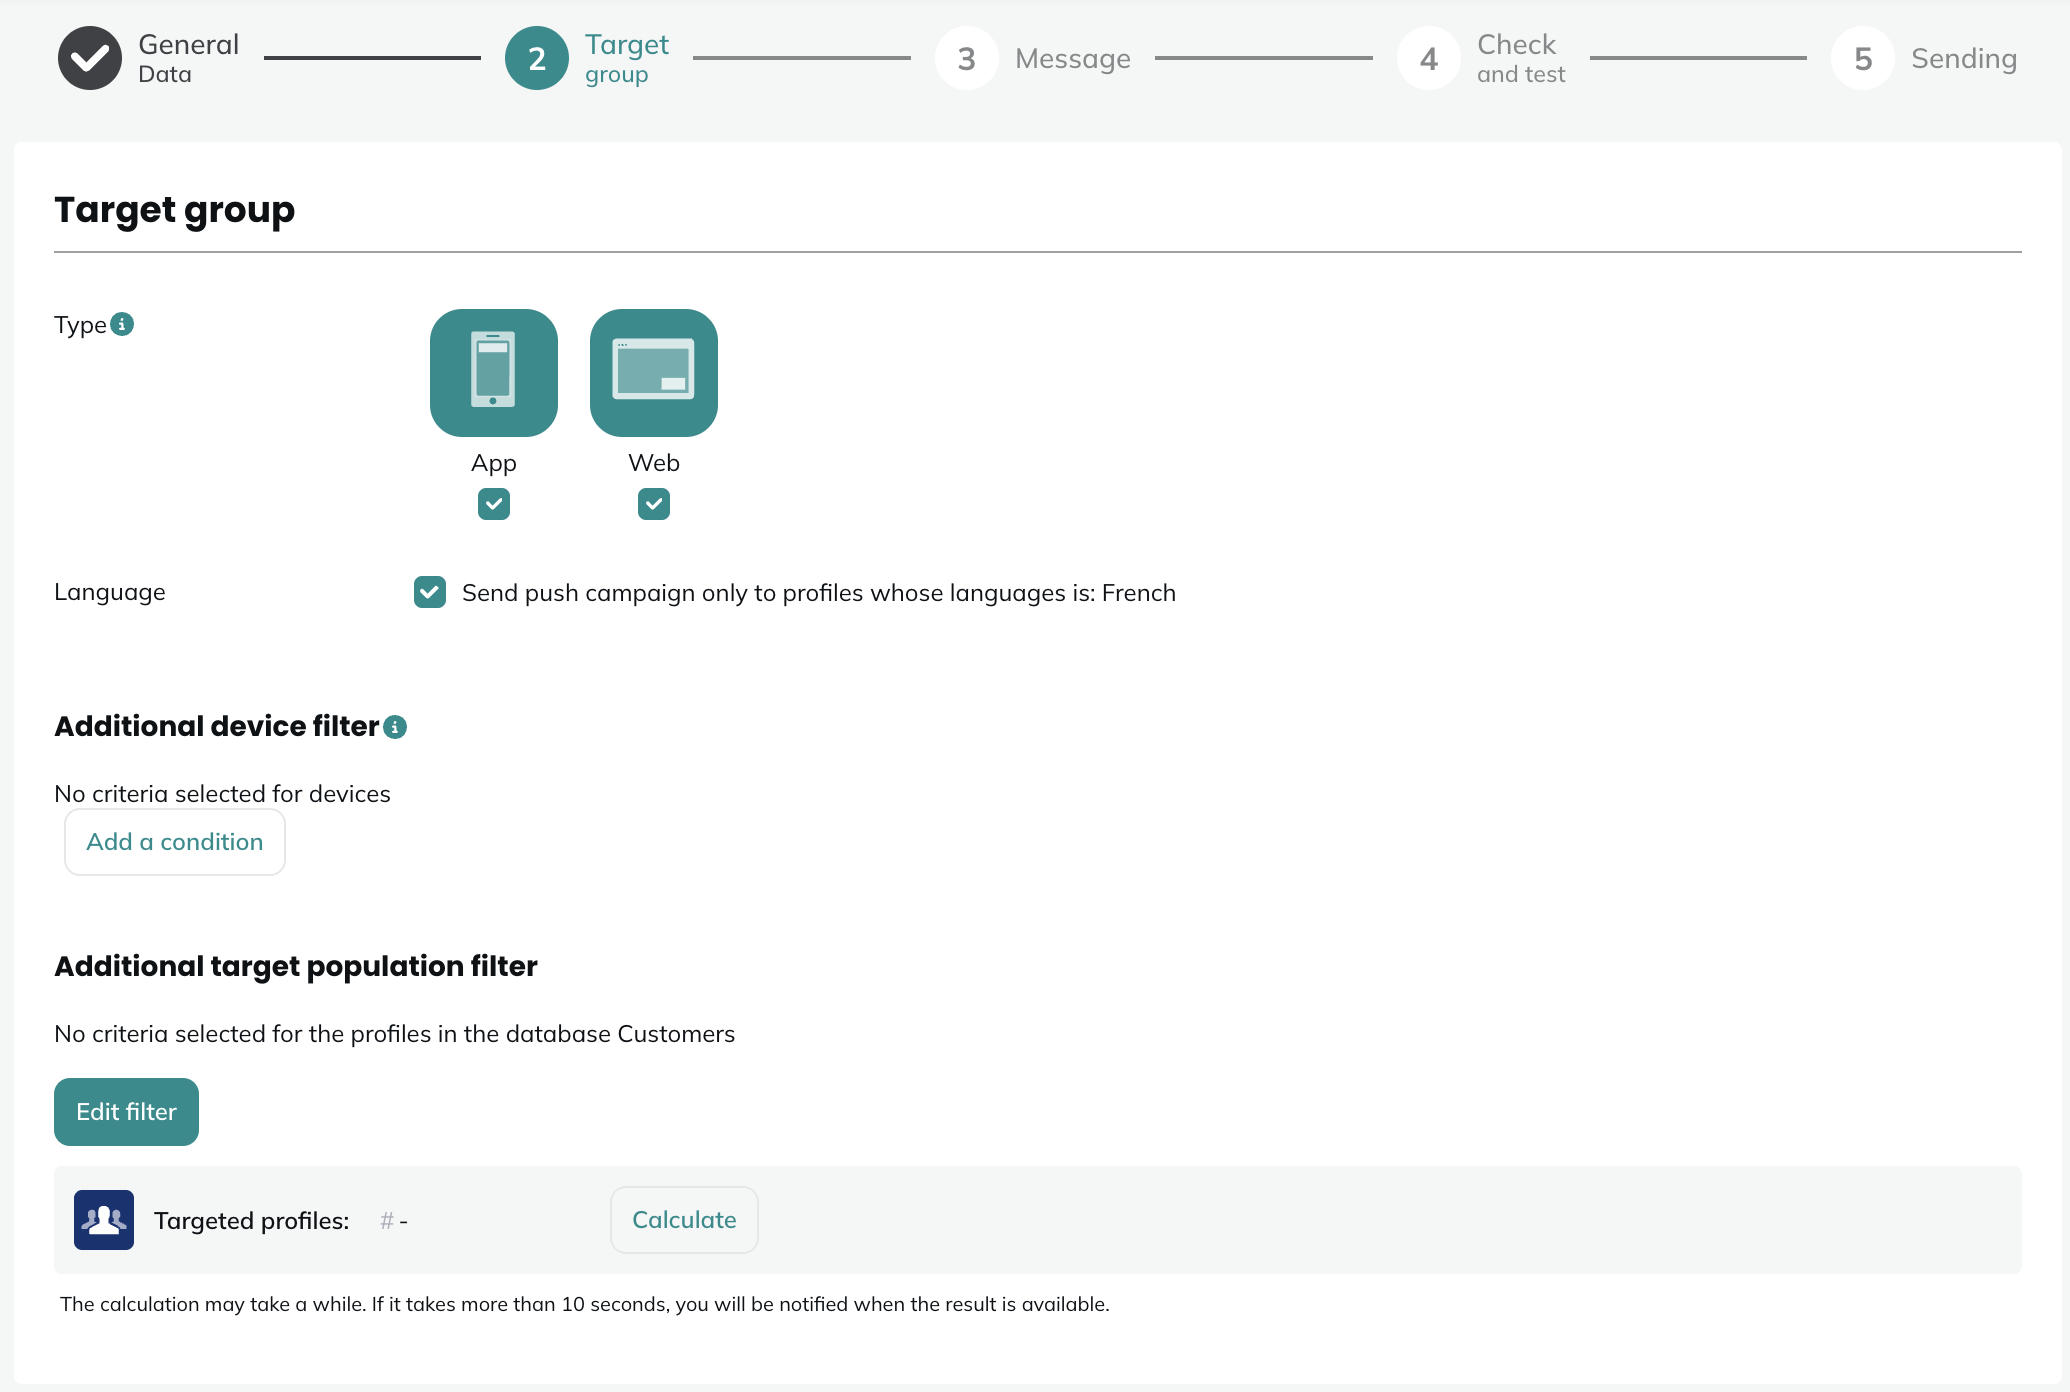
Language
Next, you can choose to target only the profile whose mother language is one of the languages chosen at step 1, or to define a default language to send the notification to everyone.
Additional device filter
Afterwards, you can apply additional device filters. This filter is dedicated to the push channel and is based on information stored in the Device custom tables. This special filter has been added because the classic targeting filter selects profiles, while this new filter selects the devices of the targeted profiles.
The device filters are the following:
- App version: the version of the app on the profile's device
- Last active: the last moment the device was active
- Origin: the URL where the web push devices are registered
- OS Version: the version of the Operating System
- Platform: the type of platform (Web, Android, iOS)
- Region: the region collected for the device
- SDK Version: the version of the SDK
- Transport: the service used to deliver the push notification
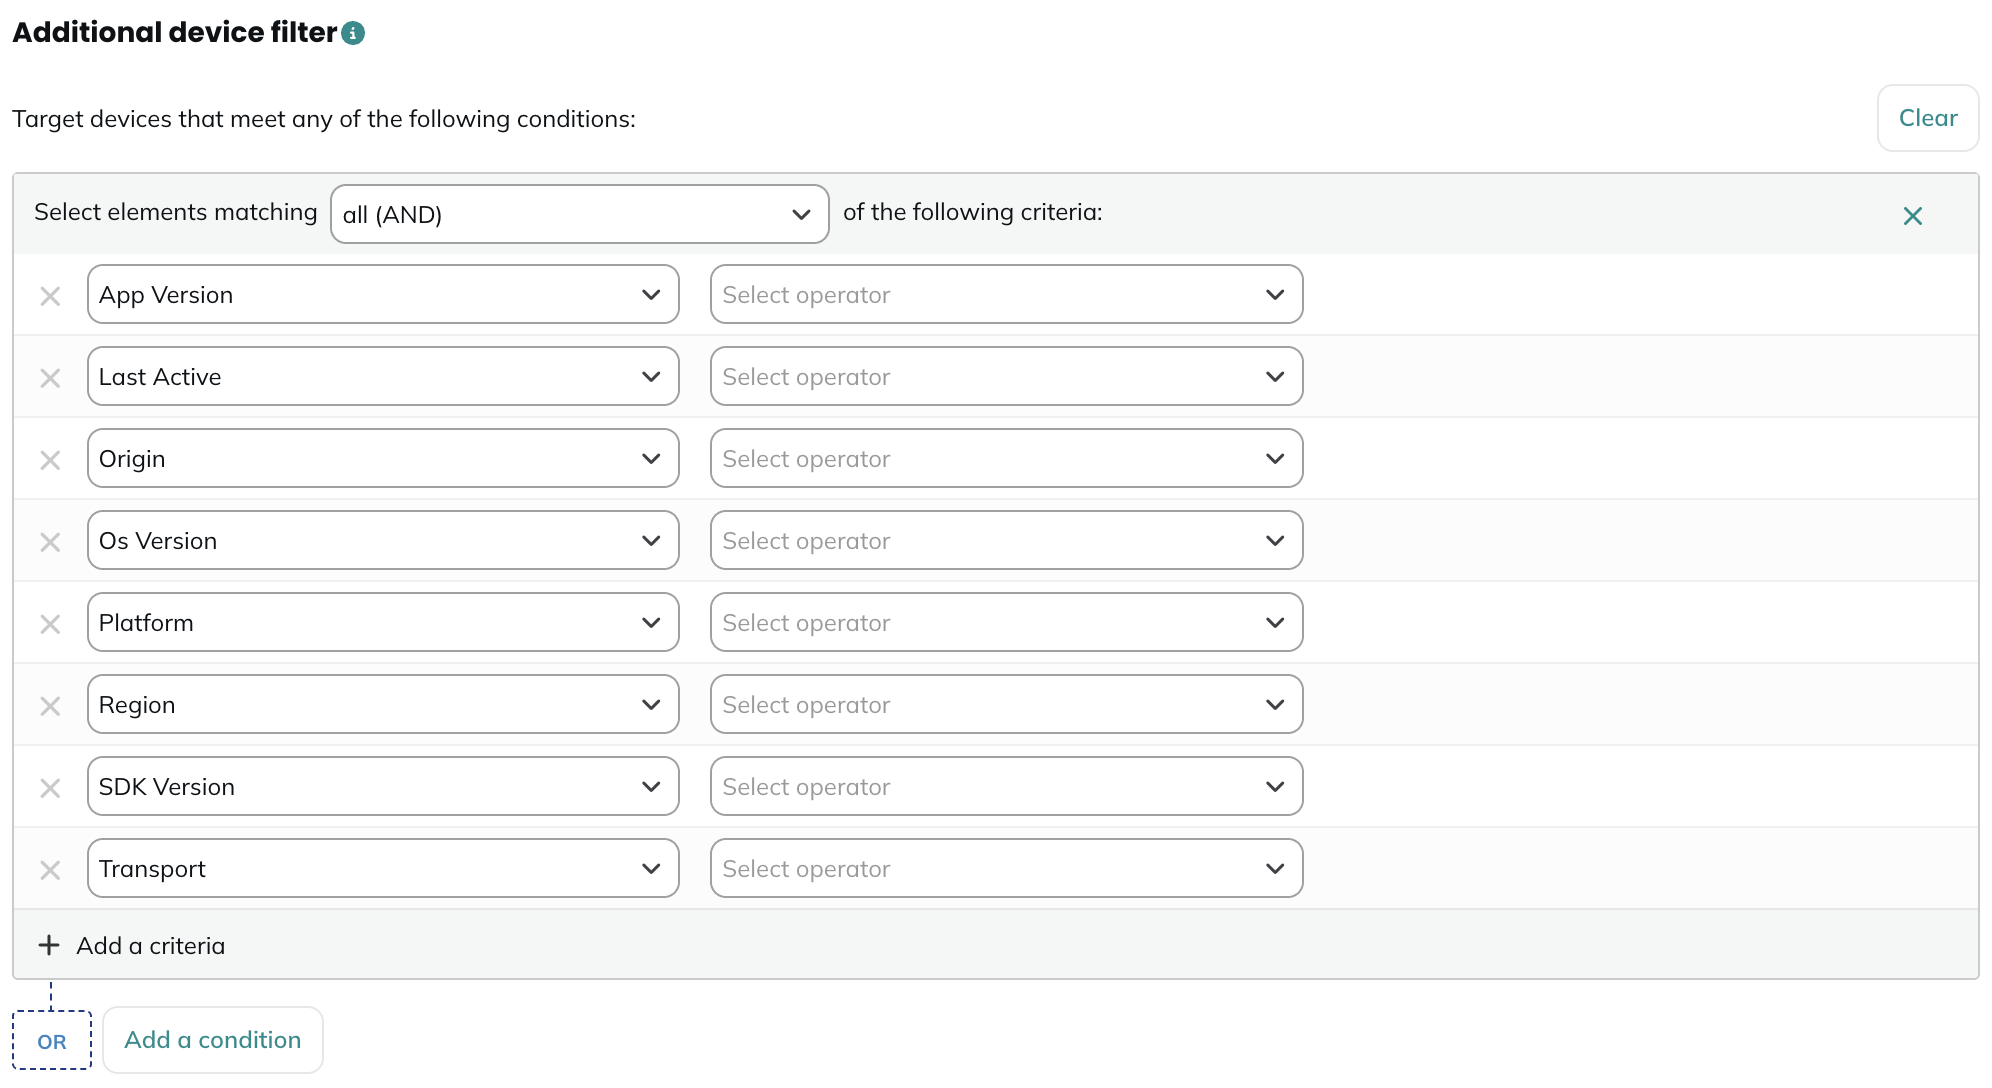
For example, if you only use the classic target population filter and you want to target profiles having an iOS device, you will use the following targeting:
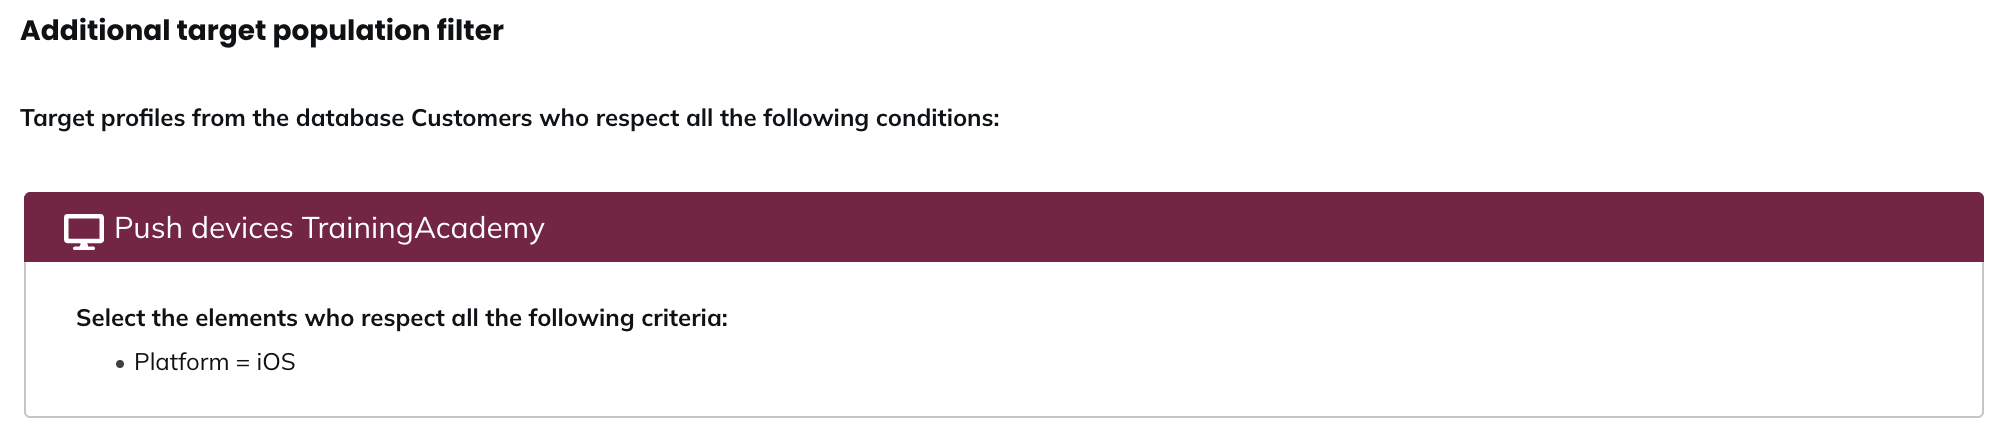
With this targeting, you will target all profiles having an iOS device, and you will send the push notification campaign to all their devices.
Now, if you combine the classic target population filter with the device filter:
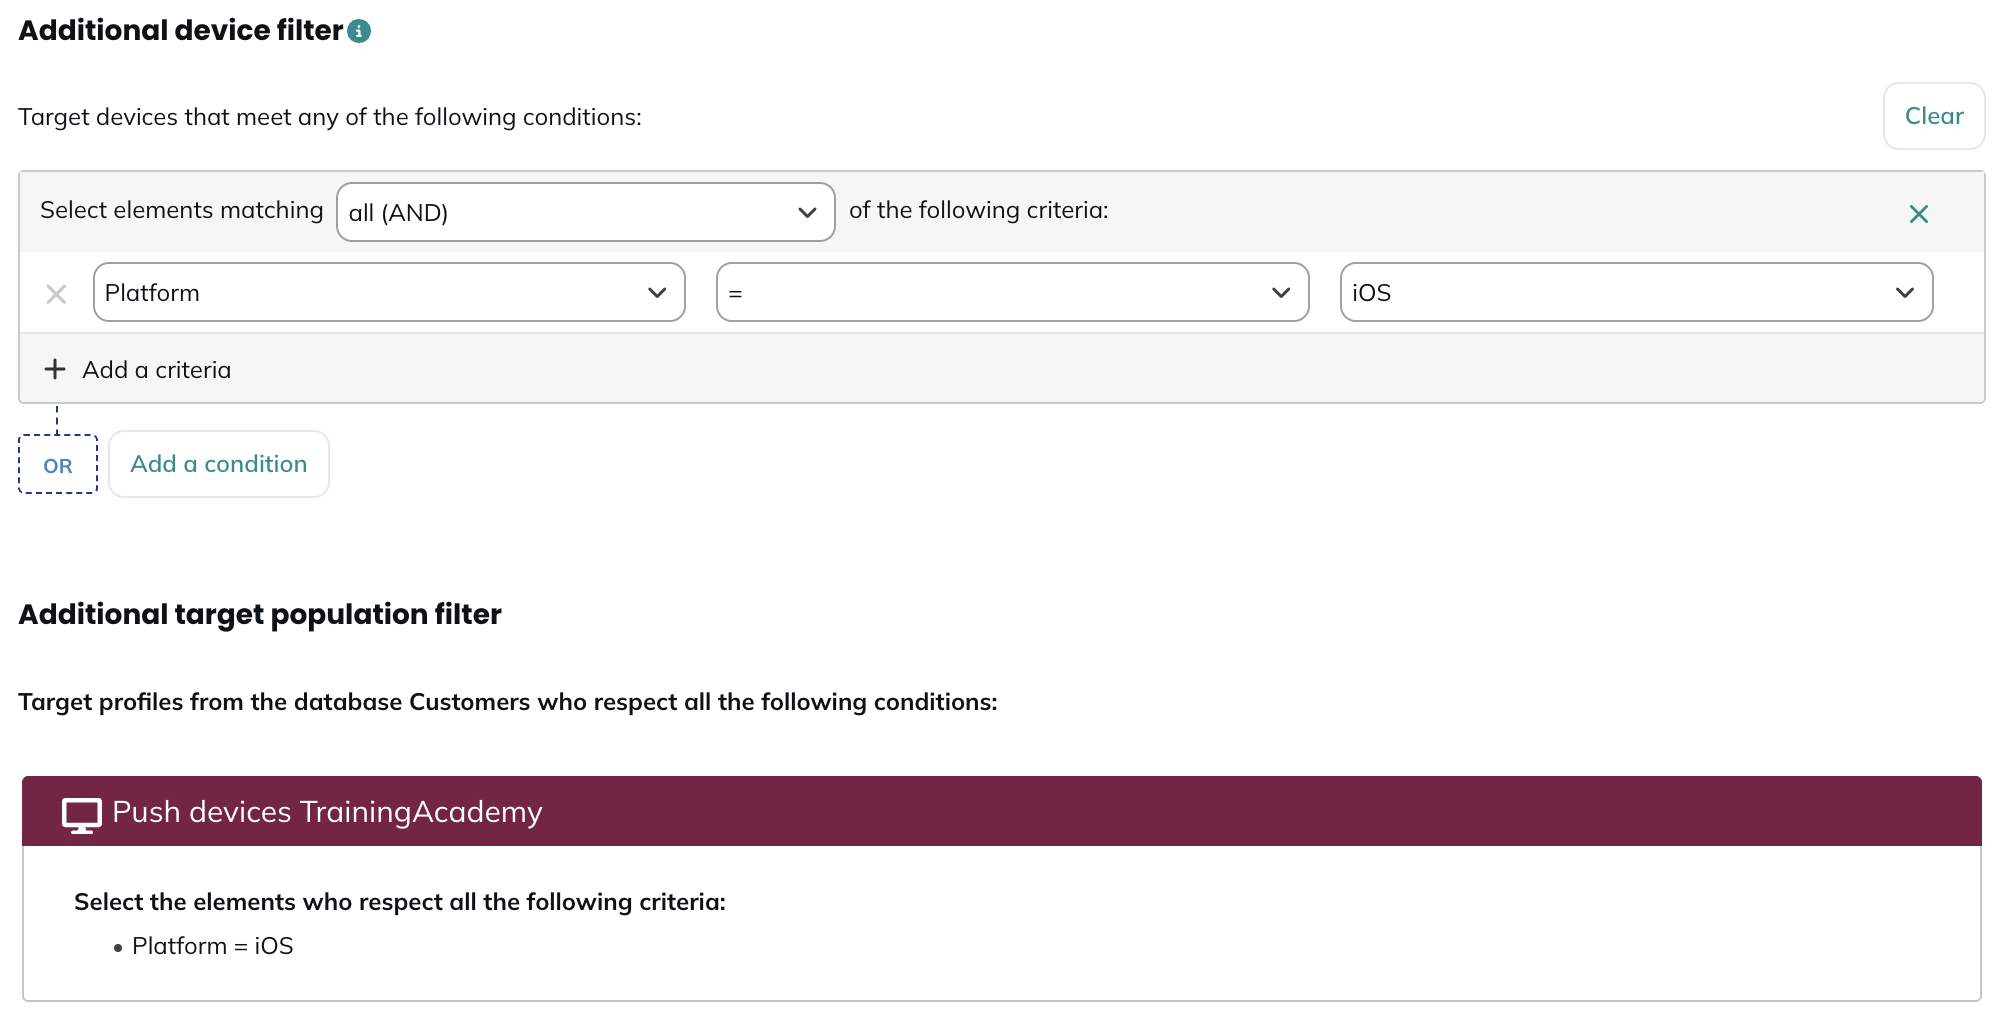
You will target profiles having an iOS device, on their iOS devices (and not on their other devices).
Additional target population filter
Finally you can apply additional targeting filters, thanks to the Targeting module.
- In scenarized campaigns, this targeting will be applied in addition to the trigger used to start the scenario, so please note that defining additional filters can mean that profiles who entered the scenario will not receive the notification.
- In one shot campaigns, all the profiles who fit the criteria will receive the campaign at once, without any additional trigger. The targeting criteria are therefore especially important for one shot campaigns.
The "Calculate" button helps you check the number of profiles who fit the criteria at the moment you are clicking on this button.
Step 3 - Message
At the third step, you will be able to define the content of your push notification.
Message push type
You will have the possibility to choose the push type: this defines the type of content that will be shown once the notification is opened.
Not all types of push notifications are compatible with all the versions of the Actito SDK. Therefore, there is a need to know the SDK version of your app or website before choosing the type of the campaign you are going to create.
If your app has the SDK 3.10.0 or your website has the SDK 3.6.0 or higher, we recommand to choose the Any Link push type if you want to add an URL or a deeplink in your campaign. This will avoid any mistakes, as we will automatically decide how to display the link you provide in the content of the campaign. For your information, these versions of the SDKs were released on the 01/07/2024. Therefore, any more recent installation of the SDK should have these versions (or higher).
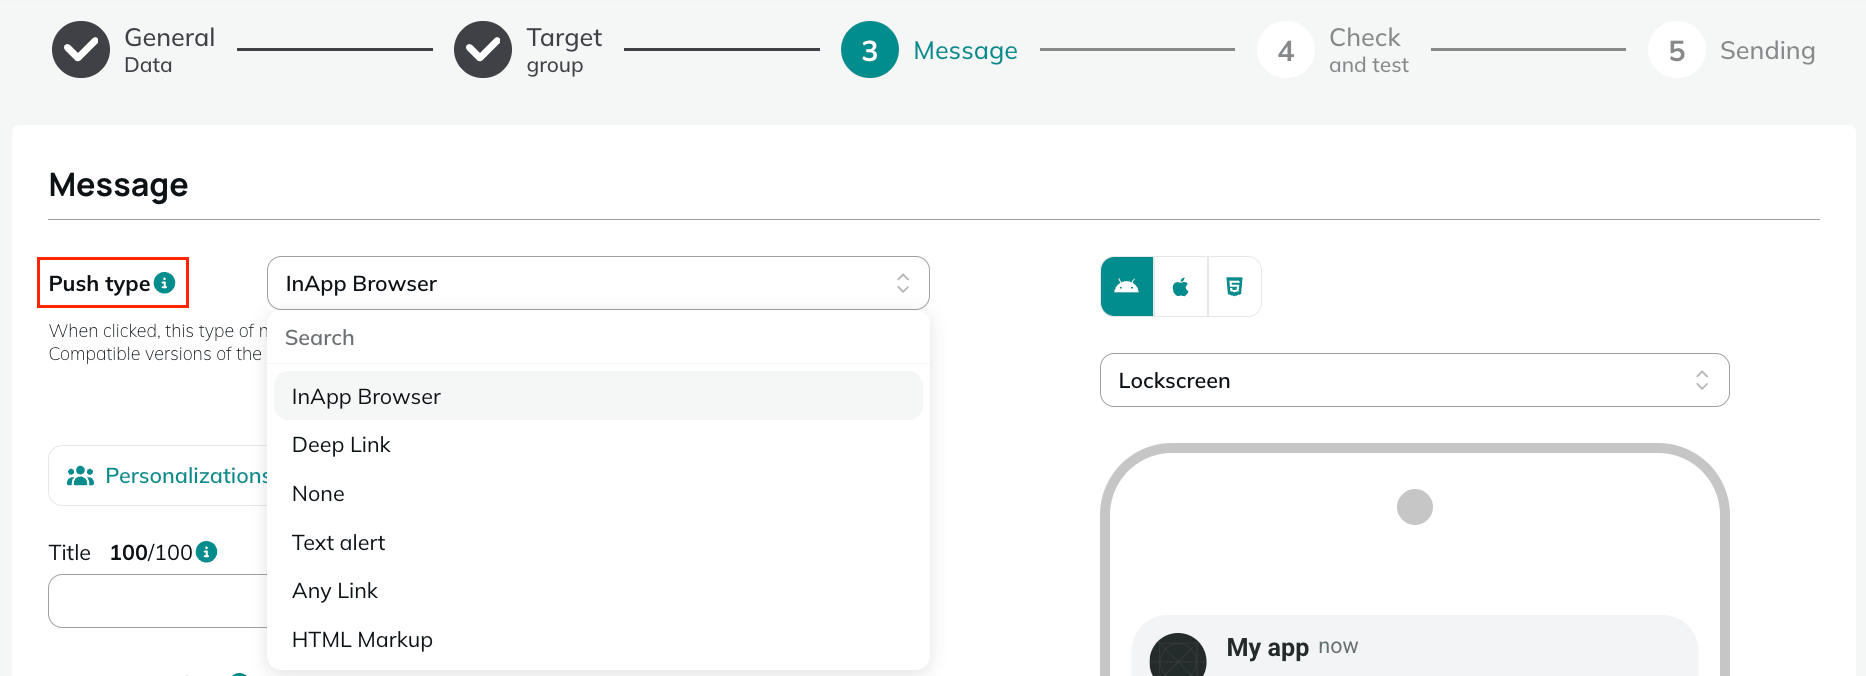
There are six types of push notifications that can be chosen from:
- In-App Browser: When clicked, this type of notification will display your app's built-in browser and load the URL you have provided. The compatible versions of the SDK are: SDK 3.2.0 or higher.
- Deep Link: When this type of notification is clicked, users will be taken directly to a specific location in your application that you have provided. Note that your application must support Deep links and correctly handle the custom URL scheme you provide. Any HTTP(S) URL will only be supported by web applications.
- None: When this type of notification is clicked, your application will be opened automatically, without generating any other action.
- Text Alert: When this type of notification is clicked, the entire content of the text message is displayed.
- Any Link: When this type of notification is clicked, users will be taken directly to the destination page of the link you have provided, whether this is an HTTP(S) or custom URL scheme. We'll automatically decide how to display it based on the value provided. The SDK versions supported are: SDK 3.10.0 (Mobile) and SDK 3.6.0 (Web) or higher.
- HTML Markup: When this type of notification is clicked, the HTML content you have provided will be displayed.
Message language and preview
If you create a multilingual campaign, you can select the edition language in the dropdown. Make sure to define the content in all the languages of the campaign.
The content will be the same for both Web and App notifications (if you selected both options at step 2). You can preview your content in real-time by switching the devices at the top right of the screen.
The number of characters displayed in the notification differs depending on the browser/OS of the receiving device.
Message content
A push notification is made of different parts.
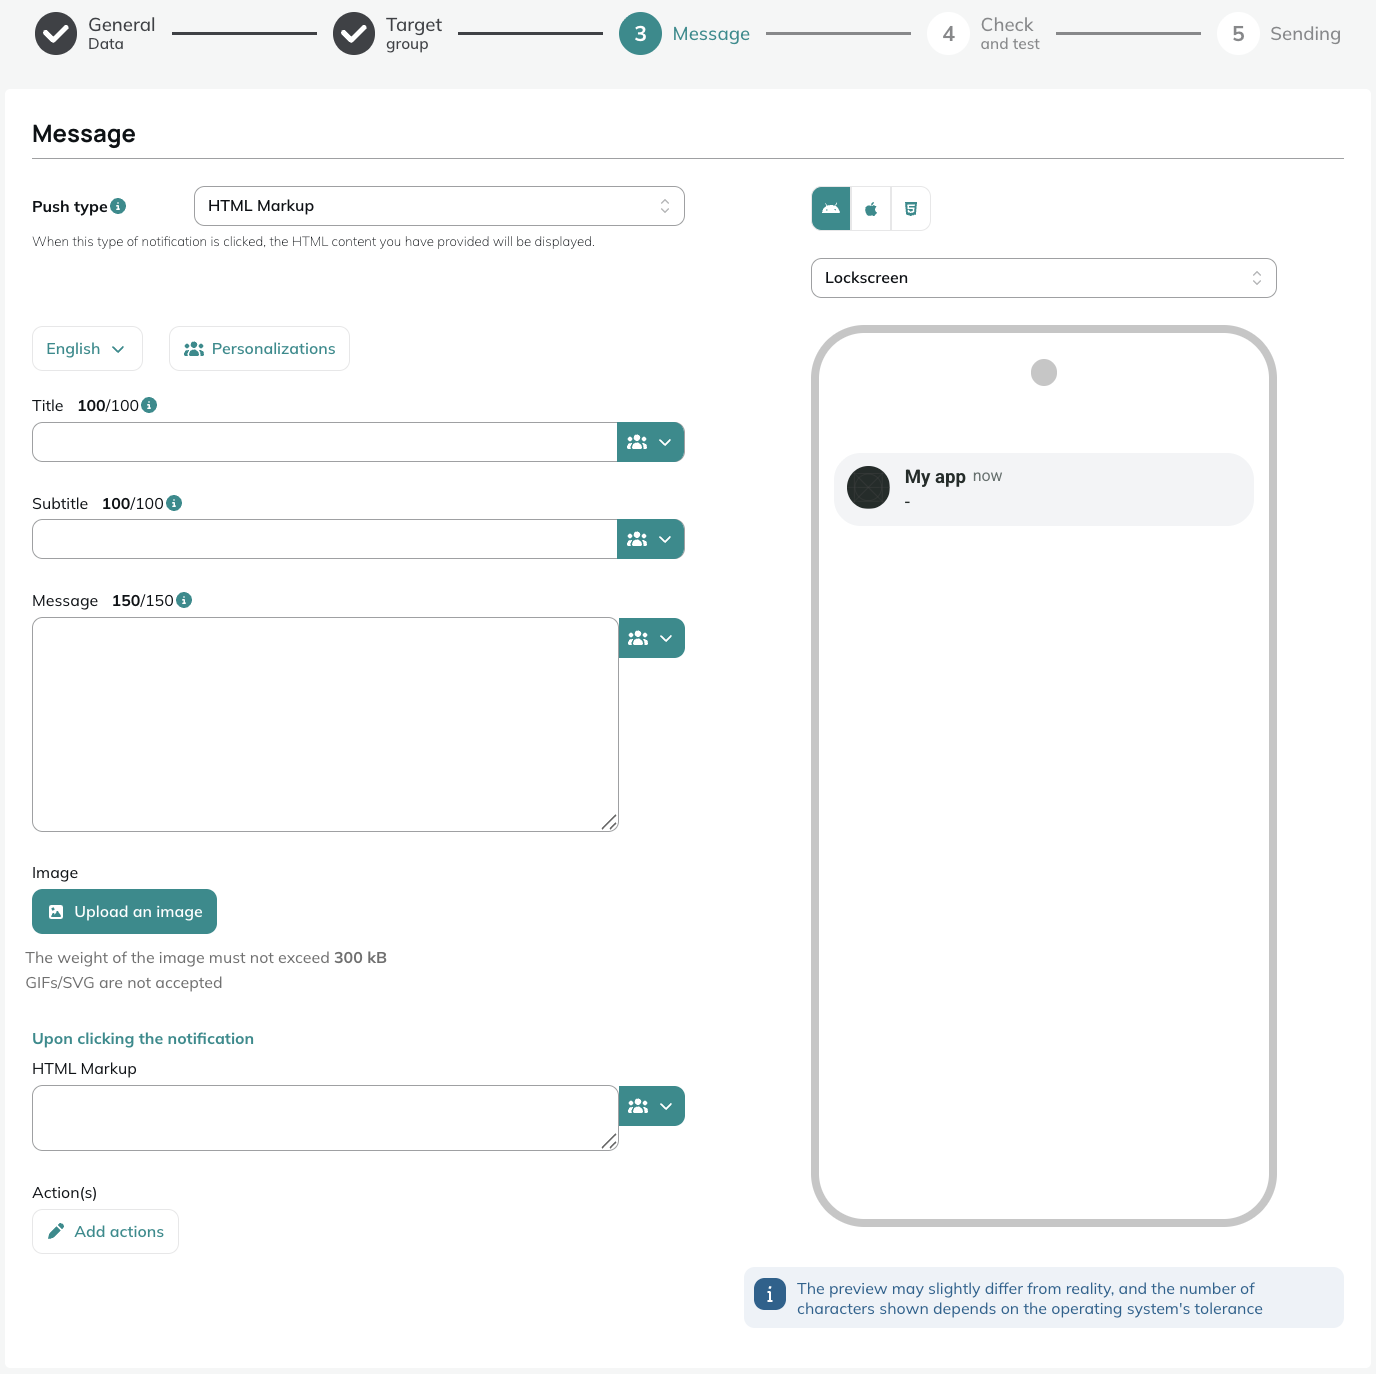
Title
This text will appear at the top of the notification, in bold or a slightly bigger font depending on the browser. Its recommended length is maximum 50 characters and can contain personalizations, to directly address the profiles using data stored in your data model.
Subtitle
When compatible with the user's device, this text is displayed below the title. The recommanded length is maximum 50 characters and can contain personalizations, to directly address the profiles using data stored in your data model.
Message
This is the main text of the message, displayed in a slightly smaller font than the title. Its recommended length is max 150 characters and can contain personalizations.
The character counter for the title, subtitle and message is a recommendation. The notification will not be blocked if you go over limit but its display might not be optimized.
Link
Profiles who click on the push notification will be redirected to a page of your website or of your app. There are several ways to set-up links depending on the type of your campaign:
- If you send a Web push campaign, the link will be a URL to your website, just like any link you would use in an email.
- If you send an App push campaign, you should use a deeplink: deeplinking is pointing to a specific page in your mobile app. There are 2 ways to do so:
-
Using a URI scheme with the protocol proper to the app like fb://, twitter://, ... (ex.: fb://profile/33138223345). This is the historical way of deeplinking and only works on apps: this should only be used if you are only sending App notifications and did not select both modes at step 2.
cautionTo use URI schemes, the
BROWSABLEcategory must declared in the intent of your app link, as explained here. For ease of use, we recommend using the second option documented below: -
Using an URL scheme compatible with Universal Links (Apple) and App Links (Android): this is a way to write your app link so that it is routed just like any standard link using HTTP(S). As a result, the link will look just like a web link and will work both with your app and with your website. This option should be used if you chose both campaign types at step 2.
tipIn doubt, ask the developer of your app how to write deeplinks toward the app, and plan your campaign types accordingly.
-
It is possible to use personalizations in the links, to use URLs or parameters stored in your data model in order to redirect your profiles toward unique pages within your website/app.
Image
The image will be displayed when the profiles receive a Web push notification, or when they expend an App notification:
- The image can be uploaded from your computer or you can copy paste the URL of an externally hosted image (this URL can be stored behind a personalization).
- The size of the image cannot exceed 300 kB and .gif/.svg are not compatible. Make sure to use another format, like .jpg or .png.
- We advise to use an image respecting a 2:1 ratio, otherwise it may be distorted or cut off.
On mobile, the image will be displayed when profiles expend the push notification.

Upon clicking the notification
HTML Markup
This is the HTML content that will be shown when the profile clicks on the notification. This is only available if you choose the HTML Markup push type.
Actions
When you choose the HTML Markup or Text alert push type, you will have the possibility to include actions in your push notification. Actions allow you to include interactive elements to your message, that you can use to collect important engagement metrics, and at the same time, harness powerful native functionality that mobile devices and browsers can offer.
To add an action to your push campaign, you can click here:

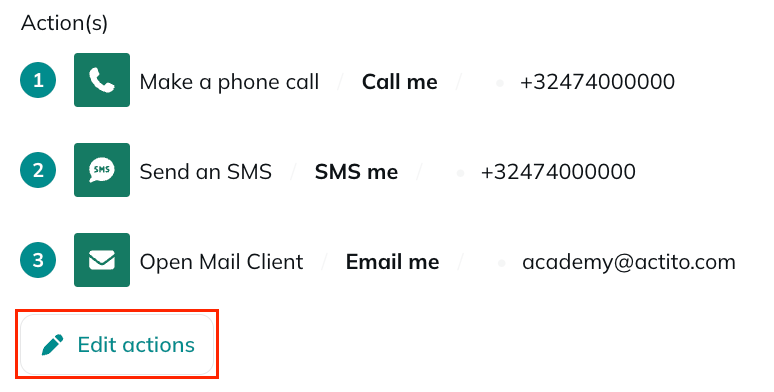
You will have the possibility to choose between seven push actions:
- Telephone: if your message is targeting mobile devices with calling capabilities, you can include actions that trigger the user to make a phone call
- SMS: if your message is targeting mobile devices with SMS capabilities, you can include actions that trigger the user to send a text message
- Mail: if your message is targeting devices with email capabilities, you can include actions that trigger the user to send a response by email
- Browser: this type of action will open a web page in the device's default browser. In iOS and Android apps, this action will make the user leave your app
- App: if your app supports deep linking, you may want to drive users to a certain view of your app, when they click in an action
- In App Browser: this type of action will open a web page in the default browser. In iOS and Android apps, this action will use a built-in controller/activity that uses a fully capable browser without leaving your app.
- Custom: if you would like to execute certain functionality in your app, this action will allow app developers to develop tailor made actions. This requires some work from your app development team before it can be used.
For each action, you will have to define a label for the button that will trigger the action, and a target. According to the type of action you have chosen, the target can be a phone number, an email address, an URL or a deeplink.
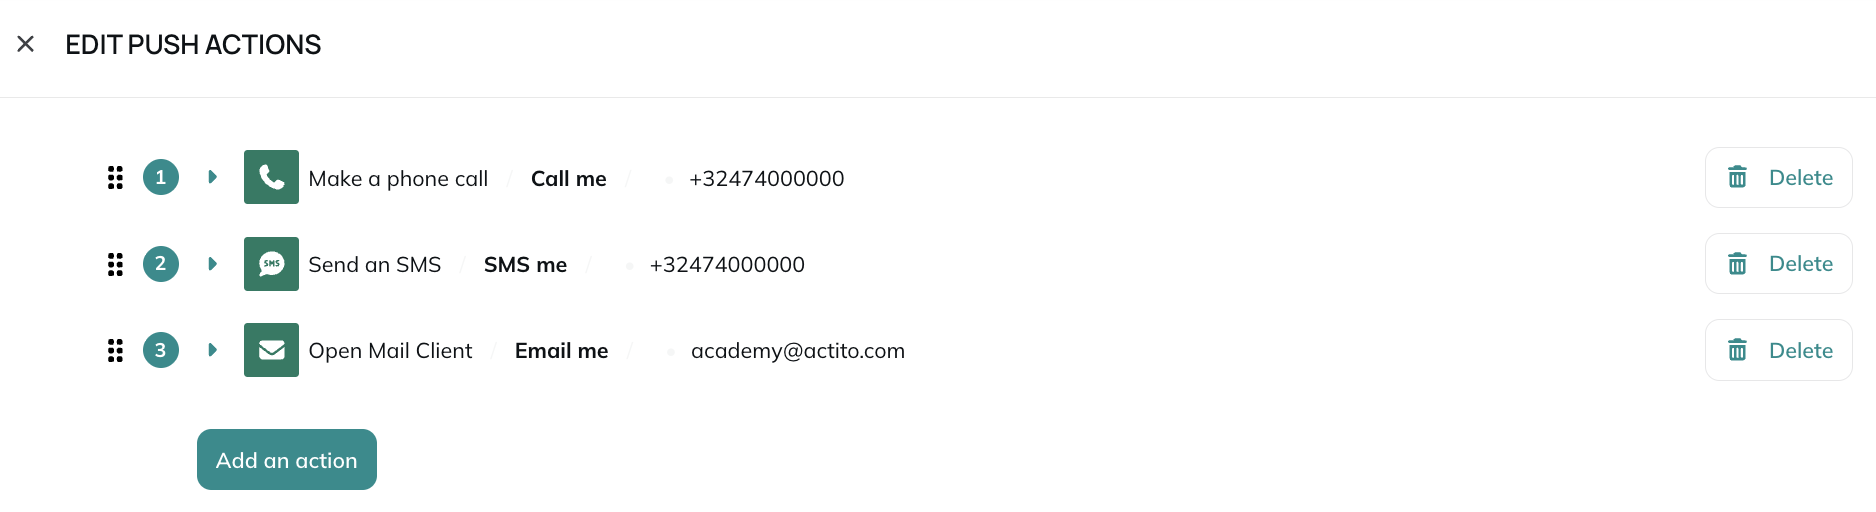
You can add several actions to one push campaign if you want to. You will have the possibility to manage the order in which the actions will appear when clicking on the "Edit actions" button:
And then by drag and dropping the actions in the order you desire:
![]()
You can also delete some actions, or add new ones.
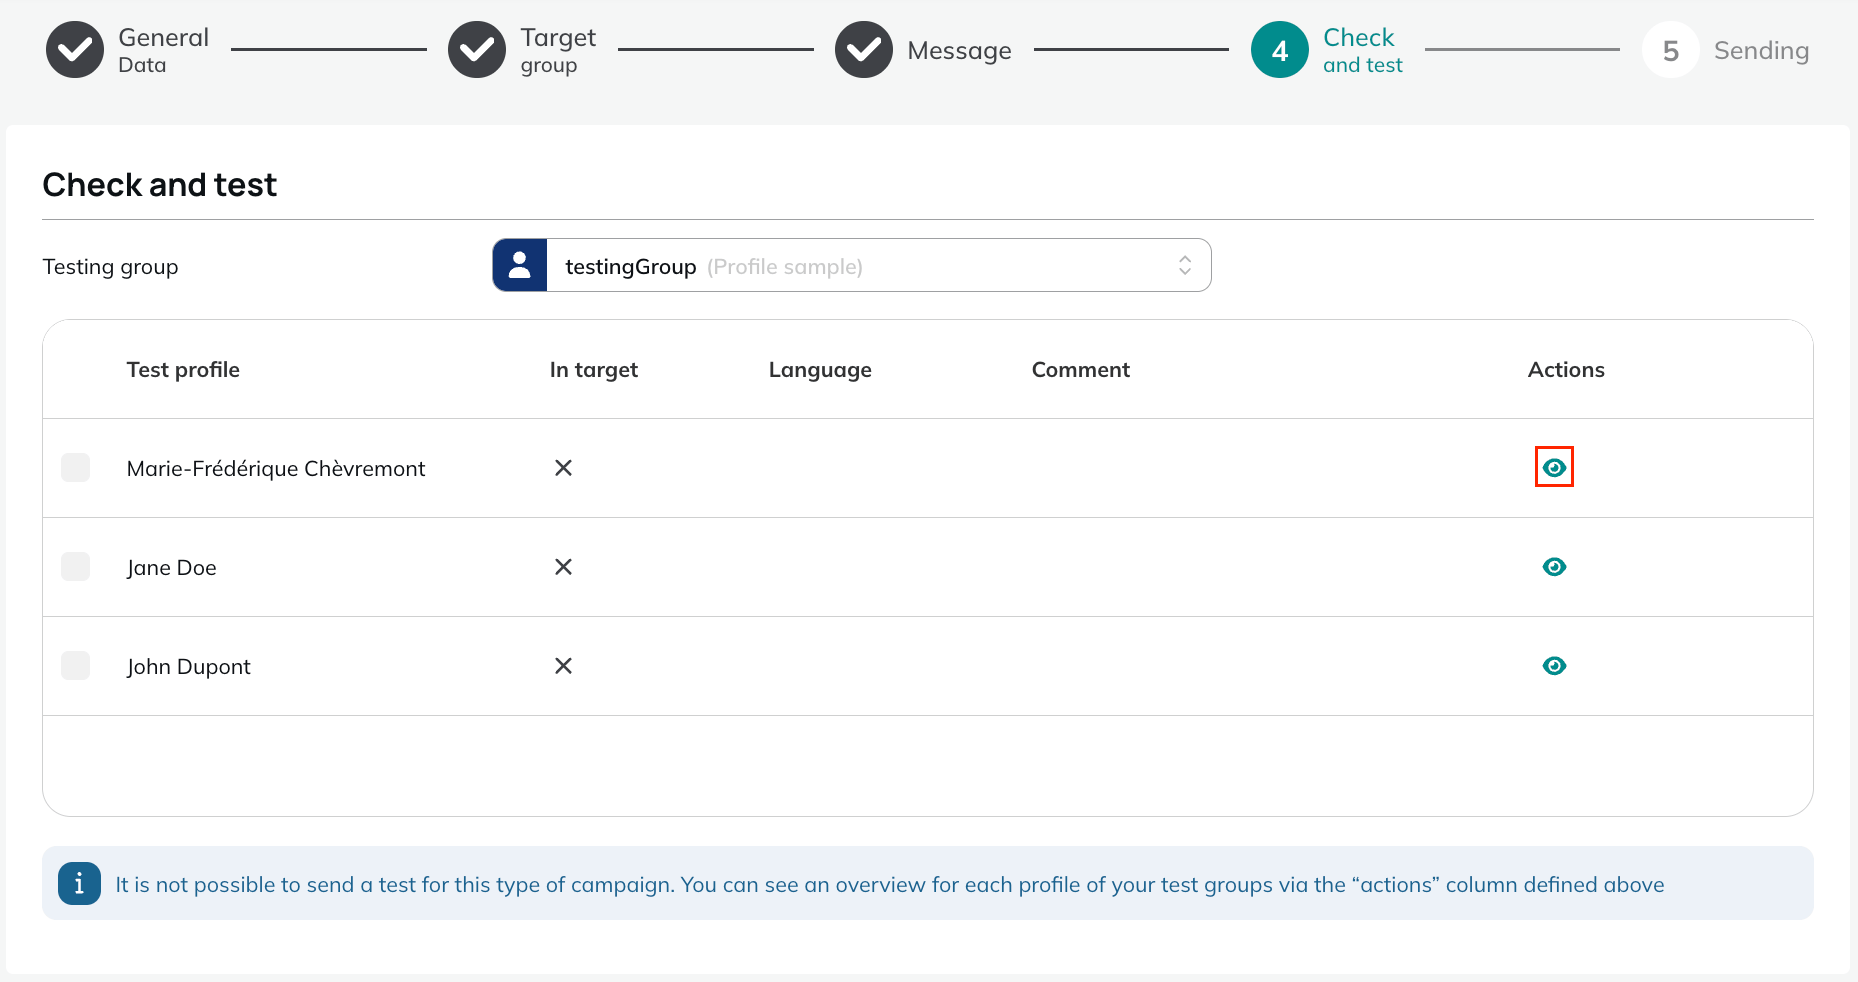
Step 4 - Check and test
Once your push notification is ready, you will be able to test it.
Unlike email or SMS, you won't be able to receive the push notification directly. Indeed, by nature, a push notification is not tied to an email address or a phone number, but to a device, to which the authorization to receive push notifications must be granted.
Therefore, your push notification can be checked by generating the preview for your test profiles: this is done by clicking on the eye and this will generated the push notification as it would appear to this profile, with the calculation of all personalizations.
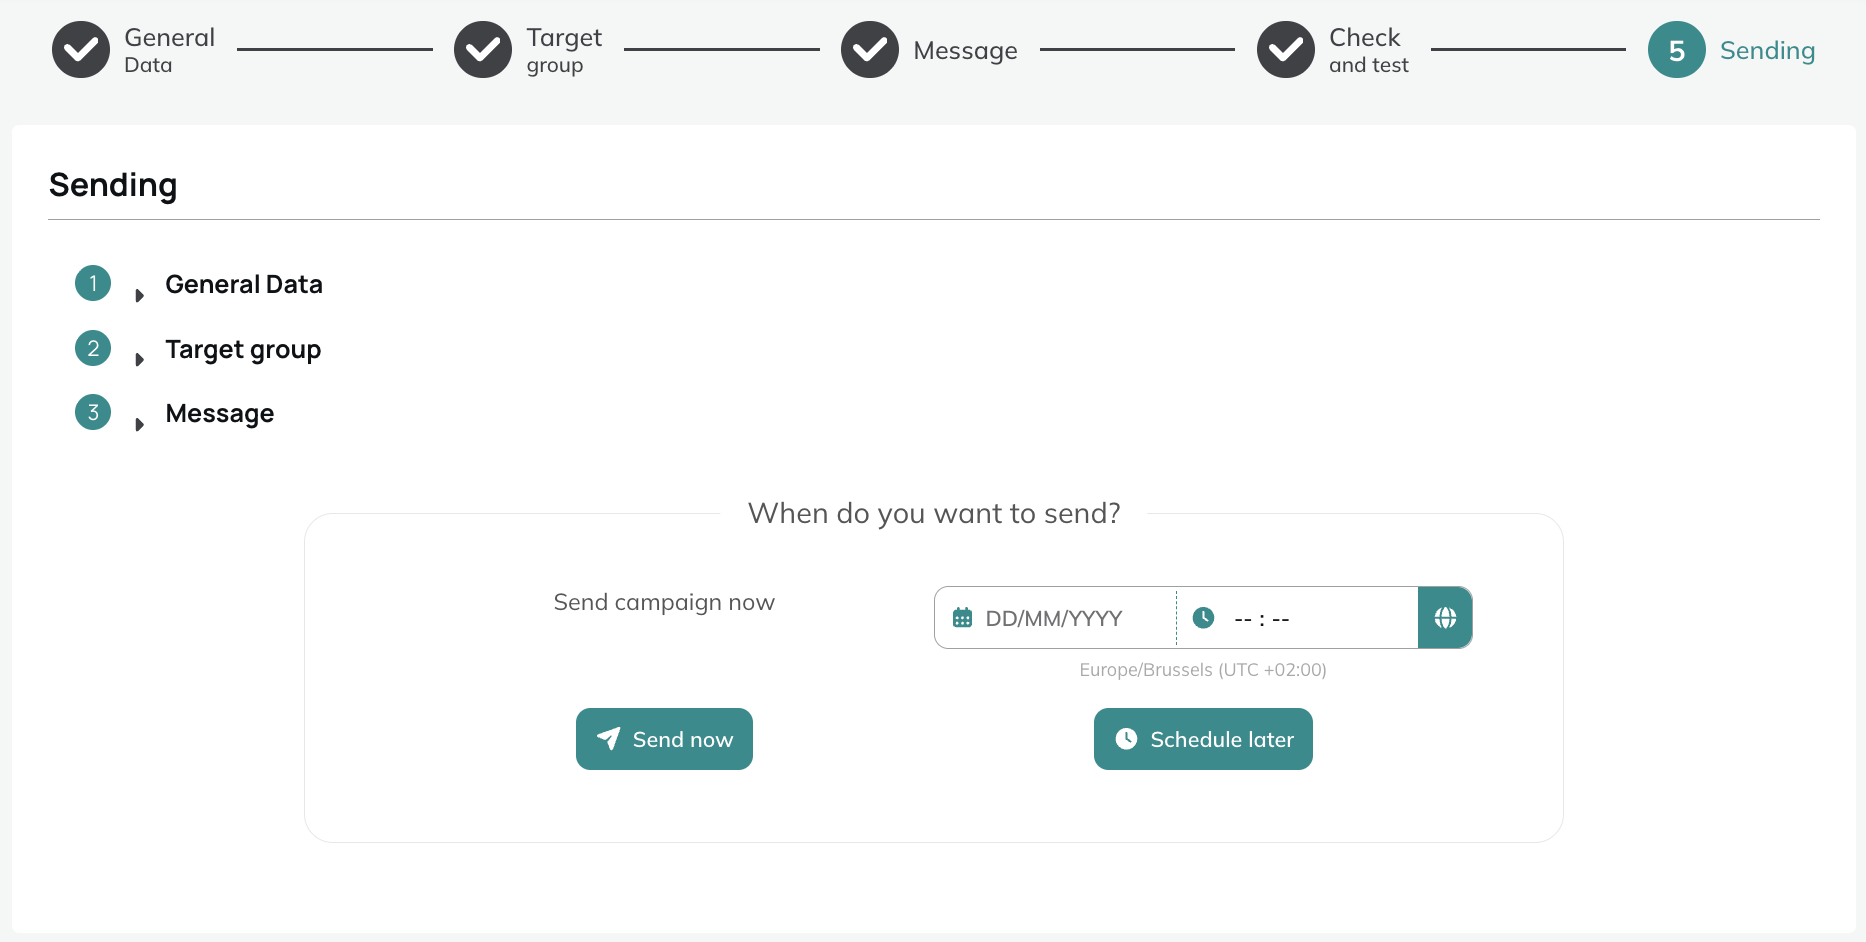
Step 5 - Sending
Once your Push campaign has been tested, you will be able to review the details of the different steps. If everything is satisfactory, you will be able to activate it or to schedule it, depending on the campaign type.
One shot campaigns
One shot campaigns can be sent immediately or scheduled at a later date.
When one shot campaigns are sent, they will be pushed to the devices of all profiles matching the targeting criteria. It is therefore important to double check the target calculation.
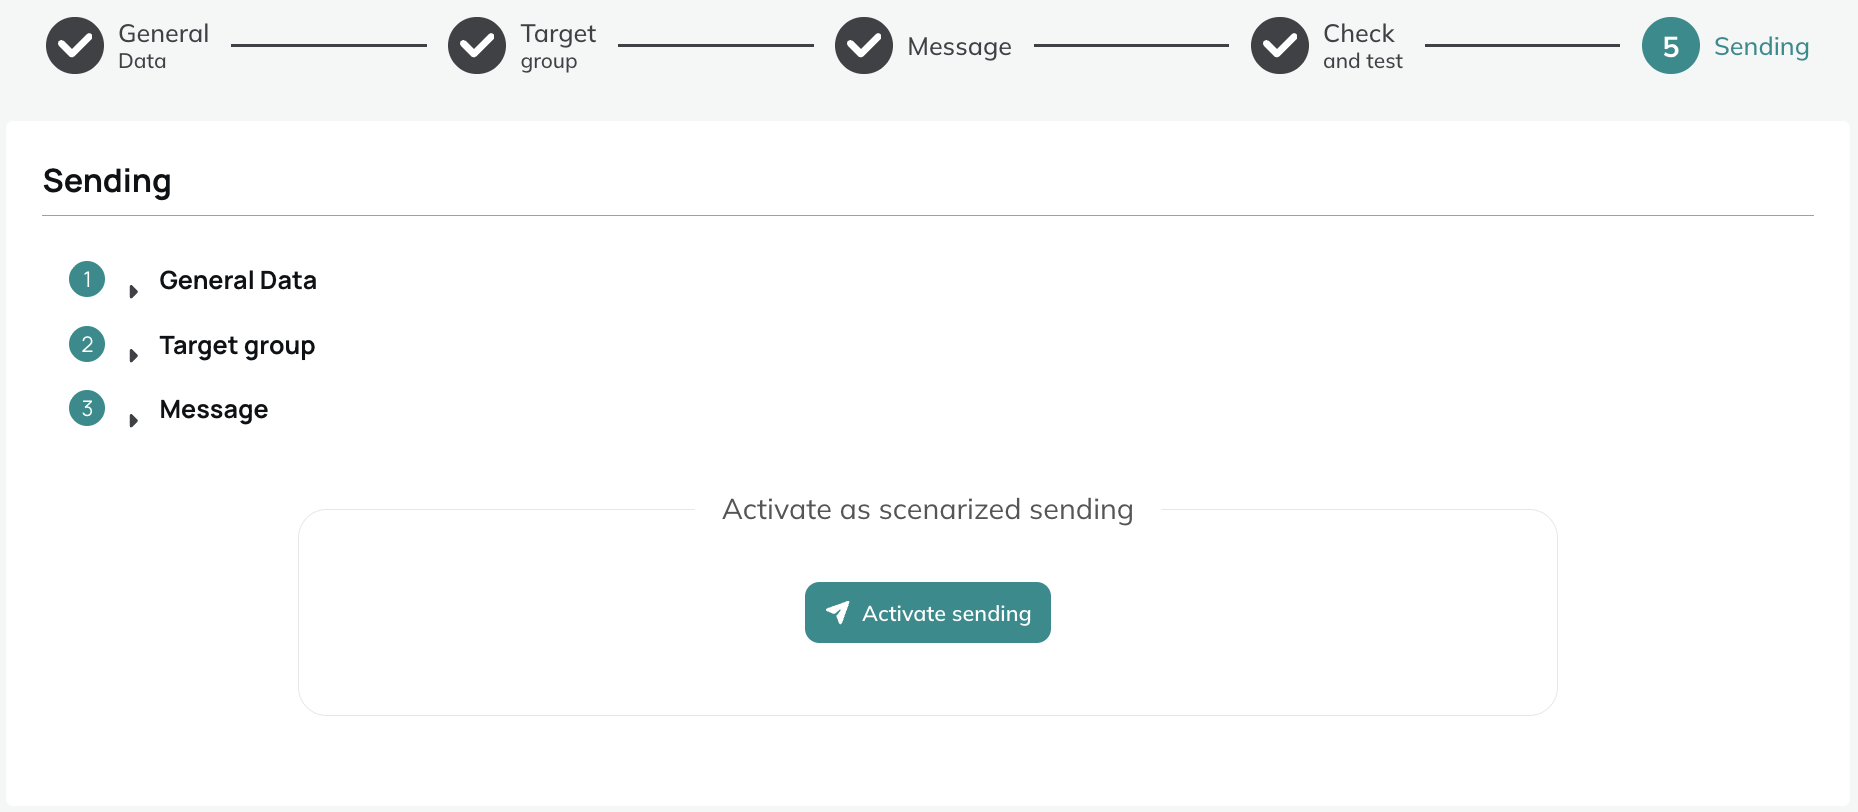
Scenarized campaigns
Click on "Activate sending" to validate the definition of your campaign and make it available in your scenarios, where you will be able to build journeys that trigger push notifications to your profiles.
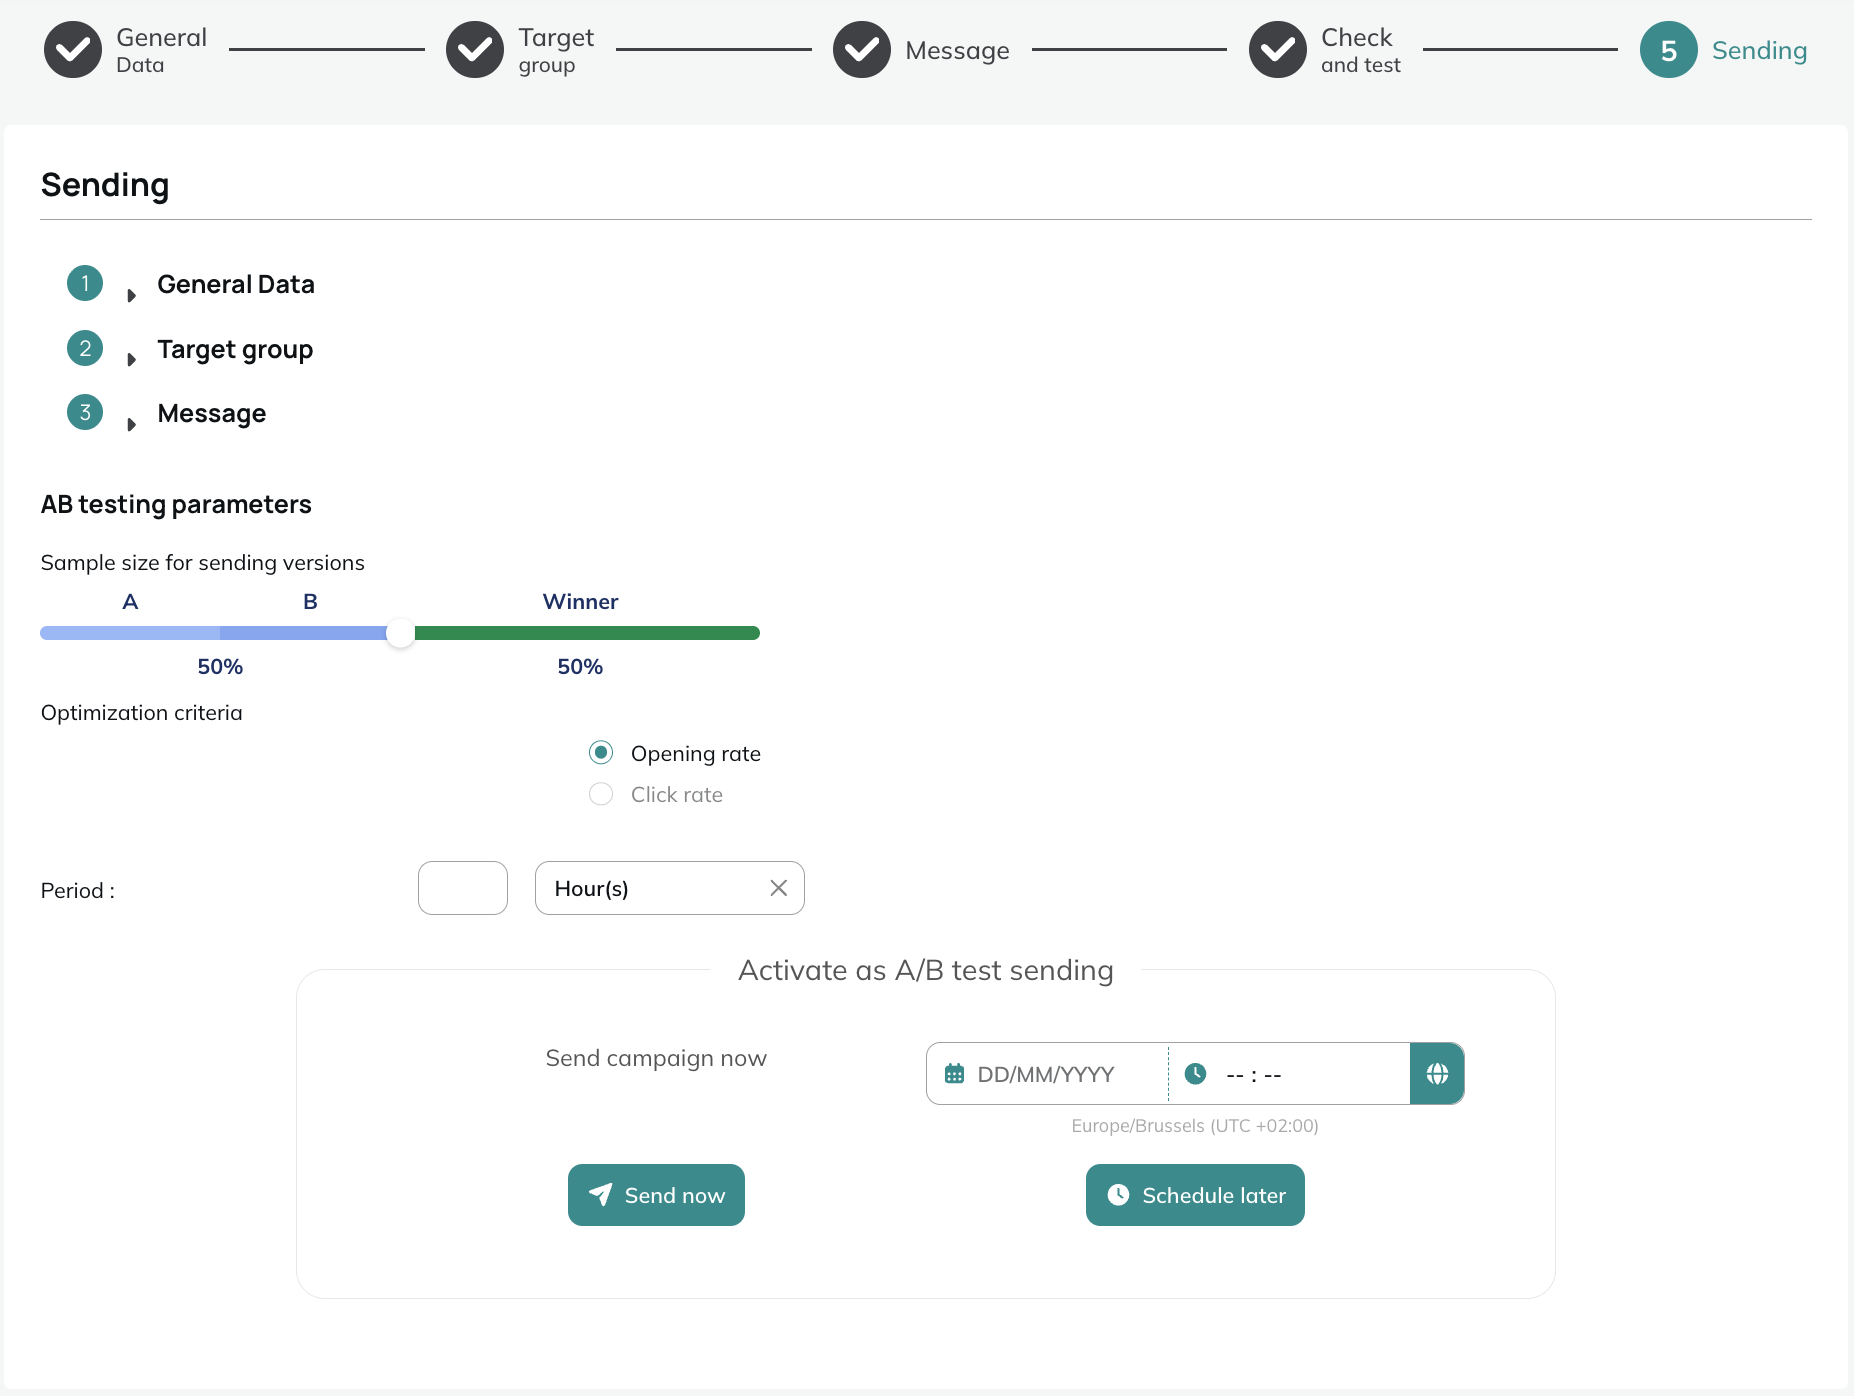
A/B test campaigns
At the sending step, you will have the option to define the sample size for each version, as well as the optimization criterion.
If your campaign does not contain any actions, you will not be able to select the "Click rate" optimization criterion.
You can also choose the period after which the winning version will be selected. This period can be defined in minutes, hours, or days.
As with one shot campaigns, A/B test campaigns can be sent immediately or scheduled for a later date.
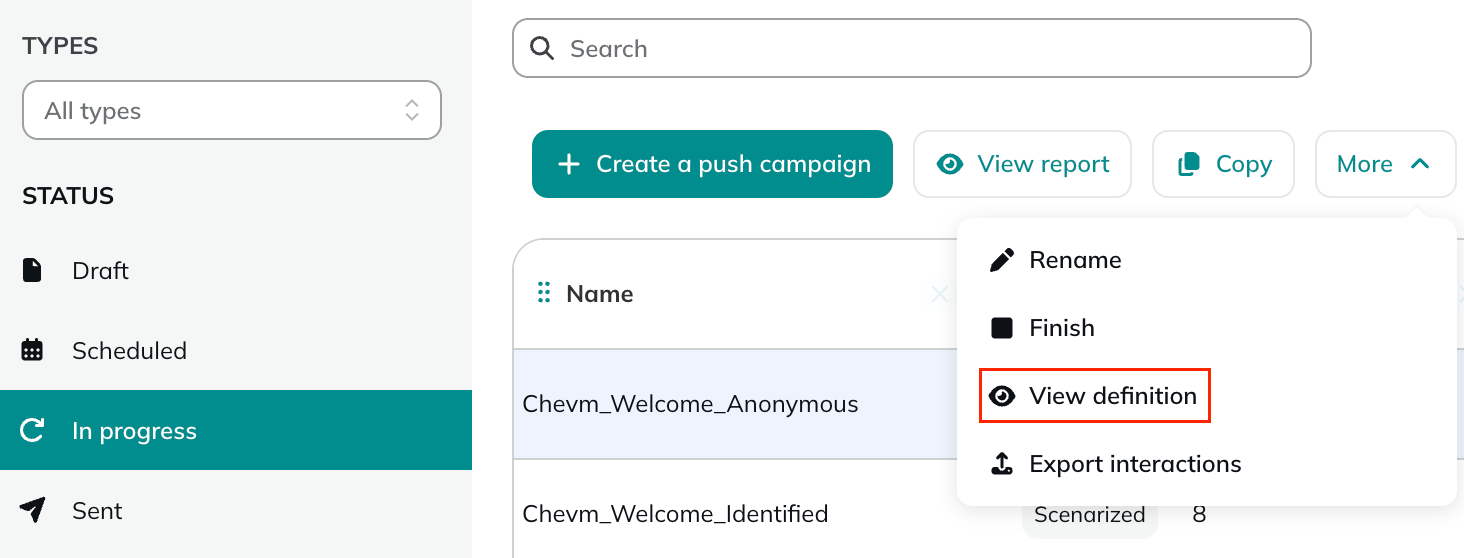
Viewing the definition of a campaign
Once your campaign has been activated, you can check its definition by clicking on the "More" button, then "View definition" from the "In progress" tab.
App deletion
When an Actito app is deleted, the status of its associated campaigns is updated automatically depending on their current state:
- Draft and scheduled campaigns are permanently deleted. Since they were never activated, no interaction data is lost.
- In progress campaigns are moved to the Sent state. This preserves all recorded interactions, but the campaigns are no longer linked to any app.