WhatsApp campaign creation
Once a WhatsApp integration has been set up in your license, you can start creating a WhatsApp campaign.
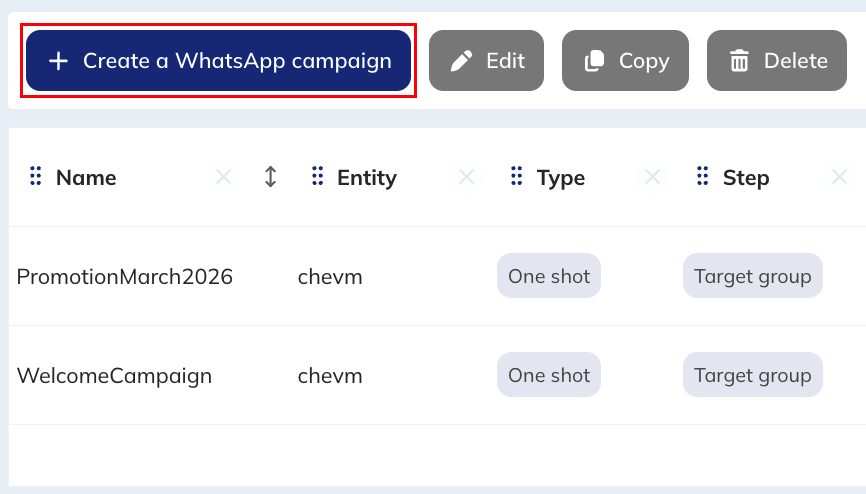
From the Hub, select "WhatsApp campaigns".

Then "Create a Whatsapp campaign".
Choosing the integration and the type
First, you need to select the integration, which is the link to the CM account from which the WhatsApp messages will be sent.
Each integration is tied to an entity, which will directly determine the entity on which the created campaign will be stored.
However, if you have multiple senders because your are managing multiple brands, this is also thanks to the integration that you are able to differentiate them.
Changing the integration after choosing it is not possible.
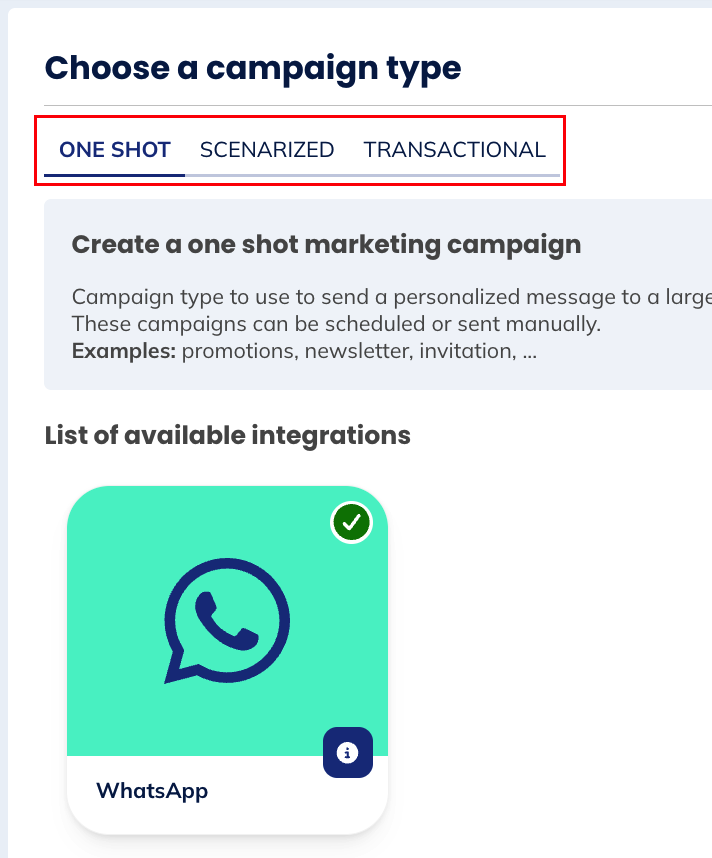
You also have the possibility to choose between two campaign types:
- One shot: This type of campaign is sent at given time to a great number of profiles all at once.
- Scenarized: This type of campaign can be triggered automatically via Scenarios or via API.
- Transactional: This type of campaign can be triggered automatically via Scenarios or via API.
Step 1: General data
Give a name to your campaign and choose the language(s) in which the campaign will be created.
If you are creating a multilingual transactional campaign, you will need to define the default language in which the campaign should be sent when there is no language defined for the profile.
Select the profile database that will be targeted.
The database can be on another entity than the campaign, as long as you have access to both, but it must contain the gsmNumber standard attribute, as this is the ID used by WhatsApp.
The entity of the campaign is tied to the integration and cannot be modified.

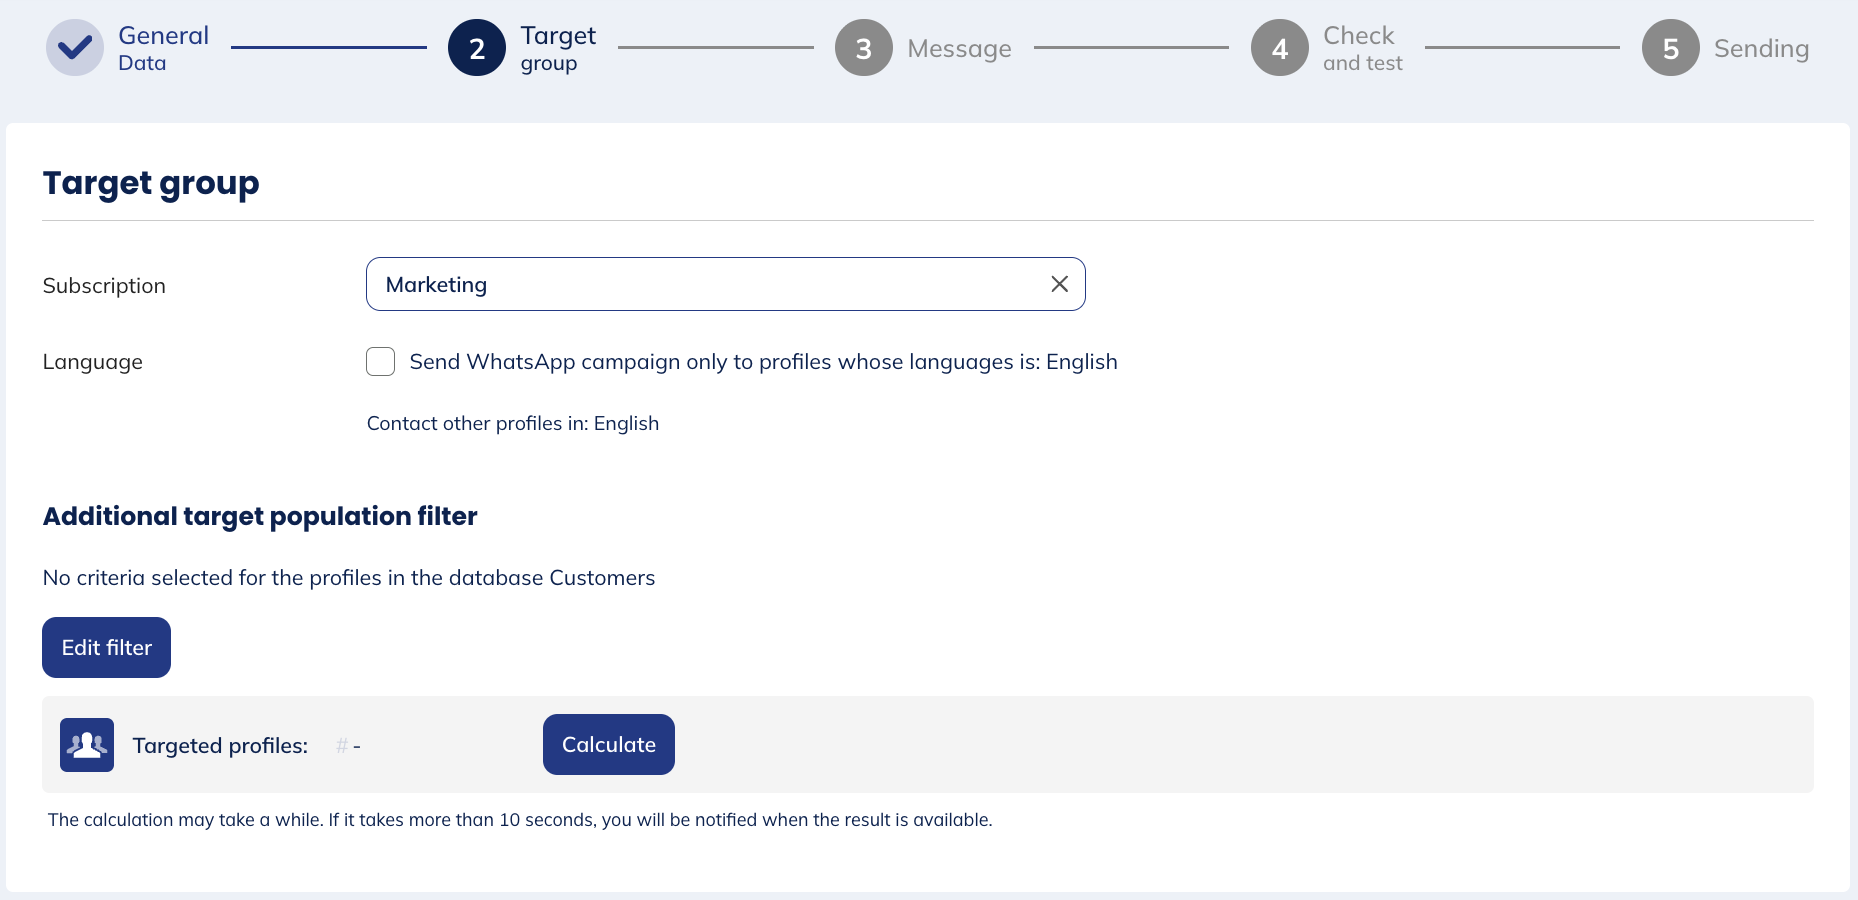
Step 2: Target group
The second step is only visible for one shot and scenarized campaigns, as transactional campaigns are triggered by a profile action rather than targeting a predefined audience.
You must choose a subscription which represent the consent given by profiles to be contacted through WhatsApp.
While you can technically choose any subscription of your profile table, we strongly recommend that you created a new dedicated subscription for WhatsApp campaigns and collected specific consent for this channel. Indeed, this consent collection also helps you determine which profiles are WhatsApp users, as you cannot contact profile who have not set up the app on their mobile device.
Next, you can select a default language, to target profiles speaking other languages than the main ones of the campaign.
Finally, you can refine your target selection by applying targeting filters, like for any Actito channel.
Step 3: Message
At the third step, you can define the type and content of your campaign. A WhatsApp campaign can contain a message, an image, a video and actions.
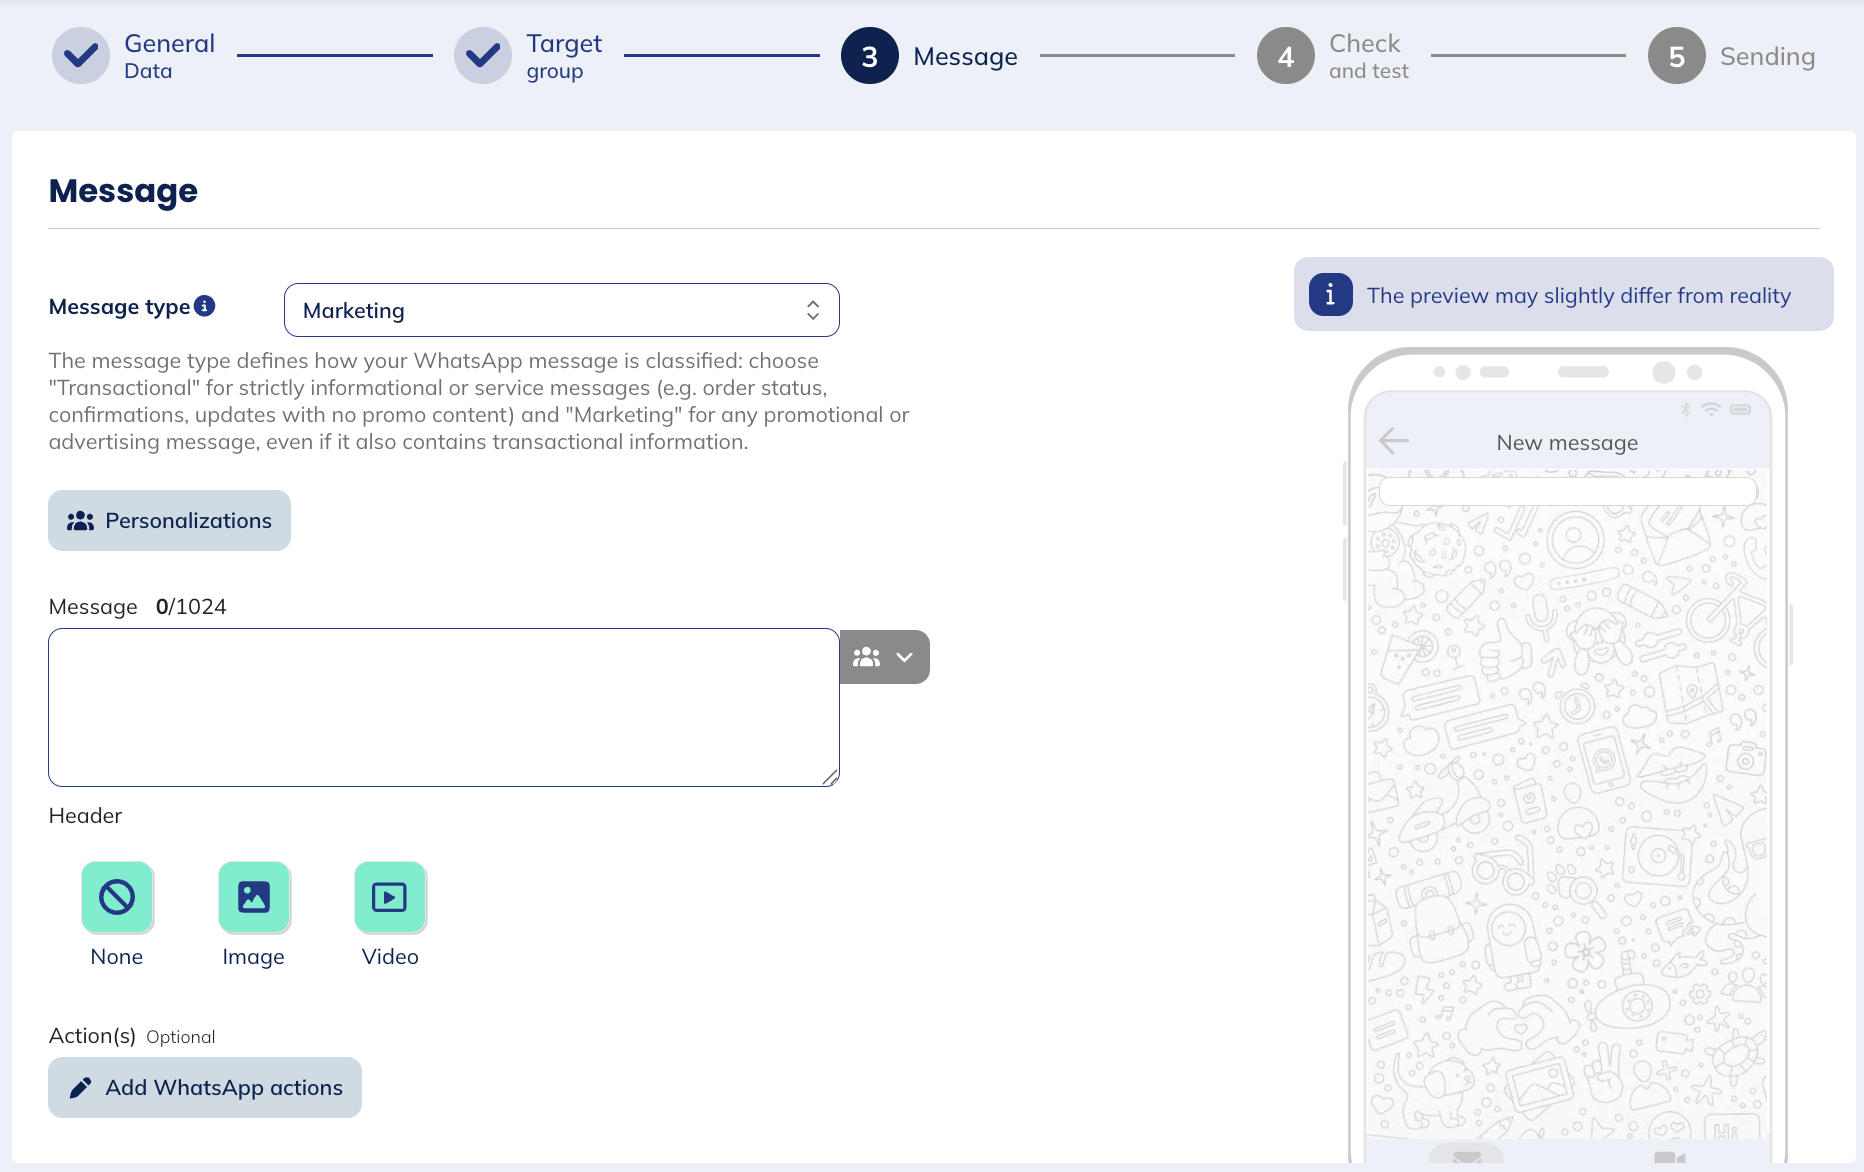
Message type
Meta distinguishes two main message categories in its pricing model:
- Transactional messages cover communications tied to a customer-initiated action: order confirmations, delivery updates, appointment reminders, account alerts. These messages are event-triggered and expected by the recipient, which is why they benefit from a lower rate.
- Marketing messages cover all promotional or engagement-driven communications such as offers, newsletters, personalized recommendations and re-engagement campaigns. These are brand-initiated messages and are priced higher.
Transactional messages do not require marketing opt-in on Meta's side. Making sure your templates are correctly categorized lets you reach customers without an explicit marketing consent.
The default message type is pre-filled based on your campaign type: marketing for one shot and scenarized campaigns, transactional for transactional campaigns.
Before sending, Meta checks whether your message actually qualifies as a transactional message. If it doesn't, they will reclassify it as marketing and apply the corresponding rate. This reclassification only goes in one direction: transactional messages can be downgraded to marketing, but not the reverse.
What happens if your message gets reclassified?
When Meta reclassifies a transactional message as marketing, Actito does not stop the sending. Since transactional campaigns are time-sensitive by nature, we let the campaign go through and leave the decision to you. You will be notified of the reclassification in three ways:
- a warning in the email report you receive after sending
- a notification in the notification center
- a warning directly in the WhatsApp module.
At that point, you can choose to accept the higher charge and keep sending, or stop the campaign, update the message template, and launch a new one.
Marketing templates are usually approved quickly, but transactional templates can take up to 24 hours to be validated by Meta. Plan accordingly when setting up transactional campaigns.
Message
Here, you will have the opportunity to define the message of your campaign. A WhatsApp campaigns benefit from a much bigger character limit than SMS, with a maximum of 1024 characters.
You can use the full extent of personalizations to directly insert data stored in your data model and create a highly personalized message. However, due to Meta rules, there are restrictions in the placement of personalizations: two personalization cannot appear in a row and they cannot appear at the start or the end of the campaign.
Indeed, Meta enforces a set of guidelines regarding the content and the format of messages sent through WhatsApp. Each campaign must undergo validation before being sent to the target.
Before writing your first message, we invite you to consult this article about Meta guidelines and strictly follow the instructions.
Make sure to write the message in all the languages of the campaign. Otherwise, you will not be able to go to the next step.

Image
You can upload an image to your message. This image must be in .jpeg or .png format and must not exceed 5MB.
Video
You can also upload a video to your message. This video needs to follow certain rules and recommendations:
- The recommended aspect ratio for optimal resolution is 1.91:1. Examples dimensions include 955 pixels x 500 pixels or 1910 pixels x 1000 pixels.
- The weight must not exceed 16MB
- Only the MP4 format is supported and an audio track is required
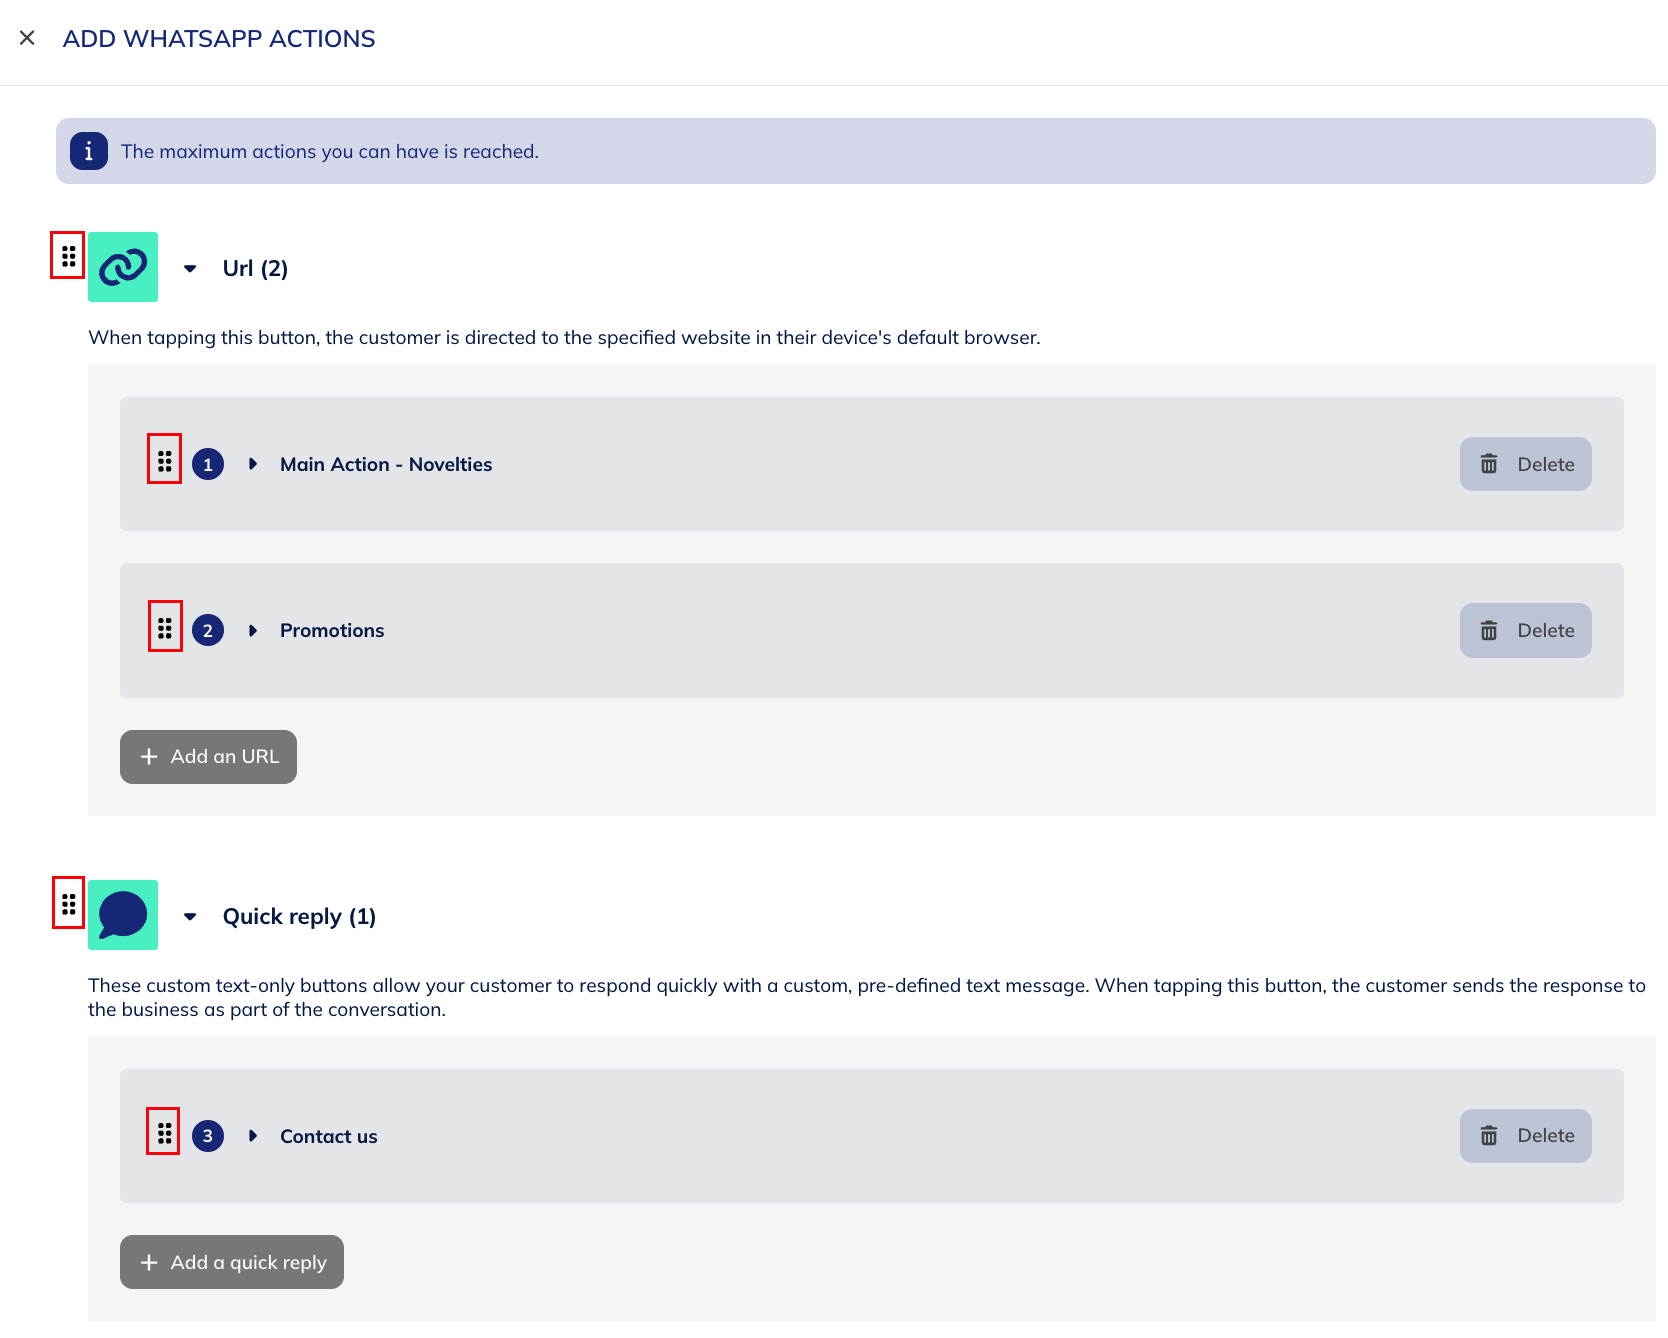
Actions
In addition, you can add actions to your campaign. You will have the possibility to choose between two types of actions:
- URLs: when tapping this button, the profile is directed to the specified website in their device's default browser
- Quick replies: these custom text-only buttons allow your profiles to respond quickly with a custom, pre-defined text message. When tapping this button, the profile sends the response to the business as part of the conversation.
You can add up to 3 actions per campaign.
A good practice is to manage opt-outs through action buttons. More information about this in this article.
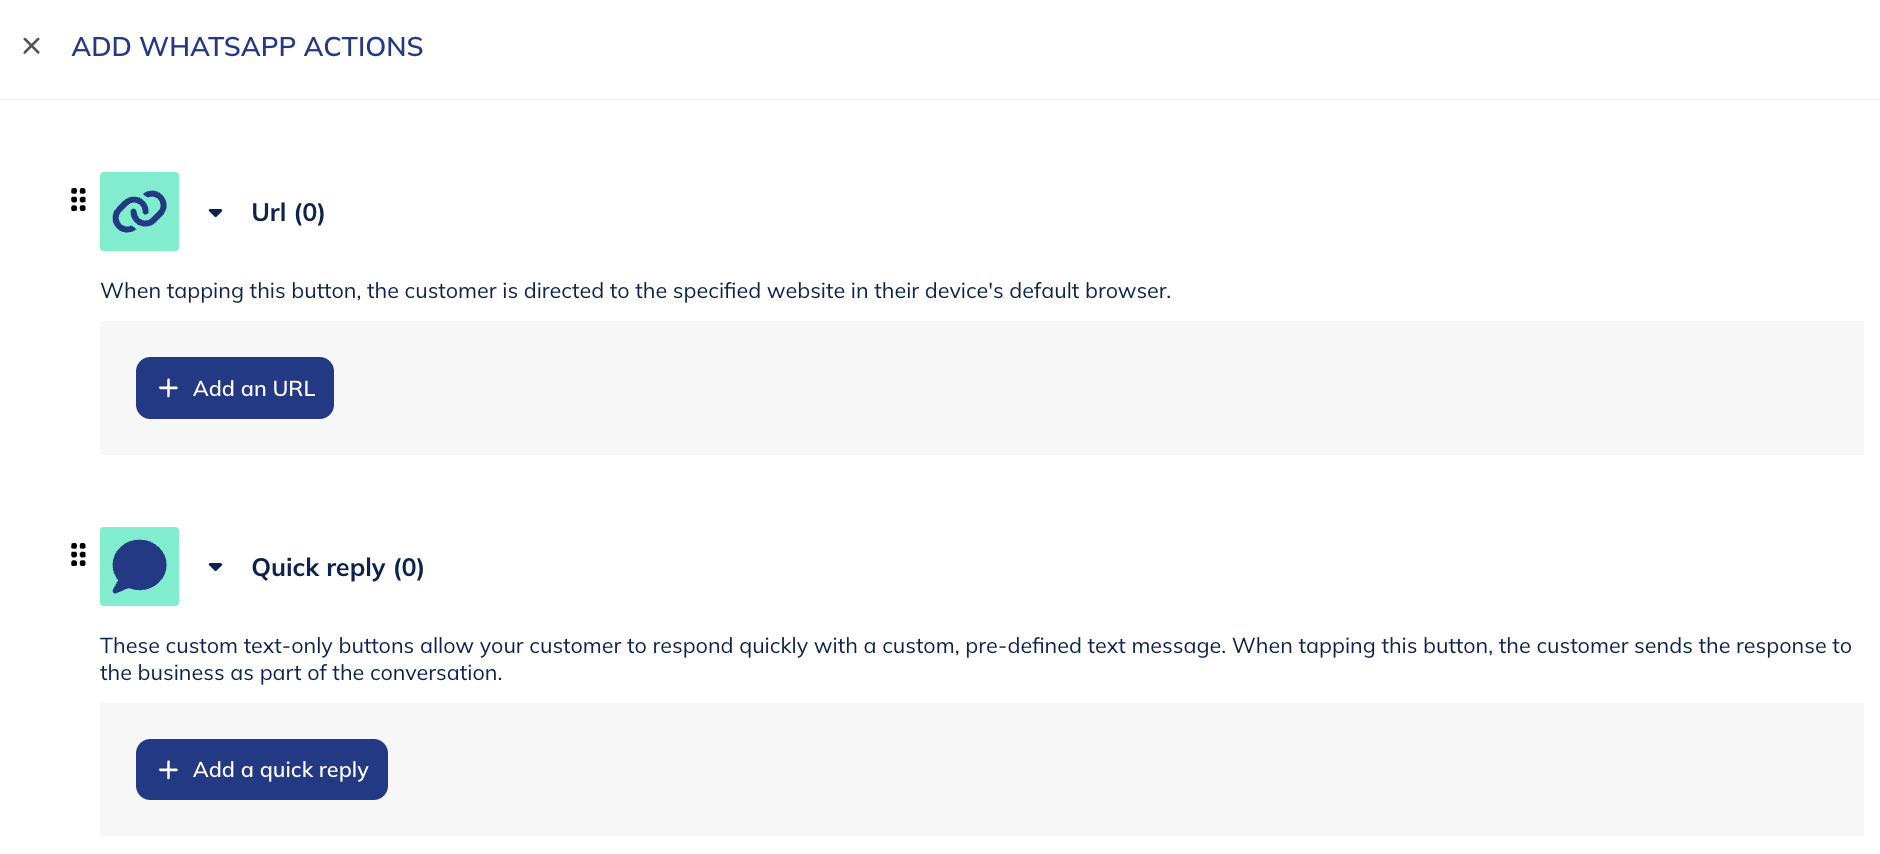
The actions have to be grouped by type. This means that if you add the two type of actions, URLs will be grouped together, and quick actions too. However, you will have the possibility to choose which type of action should appear first. Within a type of action, you will be able to choose the order too, by using the drap & drop.
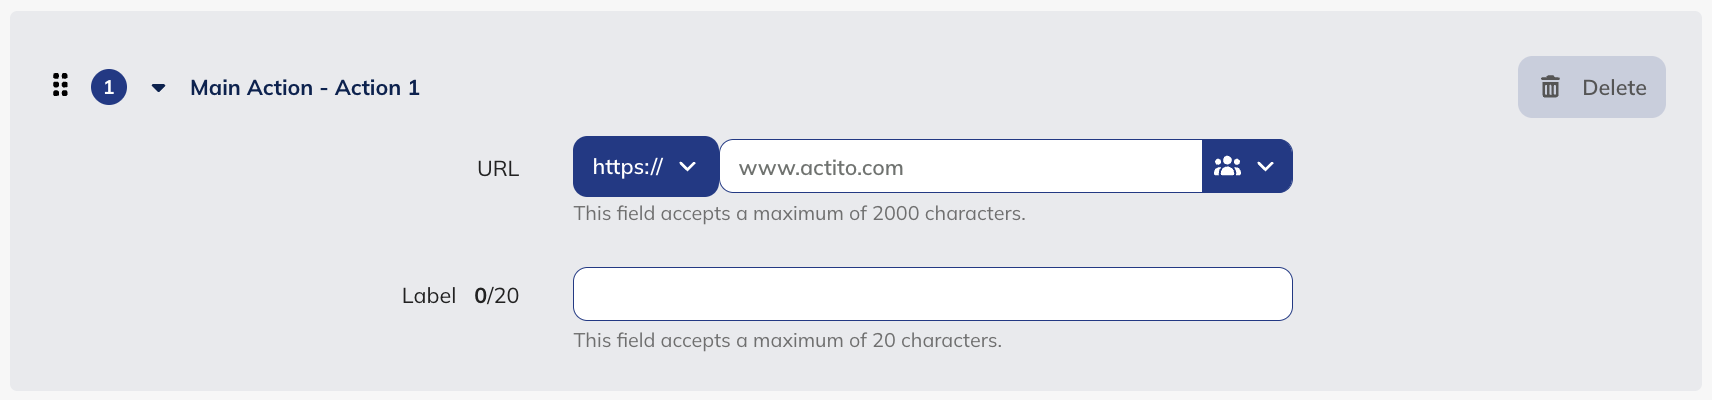
URL
When creating an URL action, you will have to:
- Define the URL to which the profile will be redirected. You can use personalization for this field, which can contain up to 2000 characters
- Define the label of the button, which can contain up to 20 characters
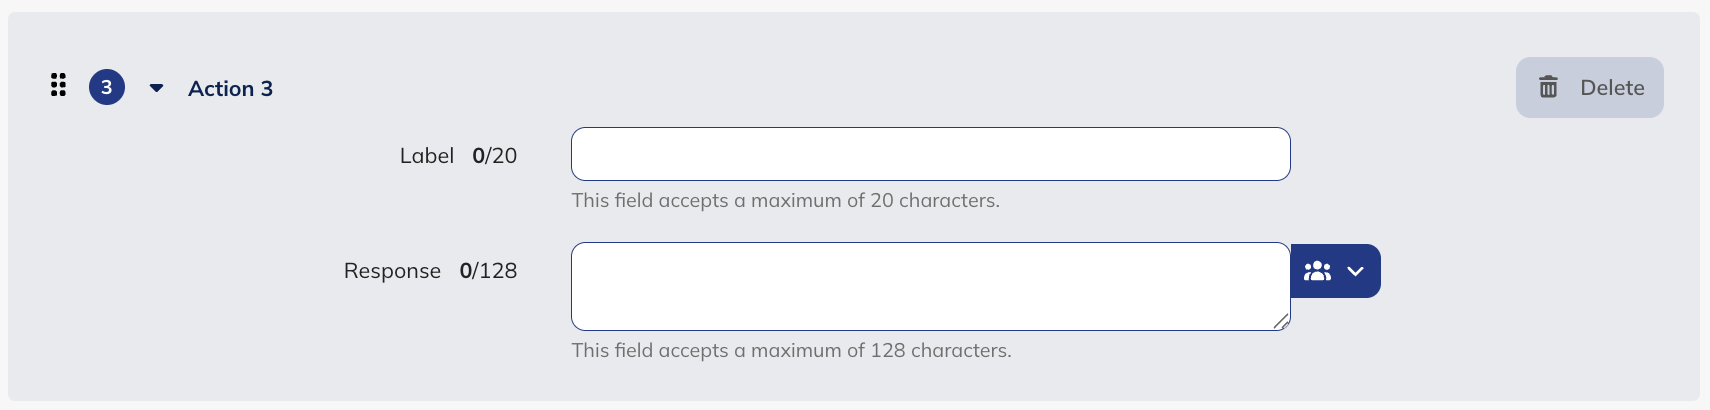
Quick reply
When creating a quick reply action, you will have to:
- Define the label of the button, which can contain up to 20 characters
- Define the customer reaction, which is the message that will be sent on your side to the profile after he taps the button. This field can contain personalization, and accepts a maximum of 128 characters
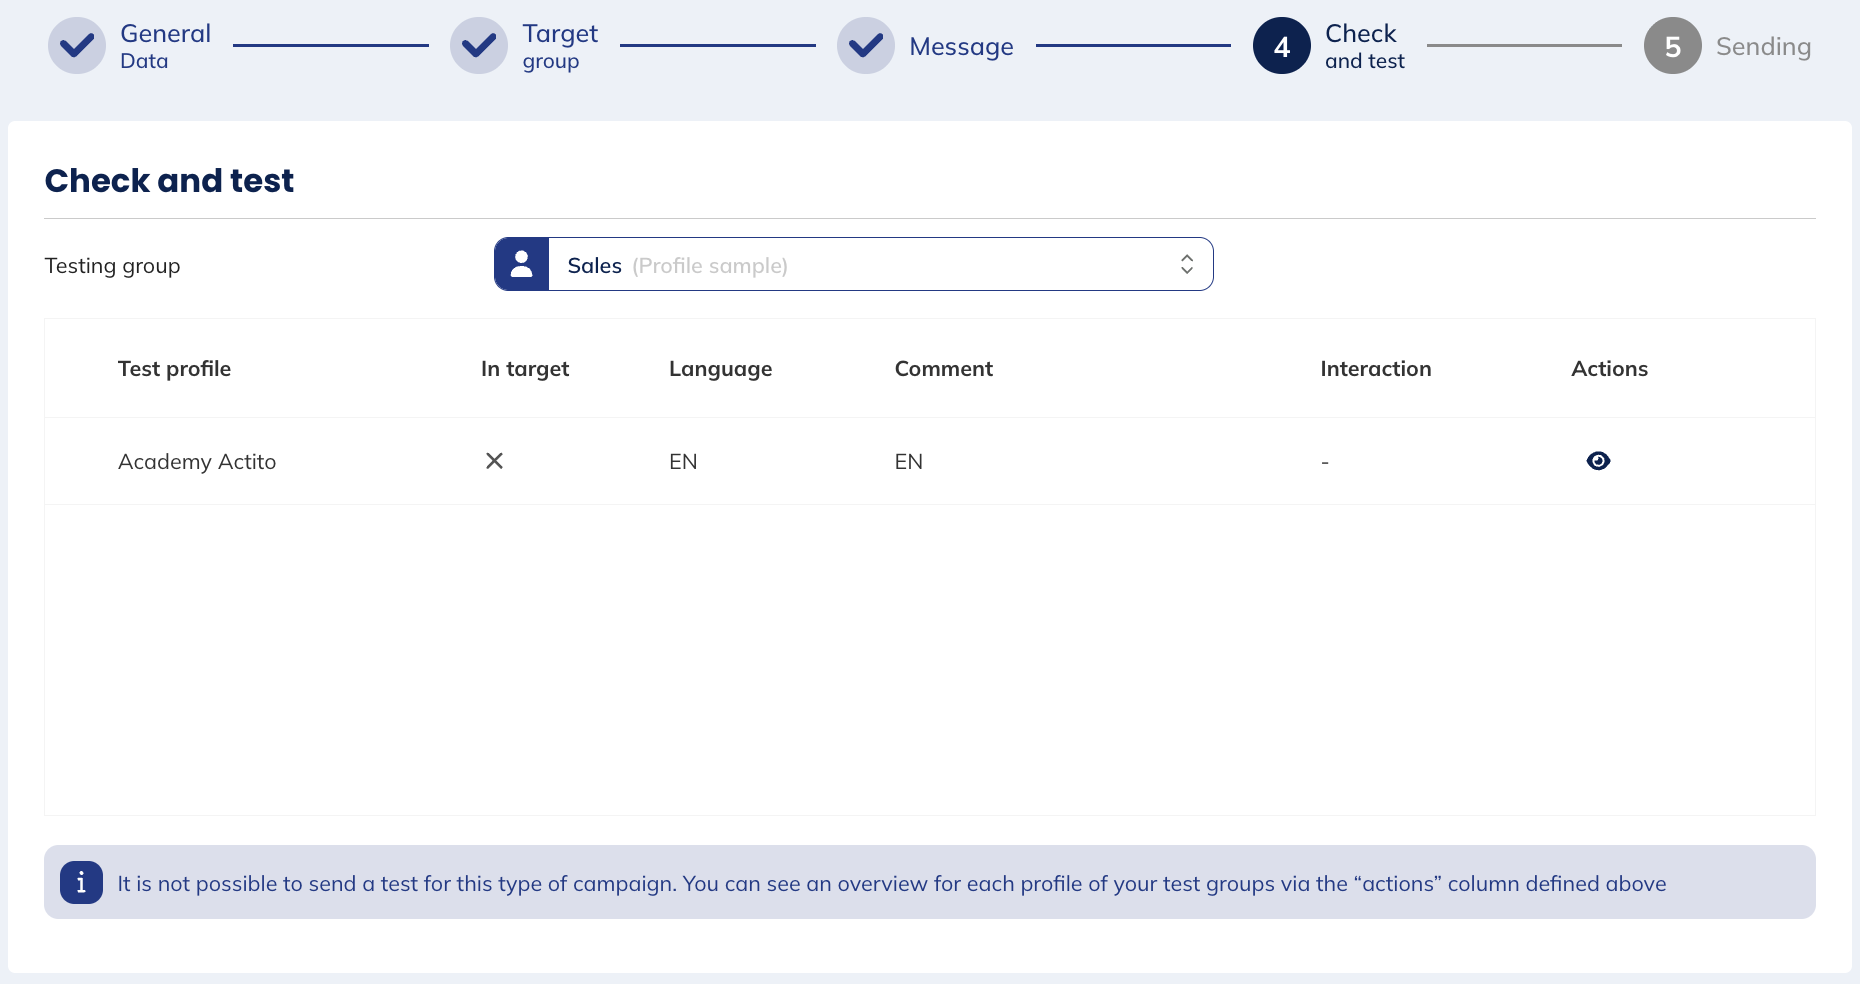
Step 4: Check and test
You can preview the rendition of your campaign for members of your testing group by clicking on the "eye" in the "Actions" column at step 4.
Because of Meta's validation process and the rule against submitting duplicate messages, it is indeed not possible to send a test message directly to your phone.
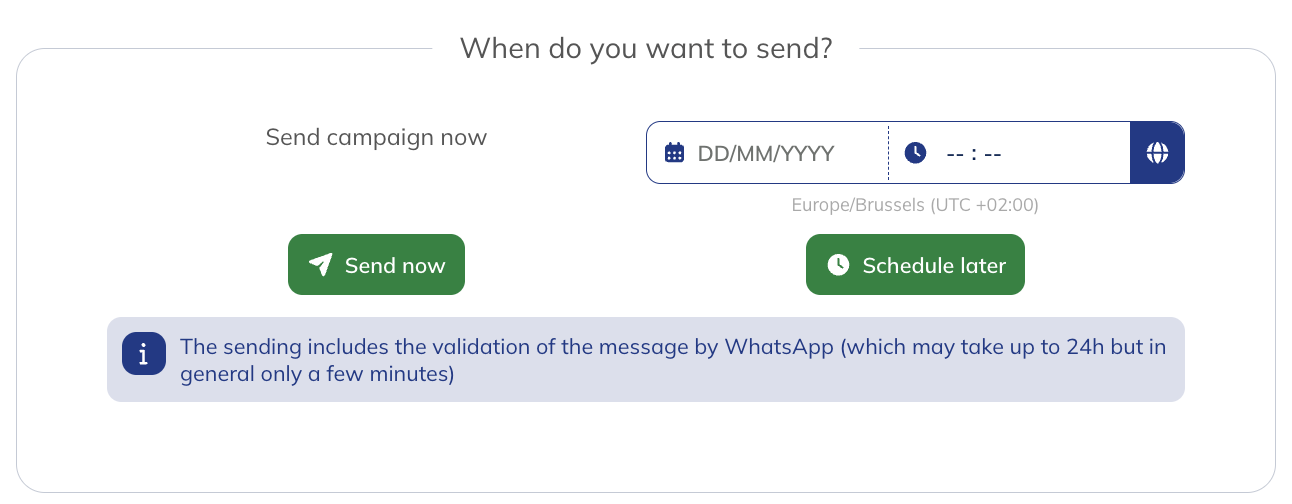
Step 5: Sending
At the final step, you can view an overview of the previously defined "General data", "Target group" and "Message", allowing you to double check all parameters of the campaign.
After reviewing these parameters, depending on the type of campaign you chose:
- One shot: you can send the campaign immediately or schedule it for later
- Scenarized or transactional: you can activate your campaign
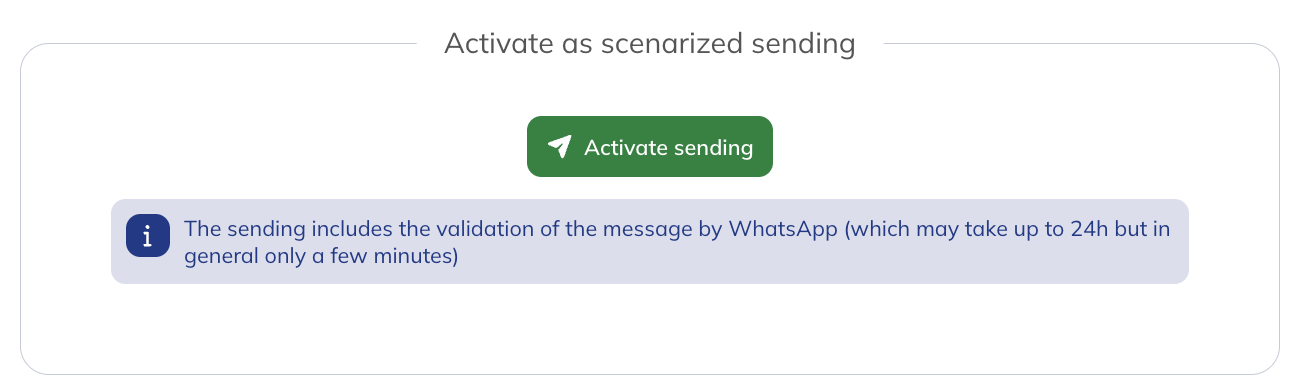
Once you have chosen the sending time, a sample will be sent to Meta for validation. This validation is carried out by an automated system and usually takes only a few minutes. However, by Meta's terms of use, it can take up to 24h.
We found that in practice, it is never so long, granted that you follow the Meta guidelines.
The validation process starts as soon as a campaign is scheduled. To guarantee sending the campaign at the time of your choice, we advise to schedule it at least 24h in advance.
As soon as the validation is finished, the user who created the campaign will receive a WhatsApp validation report.