Engage with an Actito form
The first step of this Engage integration is to prepare a standardized form in Actito, which will be used to store the participations.
To help you with this task, Actito can deploy a ready-made form that will be pre-configured with all the standard questions.
It will require only minimal adaptations to fit it to your profile table, helping you have a functioning form to collect data from Qualifio ready in no time.
To deploy this form in your license, please contact your account manager or Actito support, and specify on which profile table it should be created.
Once the form is deployed, it will be available in the drafts of the "Forms and pages" module, where you will be able to finalize and activate it.
You can complete this step in autonomy by following the walkthrough below.
If you want the help of Actito teams to set-up the integration, do not hesitate to contact your account manager.
Standard Engage form finalization walkthrough
Go to the drafts section of the "Forms and Pages" module and select the form named "engageCampaigns-{your profile table name}".
If multiple forms are deployed on the same profile table, the name of the form will be suffixed by a numeric increment.
A specific configuration in Qualifio is required to integrate Engage campaigns with multiple forms in your license. Please discuss it with your account manager.
Then click on "Edit" to start creating your form.
Steps 1, 2 & 3
This form is only used for its capability to store data, not for its layout. Profiles will never see its design, as they will participate to Qualifio forms.
Go directly to step 4, as you do need to modify anything on the first 3 steps: the form is predefined with basic info from your profile table.
Steps 1, 2, 3, 5, 7, 8 and 9 can be skipped altogether during the creation of the form, as they have no impact.
Step 4 - Define questions
All the following questions are pre-defined, they match all the standard fields that are synchronized by default. That encompasses both the technical data of the participation, and the data identifying the participant.
All these questions are synchronized automatically by the integration. Please make sure to keep all of them in your Actito form, even if your profile table does not contain these attributes. Indeed, a missing mandatory question may stop the whole integration from working.
You can choose which identity questions are asked in your campaign on Qualifio, only the Actito form must include all standard fields.
Here are, for information, all the predefined questions, their name and their type:
| Data | Question text | Presentation type & answer type |
|---|---|---|
| First name | firstName | Open field - Text |
| Last name | lastName | Open field - Text |
| emailAddress | Open field - E-mail address | |
| Address | addressStreet | Open field - Text |
| Number | addressNumber | Open field - Text |
| Box | addressBox | Open field - Text |
| Zip | addressPostalCode | Open field - Text |
| Locality | addressLocality | Open field - Text |
| Country | addressCountry | Radio buttons – Country |
| Birthday | birthDate | Open field - Date |
| Gender | sex | Radio buttons – Gender Value : "M" or "F" |
| Function | profession | Open field - Text |
| Phone | telephoneNumber | Open field - Phone number |
| Company | company | Open field - Text |
| Campaign name | surveyName | Open field - Text |
| Campaign Type Id | surveyType | Open field - Text |
| Time of the participation | surveyDate | Open field - Date (YYYY-MM-DD) |
| Participant device name | deviceName | Open field - Text |
| User Agent | userAgent | Open field - Text |
| Update source | updateSource | Open field - Text |
| Campaign language | motherLanguage | Drop-down list – language |
You do not need to edit the existing questions. You will only need to add a question based on your profile table. Such as the subscriptions question which is mandatory for a successful integration.
In addition to the subscription question, you can define other custom fields to retrieve data other than standard data.
Adding the Subscriptions question
In addition to these 21 predefined questions, you also need to add an extra question based on the Subscriptions present in your profil table. This is done manually because the answers need to match your subscriptions.
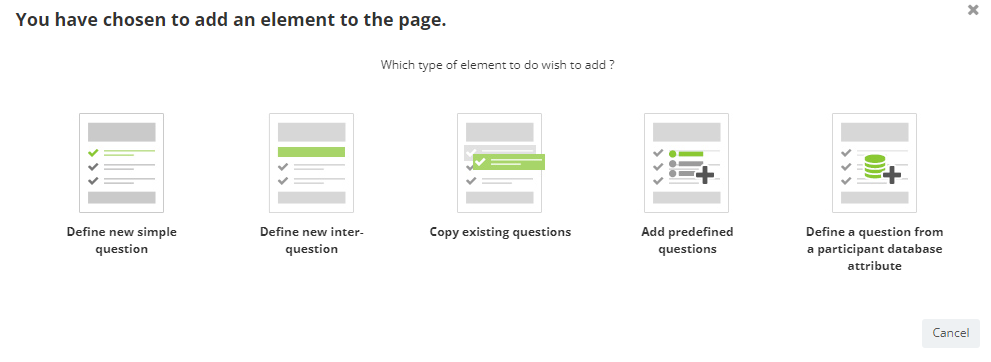
To do so, click on "+ Add page element" at the bottom of step 4.
Then choose "Define a question from a participant database attribute"
In the list of attributes, choose the "subscriptions" option, identified by a multi value icon.
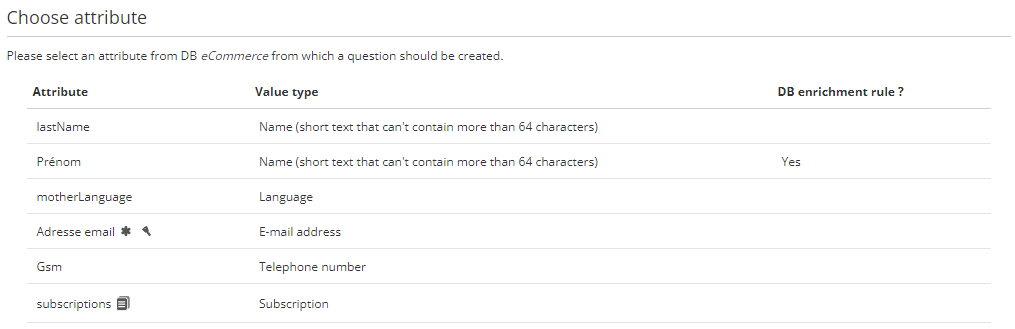
Keep the default text and leave the checkboxes empty (database enrichment will be defined at a later step). Click on "Finish".
The question is created with all the existing subscriptions of the profile table as possible answers!
These 22 questions are required to synchronize all the standard fields of the Engage integration. You can also create additional questions to synchronize custom fields.
Step 5 - Define additional pages
There are no settings required at this step. You can skip this part.
Step 6 - Database enrichment
Database enrichment is what allows to create or update profiles in your profile table based on the form participations.
It is actually optional in the scope of the Engage integration: even without enrichment, participations will be synchronized between Qualifio and Actito and all the data will be stored in the form participation itself.
Nevertheless, enrichment is a major advantage of forms. We advise to always define at least a rule based on a key attribute (i.e. emailAddress) to make the link between the participation and a profile (and to create them if they do not exist). The key must be associated to a profile to start a scenario, for instance.
If the key of your profile table is the e-mail, it is easy to ask participants to your Qualifio campaign to identify themselves through their address.
If it is rather a customer ID, you will need to add a (hidden) question that you will be able to prefill with data from your profile table when you share your Qualifio campaign through an Actito channel.
- Create a new rule
- In the rule definition, select the following options:
- When the participation to the form is complete
- Enrichment mode: mixed
- From the database attributes to the left, drag the key attribute to link profiles and drop it on the enrichment rule.
- Then click on the "Edit" button to the left of the key attribute selected
- Select "Keep current attribute value"

This is the base required to link the participation to a profile. Enrichment rules can be set up for all questions that match a profile table attribute. You will find additional instructions and best practices for enriching profile tables.
Steps 7, 8 & 9
There are no settings required at these steps. You can skip this part and go back to the drafts for the next step.
Defining the technical names
The participation on Qualifio will be pushed to Actito by API through the technical names. It is therefore very important.
The technical name of the 21 predefined questions will be set already, but you will need to assign the correct technical name to the "Subscriptions" question created at step 4.
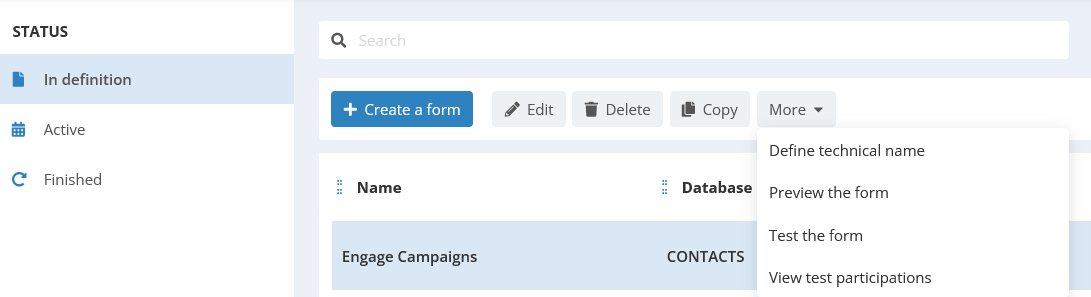
Go back to the list of draft forms, select the form, and click on "More" and "Define technical name".
Survey
This is the technical name of the form itself, that you will link to your Qualifio integration.
It is predefined as "engageCampaigns*{profiletablename}*", without the hyphen of the display name.
Questions
The technical names of the 21 predefined questions are already set. For information, they are listed below.
Unlike the form name, which allows some customization, it is mandatory that the technical names of the questions exactly match the specifications below. Please do not modify them.
| Short text | Technical name |
|---|---|
| First name | firstName |
| Last name | lastName |
| emailAddress | |
| Address | addressStreet |
| Number | addressNumber |
| Box | addressBox |
| Zip | addressPostalCode |
| Locality | addressLocality |
| Country | addressCountry |
| Birthday | birthDate |
| Gender | sex |
| Function | profession |
| Phone | telephoneNumber |
| Company | company |
| Campaign name | surveyName |
| Campaign Type Id | surveyType |
| Date of the participation | surveyDate |
| Campaign's language | motherLanguage |
| Participant device name | deviceName |
| User Agent | userAgent |
| Update source | updateSource |
In addition, you need to define the technical name of the "Subscriptions" question defined at step 4.
It must be "subscriptions".
Input it and click on "Validate".

Step 10 – Publish the form
Go to back to the edition of the form to publish the form
- Select the access: Public address, anyone can have access.
- You don’t have to copy and paste the URL of the Actito form, as participations will be pushed directly from Qualifio by API.
Now that your form has been created, you can configure the integration in your Qualifio interface.
Synchronizing custom fields
By default, Engage already synchronizes a lot of data, including information related to the campaign as well as personal info related to the participant.
But depending on your business, there are many more pieces of information that you may want to collect, such as what are the hobbies of the participant, do they own a car or anything related to the scope of your brand.
Before creating and configuring custom fields, you must complete your Qualifio integration.
This is why you have the possibility the create additional fields that will be synchronized between the Qualifio campaign and the Actito form, to help you activate the profile thanks to the data relevant to your business.
If the key of your profile table is not the e-mail address but rather a client ID, a custom question must be created for this client ID to enable you to enrich your profile table.
You will be able to hide and prefill this question when your share your Qualifio campaigns through Actito channels.
You can complete this step in autonomy by following the walkthrough below. If you want the help of Actito teams to set-up the integration, do not hesitate to contact your account manager.
Step 1 - Create the field to store the data in the Actito form
In the Actito platform, go to the Form and Pages module and select the form you have activated.
- Click on "More" then "Correct"
- Go to step #5 "Define question"
- Create a new question:
- Define simple question or define a question from a participant profile table attribute if the attribute already exists in the profile table
- Question text should be the "name of your field"
- Presentation type: open field, radio buttons or according to the answers
- Answer types that can be used:
- Open field types accepted:
- Text
- Integer
- Date
- Radio buttons accepted:
- Boolean (yes/no)
- Multiple checkboxes (for multi values data)
- Text
- Open field types accepted:
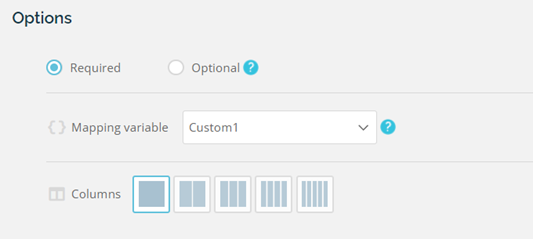
- Additional parameters:
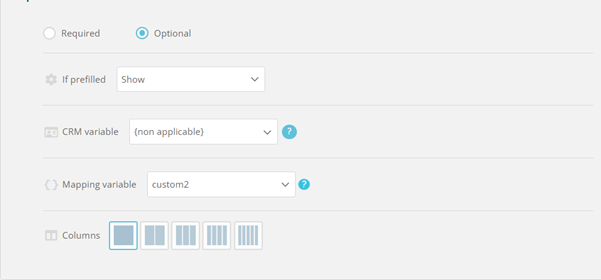
- Keep Optional
- Maximum of characters: keep the current value
- Pre-fill the answer: no value
- Open text field length: keep the current value (empty)
- Display condition: keep the current value (always visible)
- Research and reporting: "name of your field" – without space
- Go to the last step to correct and publish the form again
You now have a new question matching you custom field.

Step 2 - Assign a technical name to your field
After publishing the form, select it and click on "More", then "Define technical name".
Assign the technical name of your field (without spaces), and take note of it.

If you delete a question on the engage campaign form on Actito, the question will still appear in the structure of the form (target module, the personalization module or API). There is no true deleting. We recommend no to delete questions.
This means that, while there are no hard limits to the number of fields synchronized by Engage, you should avoid creating questions that will be used for one campaign and never again. You can create "placeholder" fields, that will accept different answers depending on the campaign
Step 3 - Set the new mapping variable on Qualifio Portal
Go back to the Qualifio portal.
Remember you can use the SSO.
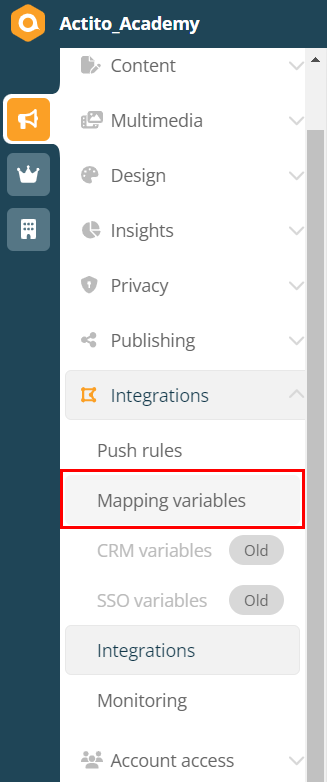
Go to the "Integrations" section and select éMapping variablesé.
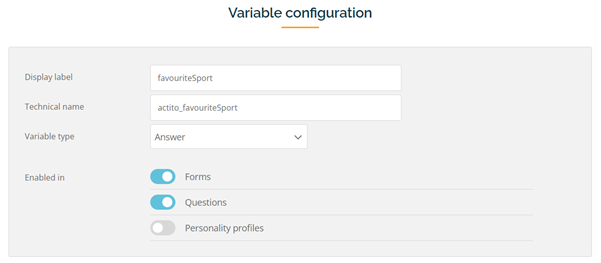
- Set a display name with the technical name set on the step #2
- Set a technical name with the technical name set on the step #2 with the prefix "actito_". For instance, the "myCustomField" field becomes "actito_myCustomField".
- Keep the variable type as "Answer".
- Enable this mapping variable for questionnaire and/or forms (see step 4 for practical applications).
Step 4 - Use the custom variable in your campaign
Depending on the settings chosen at step 3, you can use your custom variable:
- At the "Questions" step of your Qualifio campaign. This is where you define the quiz proper, namely the interactive part of the campaign. Simply choose the relevant mapping variable in the options.
Using a custom variable in the Questionnaire allows you to collect additional data from your profile while making it part of the "game".
- At the "Forms" step of the campaign, where you collect the personal information of the participant such as the Identification questions. But you can also write your own questions, then map them with a custom variable to push the answer in Actito.
Using proper question formats
Make sure that the format types of the questions are matching on both Actito and Qualifio. Please mind the following comparison table when setting up custom fields.
| Type of data | Type of answer on Actito | Type of question on Qualifio | Value of questions on Qualifio | Type of data to enrich on Actito profile table |
|---|---|---|---|---|
| Text | open field - text | Single answer - Answer buttons - Radio buttons - Clickable images br/> - Drop down list - Related drop-down list Multiple answer - Alphanumeric field with instant check Open-ended questions - Text box | Text – be careful about the characters limit if using enrichment rules | Text attribute |
| Integer | open field - integer | Single answer -Answer buttons - Radio buttons - Clickable images - Drop down list - Related drop-down lists Open-ended questions -Numeric field | With an integer as a value | Integer attribute |
| Date | open field - date | Open-ended questions - Date field | Date attribute | |
| Boolean | Radio buttons – yes/no | Single answer - Answer buttons - Radio buttons - Clickable images - Drop down list - Related drop-down lists | With a value: true/false | Boolean attribute |
| Text multi-values | Multiple checkboxes – text | Multiple answer - Checkboxes Ranking | Warning: all answers values set on Qualifio must be also set on Actito answers | Text attribute with multi-values |
Step 5 - Enriching profile attributes
Enrichment can be applied to all questions corresponding to a profile table attribute, the answer to which can be used to update the profile table. For example, updating personal information (last name, first name, etc.), subscription values, or custom fields.
As a reminder, it is mandatory to match a participant to a profile in the profile table.
To enrich a profile table, you'll need to define a custom data enrichment rule on your Actito form.
- From the Actito portal, go to the Forms and pages module
- Select your active "Engage campaigns" form
- Click on "More" and "Update database enrichment"
According to you goal, you must define you own business rule in addition to the pre-defined enrichment rule based on the key of the profile table.
The enrichment rules will be executed each time when a participation is added by Qualifio.
For detailed explanations about enrichment rules, we invite you to read Enriching a database.
Subscription use case
You want to subscribe new profiles and existing profiles to your newsletter subscription if they give their consent. For already existing profiles, if the profile doesn’t give their consent again, you don’t want to unsubscribe him.
From the database attributes to the left:
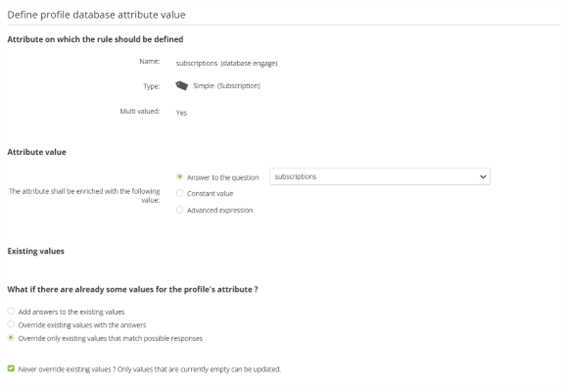
- drag the "Subscriptions" attribute and drop it on the enrichment rule. Then select the question used to enrich your attribute ("subscriptions").
- if not done already, drag the key attribute (ex.: emailAddress) and drop it on the enrichment rule, then select the question matching this attribute.
Then click on the "edit" button next to each attribute:
- For "Subscriptions"
- Select "override only existing values that match possible responses"
- And "Never override existing values. Only values that are empty can be updated"
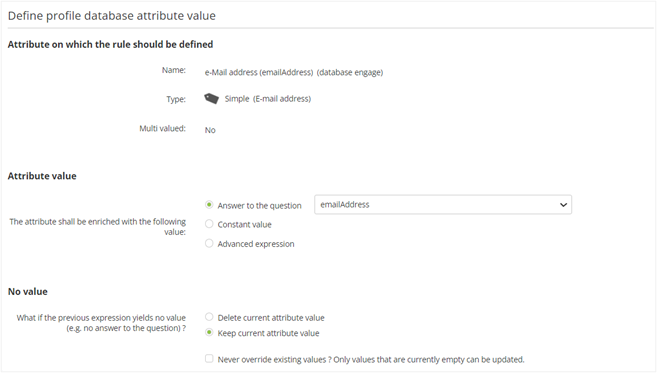
- For the key attribute ("emailAddress" in our example)
- Select "Keep current attribute value" if no value is captured during the participation to the Engage campaigns
Continue the process for each attribute that must be updated from a question.
Defining the behavior for empty values
For each attribute to enrich, you must define:
-
What is the behavior if Actito if an empty value is collected for an attribute?
- Delete the current value and update with an empty value
- Do nothing and keep the current value
- Update the current value only if the attribute is empty (otherwise the existing value is kept)
-
For multivalue attribute only, if a list of possibles values is set on Actito side, then select "Override only existing values that match possible responses" to avoid erasing possibilities that are not in the Engage campaign. This is very useful if you have many subscriptions in Actito, but only want to display a reduced selection of optins in Qualifio.
Example: You collect the first name of your profiles trough an Engage campaign. The participant doesn’t answer to question. An empty value is captured.
| "No value" management | The first name attribute is empty on the profile table | The first name attribute is "John" in the profile table |
|---|---|---|
| Delete current attribute value | Actito replaces the empty value by an empty value | Actito replaces the "John" value by an empty value |
| Keep current attribute value | No enrichment, Actito keeps an empty value | No enrichment, Actito keeps "John" |
| Never override existing value. Only values that are empty can be updated | No enrichment, Actito keeps an empty value | No enrichment, Actito keeps "John" |
Example: You collect the first name of your profiles trough an Engage campaign. The participant answers "Johnny" to the question.
| "No value" management | The first name attribute is empty on the profile table | The first name attribute is "John" in the profile table |
|---|---|---|
| Delete current attribute value | Actito replaces the empty value by "Johnny" | Actito replaces "John" by "Johnny" |
| Keep current attribute value | No enrichment, Actito keeps an empty value | No enrichment, Actito keeps "John" |
| Never override existing value. Only values that are empty can be updated | Actito replace the empty value by "Johnny" | No enrichment, Actito keeps "John" |
Particuliar case: Enriching Custom table attributes
Standard enrichment rules can be used by default to update the Profile table. They cannot be used to directly push data into custom tables (like Interaction and Linked Data tables).
Nevertheless, there are alternatives to Push data collected by Engage campaigns into custom tables, by using Actito's integration framework:
- Define a "Participation" export of the Engage campaigns form
- Define a scheduled ETL to the relevant custom table(s).
The data can be kept entirely inside Actito by using the Transferbox to export the participations and to reimport them directly, or it can be used to update your CRM. In this second case, the data would be pushed into the custom tables through your usual daily synchronizations.
Do you need to push Engage data into custom tables? We advise you to contact your account manager to start a project with our Integration & Data experts.