Profile data import
Your profile table contains all the useful contacts to set up your marketing automation. In order to increase its size, Actito allows you to import profiles from an Excel or .csv file.
It is important to allocate time and pay necessary attention before importing data, because it can impact your marketing automation and your existing profile table.
Moreover, if Actito is not "master" of the data that you want to modify, a manual import might not be the best option.
To import profiles in Actito, you first need to:
- Have created a profile table. For more information, see the article about the creation a profile table.
- Have created all the necessary attributes in this profile table. See how to add an attribute to the profile table.
Necessary material:
- An Excel or .csv file containing all the data that you want to add to your profiles.
Preparing your import file
Before starting your import, your data must be structured in a file. There are several possibilities, the most common being an Excel or .csv file organized by columns.
Your file must be organized in columns, with the name of the attribute (e.g. emailAddress) as a column title and the value of the attribute for the profile (support@actito.com) as value in each line.
Filter the columns of your file and delete all empty lines

When you import profiles in Actito, we advise you to include the three following pieces of information:
- A subscription: it is your authorization to contact the person
- An e-mail address, a phone number, or any other contact information
- A key (or unique attribute) which:
- ensures that each individual is only found once in your profile table
- function as a link when updating data
The aim of these constraints is to ensure the quality of your data, in order to enable you to use them correctly and easily in the future.
To enable automatic attribute mapping for your subscriptions, the column name should be sub_{subscription}.
To enable automatic attribute mapping for your segments, the column name should be S_segment.
- To declare that profiles belong to a segment in an exclusive segmentation, enter the segment name.
- For a simple segmentation, enter "Member" if the profile belongs to the segment, and leave the field empty if it does not.
Starting your import
To begin with, go to the Imports app (Apps > Data > Imports).

Then click on "Create an Import".

You can choose between creating your profiles import from blank, or from an import configuration.
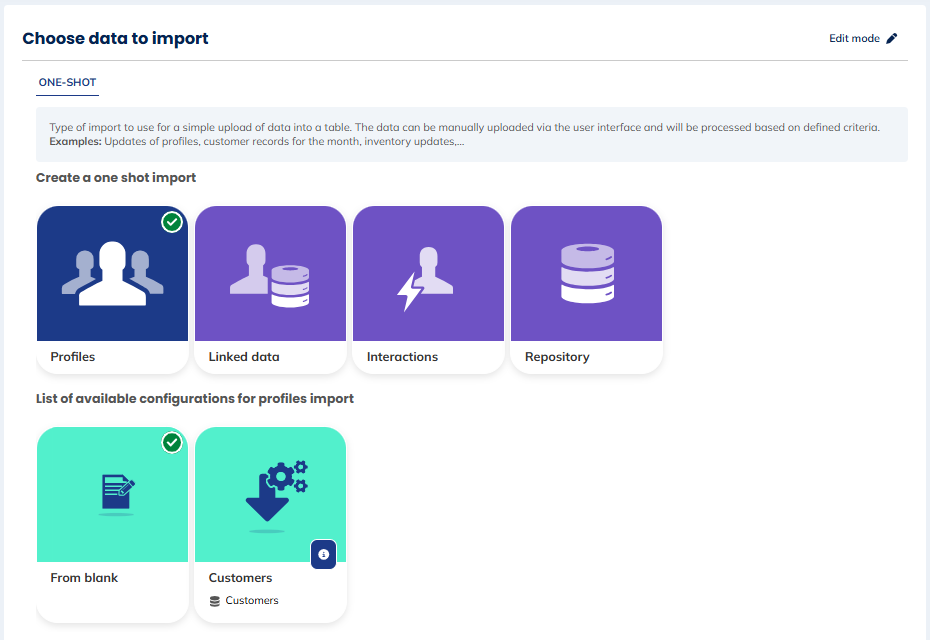
An import configuration is a predefined import template which will be useful if you repeat the same kinds of imports several times, from a file whose columns are in the same order. In order to see the configuration of the import, you can click on the "View details" button. Everything is summarized, including the data parameters and the transformations that might have been applied.
You can save a configuration at the end of an import process and use it for your next import.
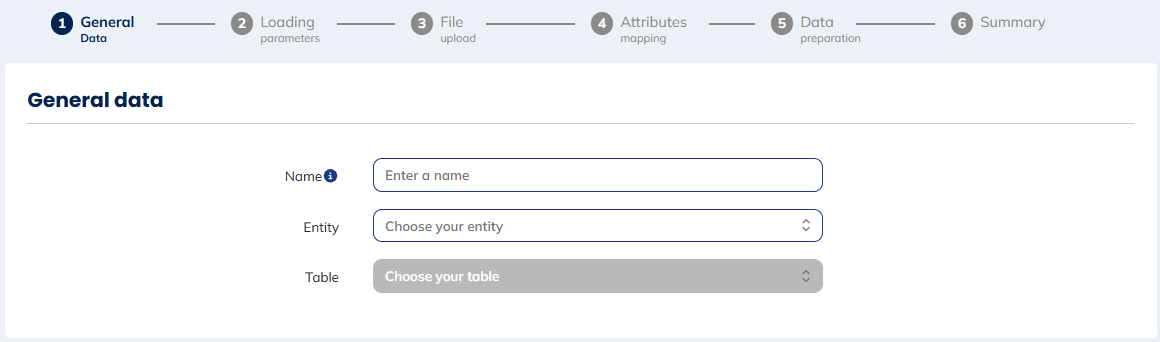
Step 1: General data
Choose a name and select the profile table in which you want to import your profiles.
Step 2: Loading parameters
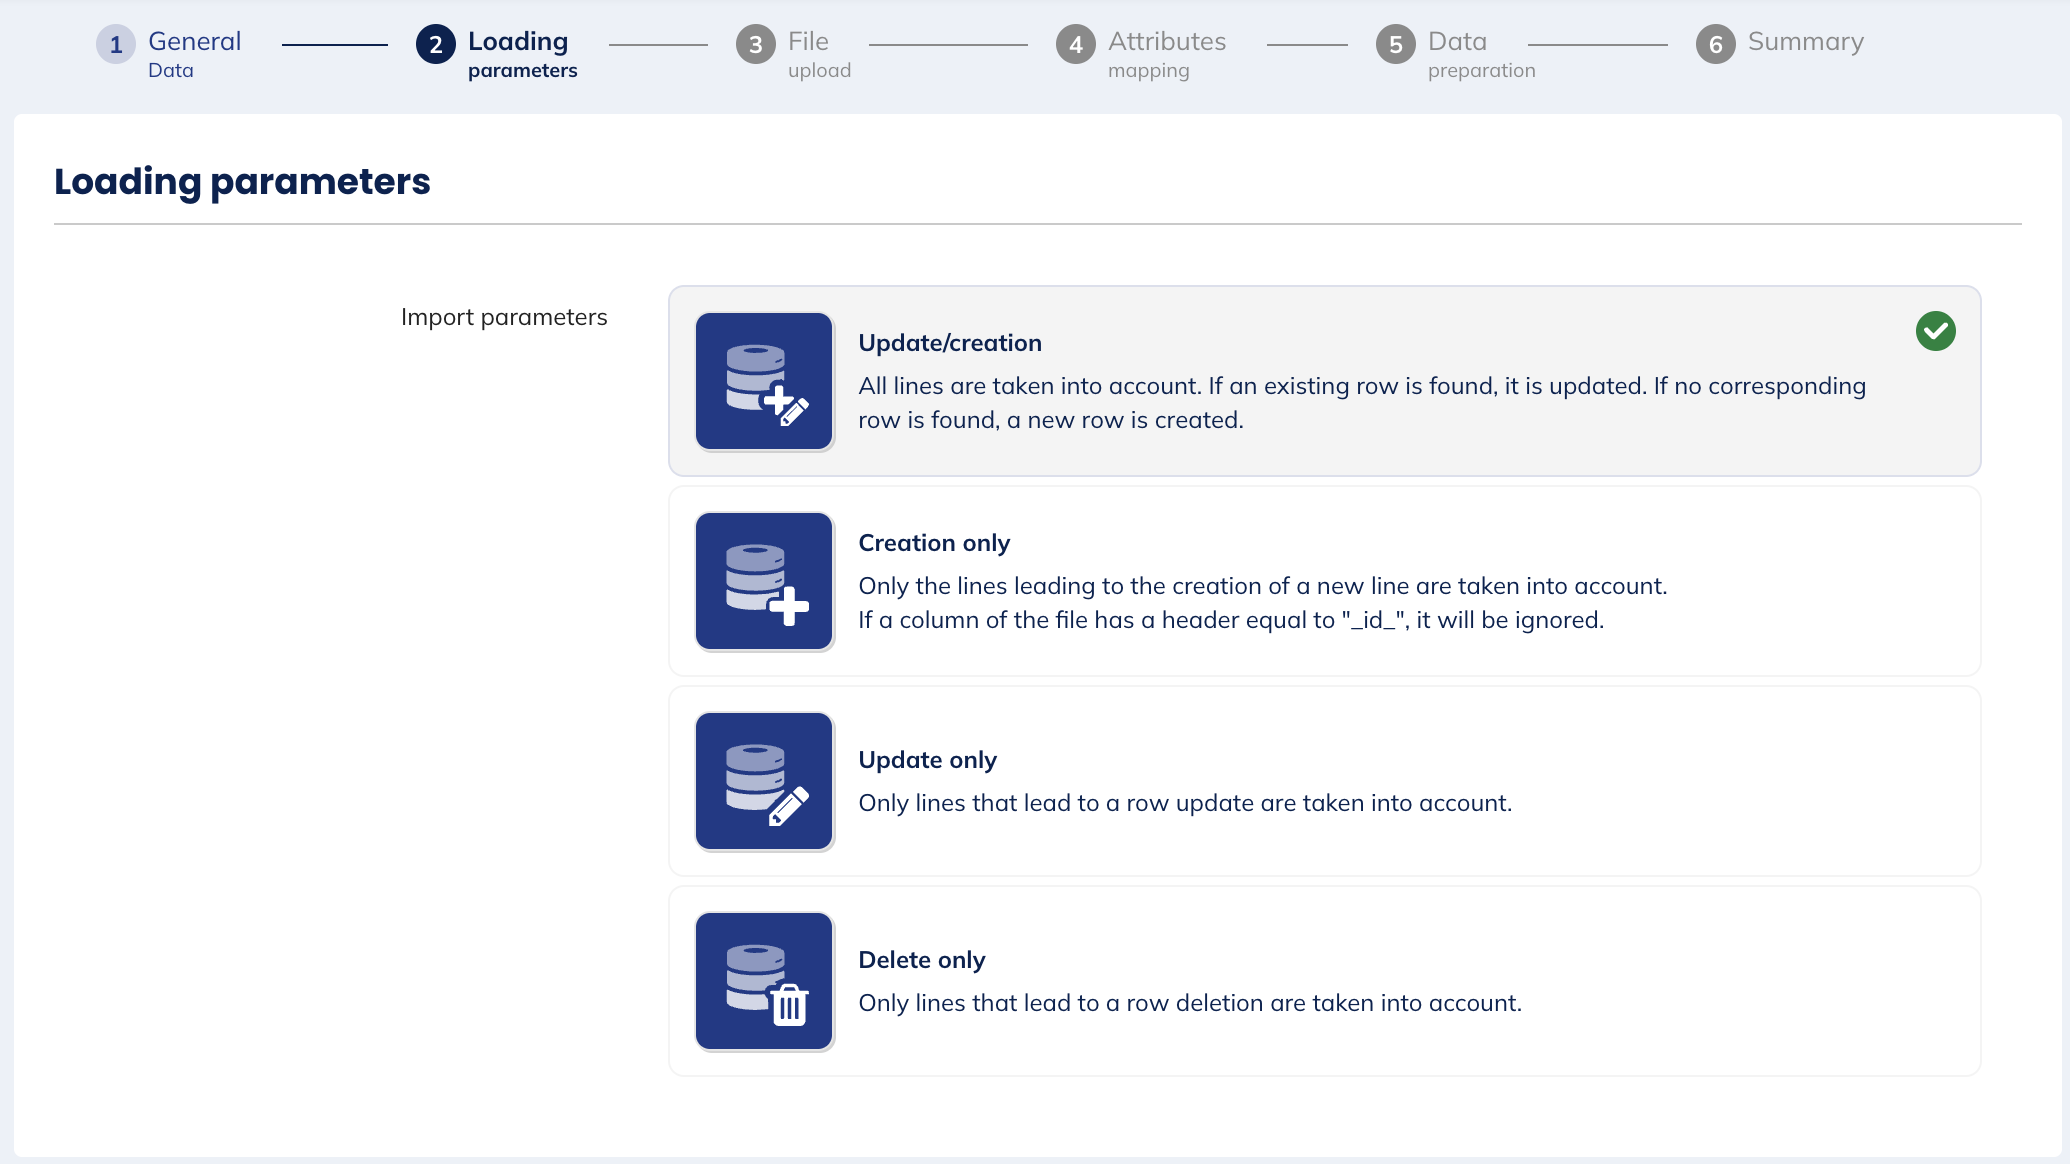
You have four import behavior options:
- Update/Creation: All lines are taken into account. If an existing row is found, it is updated. If no corresponding row is found, a new one is created.
- Creation only: Only the lines leading to the creation of a new line are taken into account.
- Update only: Only the lines leading to a row update are taken into account.
- Delete only: Only the lines leading to a row deletion are taken into account.
To allow an update, a key attribute is required in your profile table. It must be present in your import file and mapped, as explained at step 4.
In each case, profiles which could not be imported will be identified and you will be able to download them in order to analyze them after the import.
Depending on the import type, you will have to choose the appropriate configuration.
For a deeper understanding, please find below some specific cases and how to manage them
There are three typical cases:
- Only adding new profiles: if you only import new profiles, you can choose the "Creation only" mode.
- You only want to update contacts: if all your contacts are already in your profile table but you want an update (due to the acquisition of new information), please choose "Update only".
For each attribute, ask yourself the following question: "Is the information more recent/relevant in my Excel spreadsheet than in Actito?". Only import columns for which the answer is "yes".
Subscription data is likely to be more recent in Actito that in your import file. Please do not map the "subscriptions" column if you update profiles.
- Mixed mode (Update and creation): if your file includes profiles that are already in your profile table and others that are not in your profile table, or if you do not know which are present or not, you might want to use the "mixed" mode. However, this raises a potential risk: if some profiles unsubscribed following a previous campaign, you would register them again. This is not something you want to do.
How to avoid that? You will have to import your data in two steps:
- Step 1: Update all the existing profiles without subscription information. Choose the "Update only" mode and do an import without selecting the subscription column ( do not map it or do not put it in the file).
- Step 2: Add the "subscriptions" column to your Excel file (or map it at the "attribute mapping" step) and import your file again in 'Creation only' mode. In this way, only new profiles will be added and subscribed.
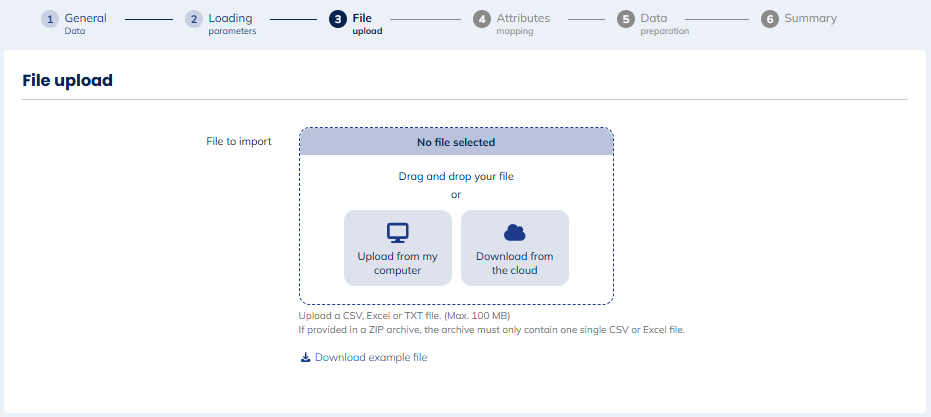
Step 3: File upload
Choose the file you want to import, either by uploading it from your computer or downloading it from the cloud.
The file can be a .csv, .txt or an Excel file of maximum 100 MB. It can be uploaded from your computer or from a cloud location configured in your license, namely the transferbox or a FTP. Various separators and formats are available, but must be specified.
The details will be automatically filled in:
- the compression type (ZIP, GZIP or none): will be detected
- the format (CSV or TXT semi-colon separated, CSV or TXT comma separated, CSV or TXT tab separated, Excel or, for deletions only, CSV or TXT one column without separator): CSV or TXT semi-colon separated by default
- the encoding (UTF-8, UTF-16 Little Endian, ISO-8859-1, CP1252): UTF-8 by default
- the file with header: This button (which is toggled by default) specifies if the fist line of the file is the header of the columns. A file with headers makes the data mapping easier. If it doesn't contain nay, the next step will follow the order of the columns.
Compressing the file is not mandatory but can hold more data. Please try to zip your file if it is bigger than the limit of 100 MB.

Please note that there are several encoding types for .csv files.
The UTF-8 format is the only format enabling all types of characters (&éù…). Please note that Excel under Apple does not recognize UTF-8.
To avoid any encoding error on .csv files, we highly recommend you not to open the files in .csv by clicking on them (meaning direct opening of Excel), but to import them via the import task in Excel (first open Excel then search for the file via the Excel import task : "Data"/"Text file").
File format - specifications
Your file must follow specific constraints in order to be accepted.
- The size of the file must be maximum 100 MB (if the file is zipped, only the size of the ZIP counts).
- The order of the columns is not important.
- Mandatory columns must be found in the file. Optional ones can be omitted.
- Each column must be unique.
Click on the "Download an example" to download an illustration file containing the structure of your table and the expected value type for each column.
You will obtain a practical example of the format expected for this file.
Step 4: Attributes mapping
The aim of this step is to match columns of your Excel file with attributes of your profile table.
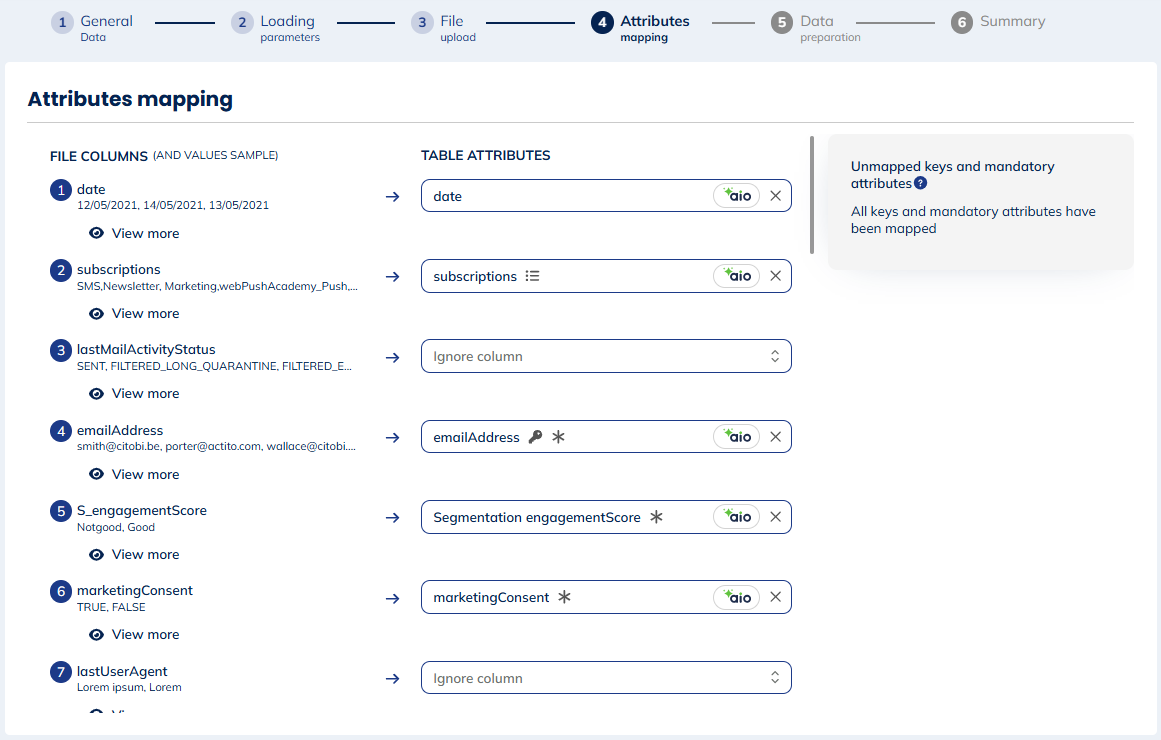
When the name of the Excel column and the attribute are exactly the same, Actito will automatically do the mapping. If not, you can easily do it by yourself.
If your file contains headers, Actito's artificial intelligence will automatically map the column to the corresponding field.
The AIO logo indicates automatically mapped fields. These remain editable manually.
You can ignore some columns, such as lines 3 and 7 of the above example.
- If the header of a column does not correspond to an attribute in the table, you will have to perform the mapping manually by selecting the corresponding field from the drop-down menu.
A sample of values is displayed below the column header. - If your file does not contain any header, you will need to perform the mapping based on the order of the columns and the sample of values serving as an example.
- If a column in your file should not be imported, keep the "Ignore column" option.
The top right box shows all mandatory (and unique) fields that have not yet been mapped.
All mandatory attributes must be mapped to allow new rows to be created, while keys identify existing rows in "Update/Creation" and "Update Only" modes.
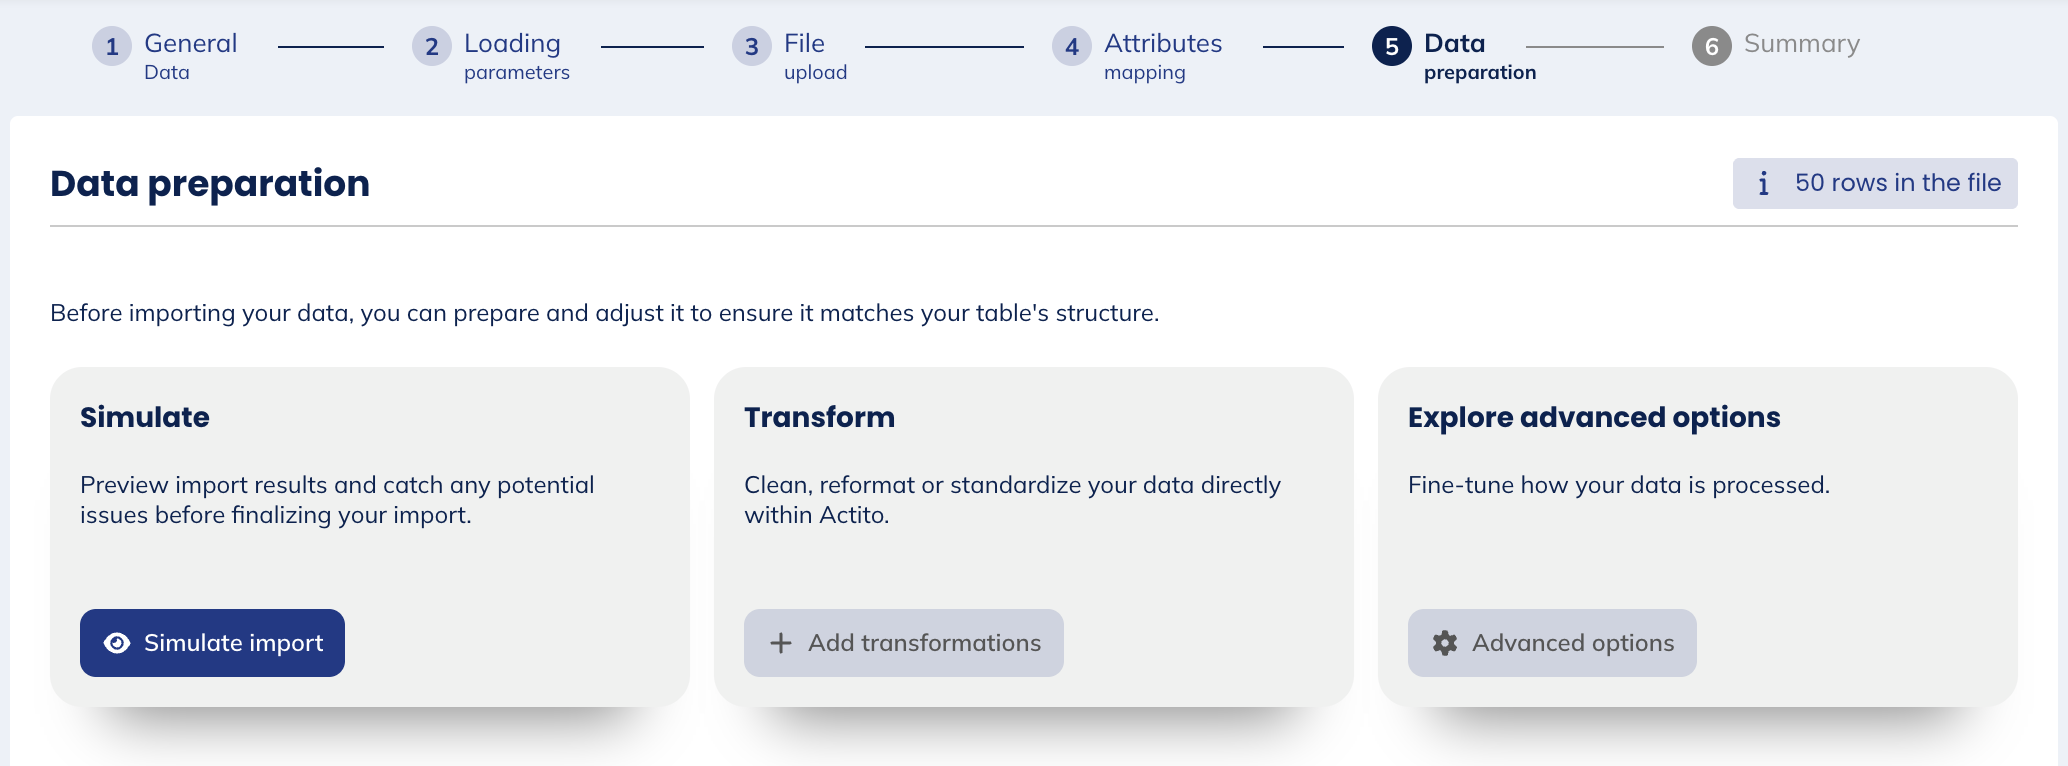
Step 5: Data preparation
Actito will let you prepare and adjust your data to ensure it matches the structure of your profile table. You have the possibility to:
- Simulate: Preview import results and catch any potential issues before finalizing your import
- Transform: clean, reformat or standardize your data
- Explore advanced options: fine-tune how your data is processed
Simulate
This allows you to run a simulation of the file loading (without actually importing the data into the concerned table) and to identify potential issues in advance.
All lines of the file are displayed, with their status. If there is no warning on the field then no error has been identified. It is also possible to filter via the “Show warnings only” button to display only problematic fields.
Once you've simulated your import, you will see the results:
- Orange lines: These are non-blocking errors, which you may want to correct or not.
- Red lines: Corrections are mandatory (there are errors in the data that will block their import)
You have access to all the features of the transform option described hereafter, including the use of transformation rules and the choice to ignore invalid values if needed.
You can relaunch a simulation at any time that will take into account any adapted transformation rules, and/or download the corrected file.
When you apply the corrections and simulate, the screen will update with the result of this new simulation, with the possibility to define a new round of transformations. This makes it possible to apply several transformation rules in succession to the same field if necessary to ensure it is in the correct format in Actito.
The advanced options are also available, as explained hereafter.
Transform
You have the opportunity to clean, reformat or standardize your data to make sure it matches the structure of your profile table. Here, you can also simulate your import to make sure your import will be accepted.
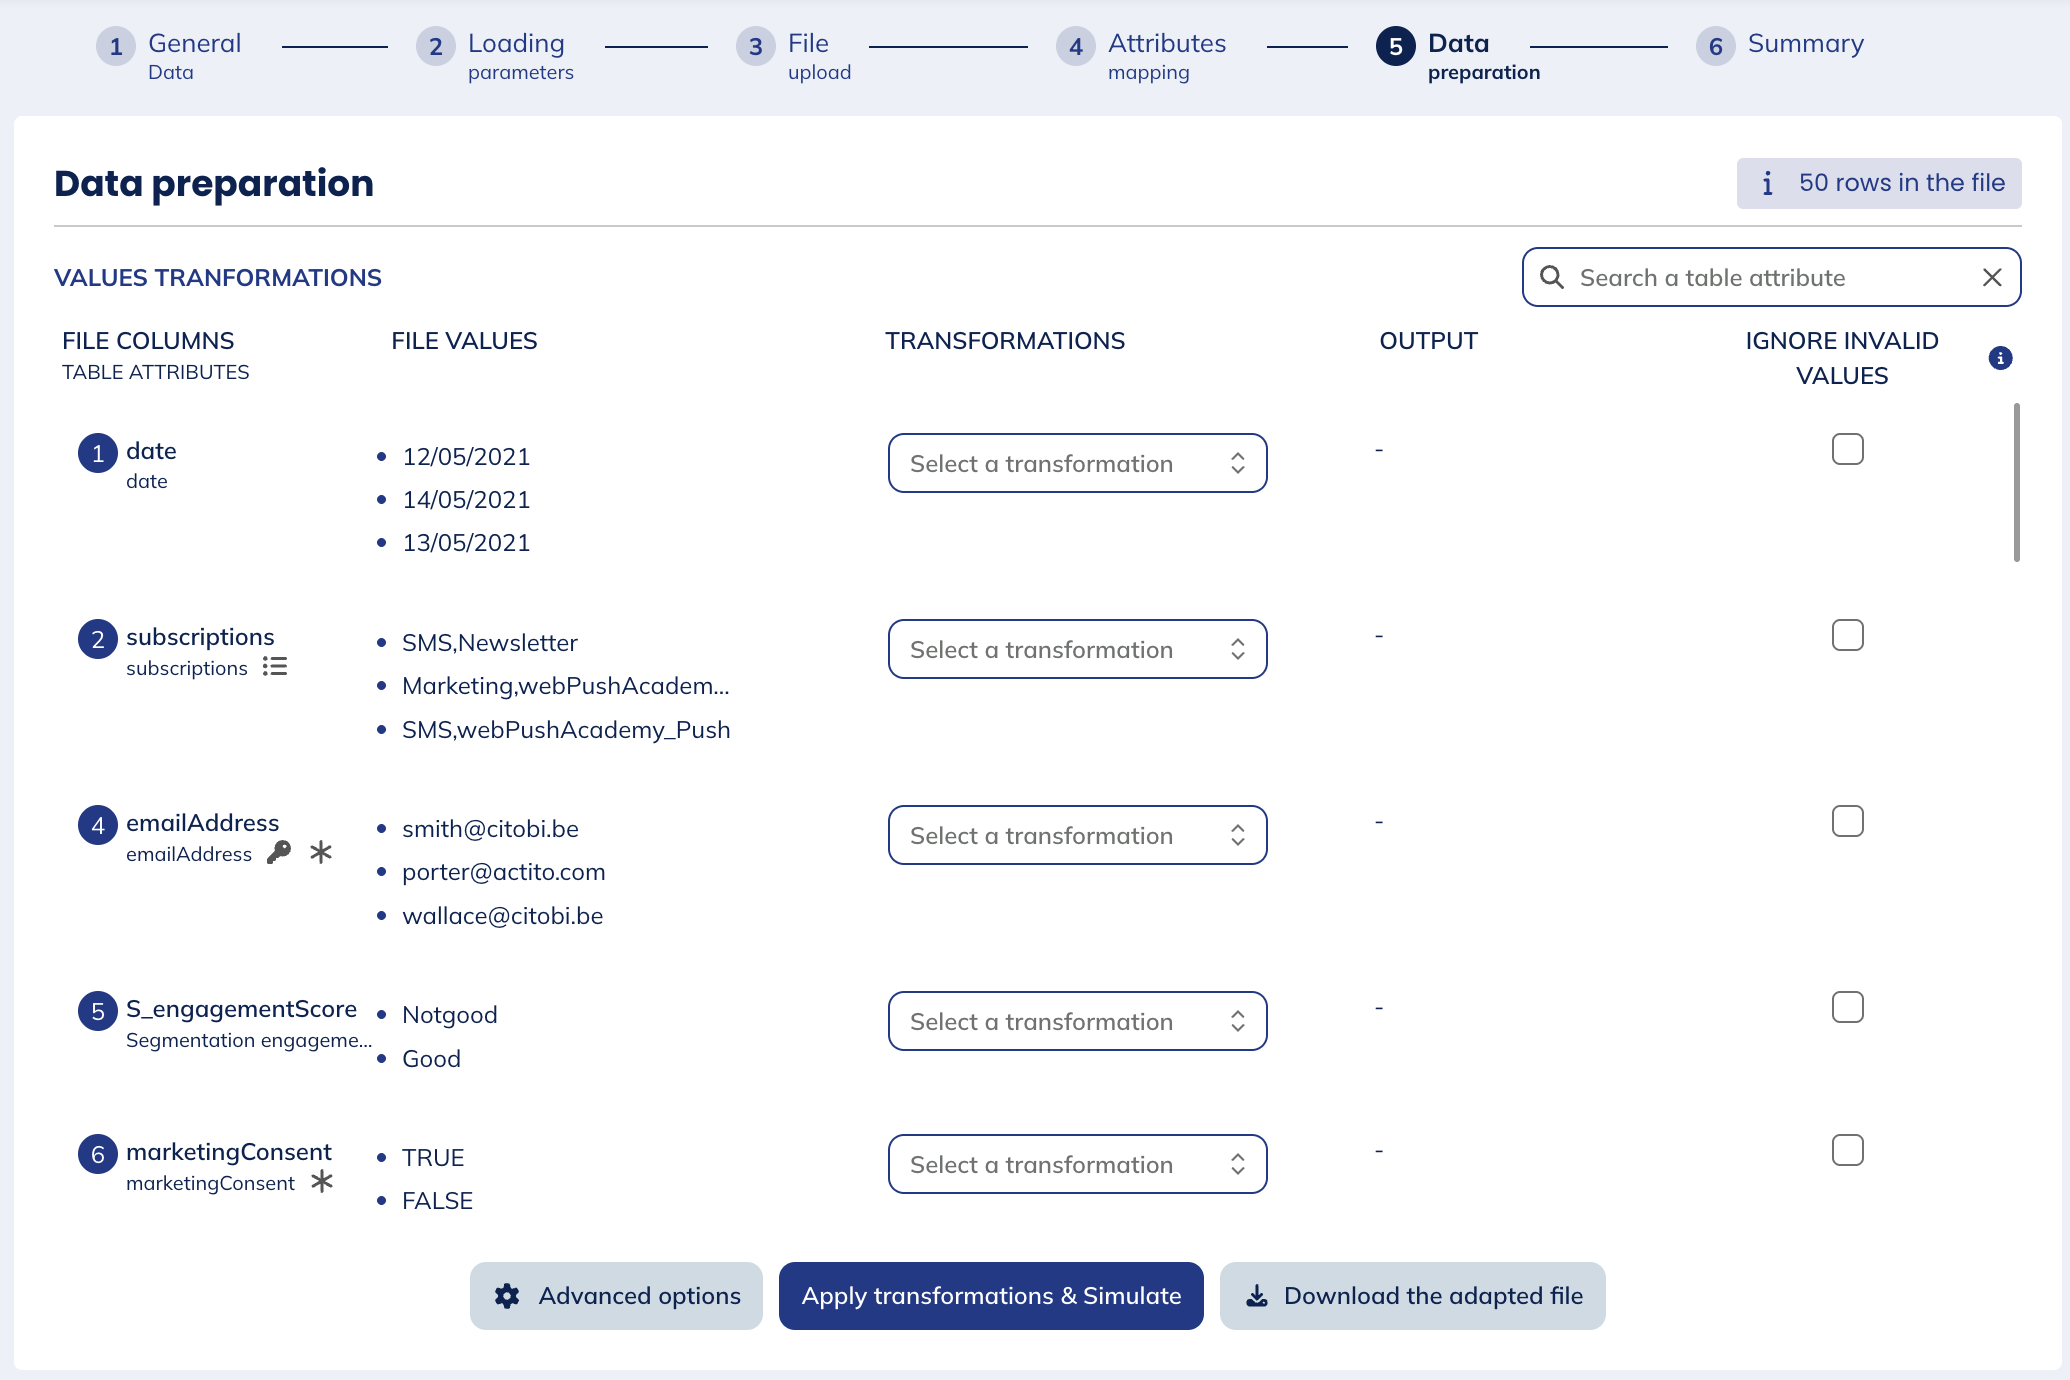
This screen allows you to:
- View the columns of the file and the mapping with Actito attributes carried out in the previous step.
- View a few values from the file for each field.
- Define transformation rules to be applied to your fields if necessary.
- Preview the result of these transformations applied to the values already displayed from the file.
- Ignore invalid values:
- If the box is unchecked, then in the case of an invalid value for this field the entire line in the file will be completely rejected, even if the other fields contain valid values.
- If the box is checked, an invalid value will simply be ignored and left empty in Actito, while the rest of the line will be imported. Note that in the case of a mandatory field, the rest of the line will still be rejected.
Here, you can select the transformation you want to apply to your data:
- Value Mapping: You will have to do a mapping between the value of your file and the expected Actito value for the attribute in question. This mapping could be compared to a simplified "search and replace" function in Excel. Once the attributes are mapped, click on "Save".
- Data Formatting
- Date: possibility to change the date and time format
- Phone: choose a default country code for phone numbers that do not have one, or select a column from your file that provides the country code values
- Specify ISO Language Code: if your file uses the ISO 639-1 format for language codes (e.g. "en"), no transformation is needed. Otherwise use this rule to specify the format used in your file so it can be converted automatically.
- Specify ISO Country Code: if your file uses the ISO 3166-1 alpha-2 format for country codes (e.g. "UK") or the complete country name, no transformation is needed. Otherwise, use this rule to specify the format used in your file so it can be converted automatically.
- Text Cleaning
- Escape special characters: convert special characters (e.g. & < >) into their escape sequences
- Unescape special characters: convert special characters (e.g. & < >) back to their escape sequences
- Remove accents (diacritics): remove accents and other diacritical marks from characters (e.g. "résumé" > "resume")
- Remove characters
- Replace text
- Text Formatting
- Convert to lowercase: convert all letters to lowercase (e.g. "HELLO WORLD" > "hello world")
- Convert to proper case: capitalize the first letter of each word (e.g. "john doe" > "John Doe")
- Convert to uppercase: convert all letters to uppercase (e.g. "welcome" > "WELCOME")
- Capitalize first letter: capitalize only the first letter of the entire text (e.g. "hello world" > "Hello world")
- Text Cropping
- Remove leading and trailing whitespaces
- Keep first N characters: keep only the first n characters from the start
- Keep last N characters: keep only the last n characters from the end
- Delete first N characters: remove the first n characters from the start
- Delete last N characters: remove the last n characters from the end
Do not forget to apply transformations once you have added them.
You may then download the adapted file to save a corrected version of your data.
Advanced options
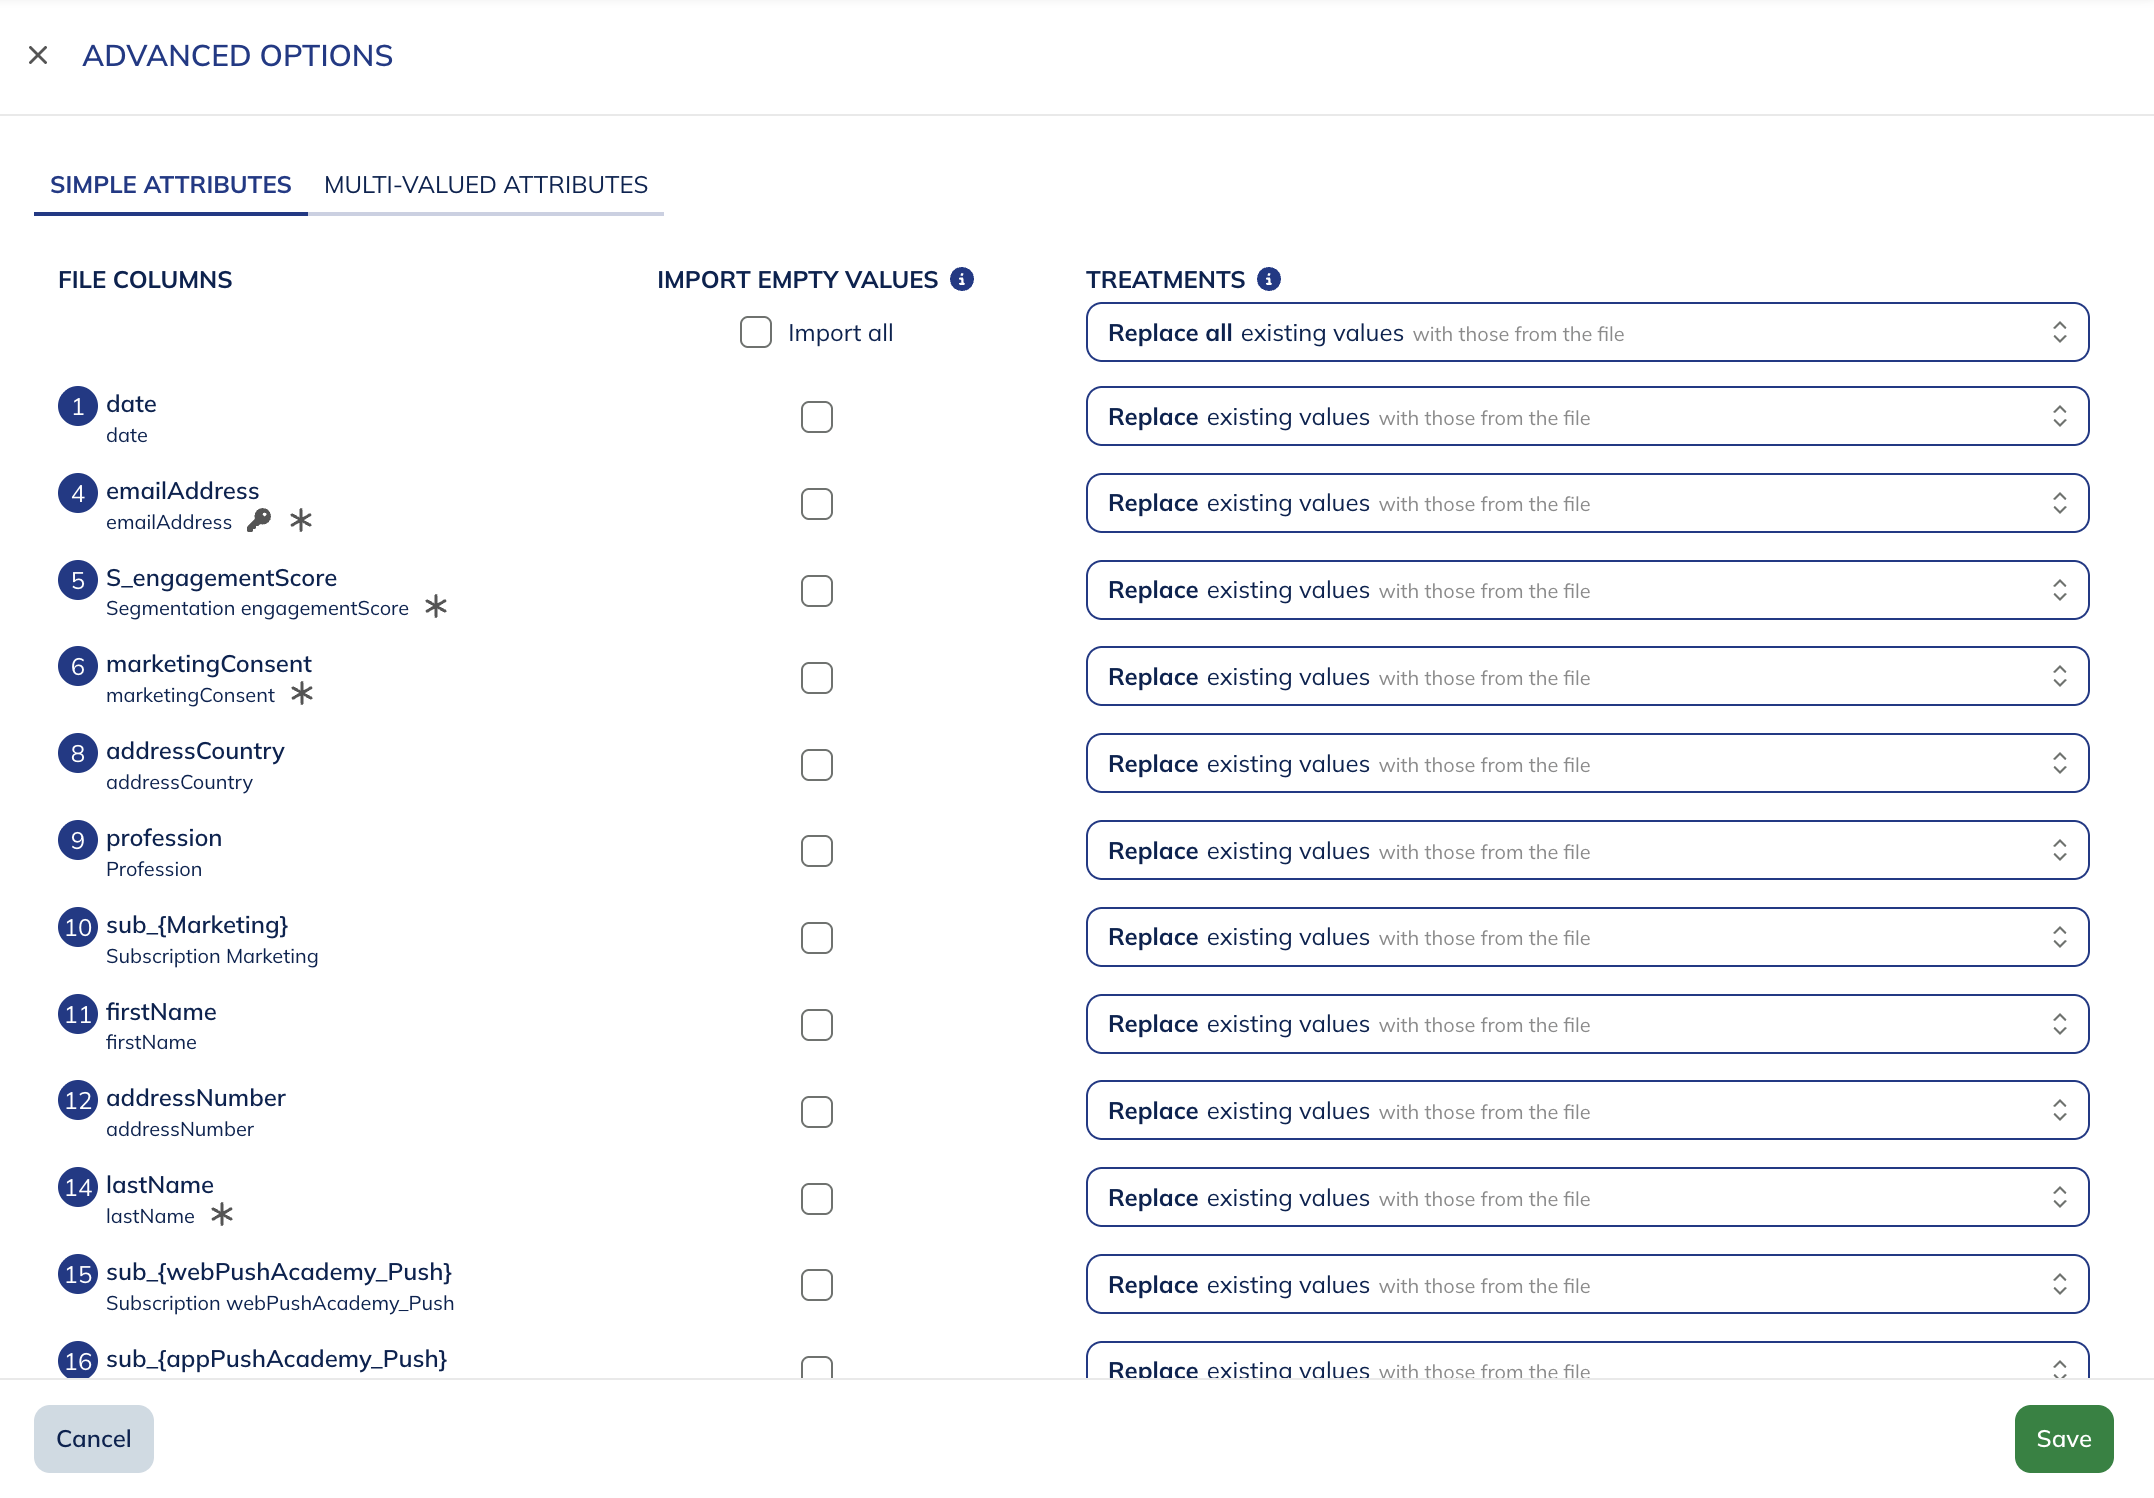
Here you can define two main behaviors:
- Handling empty values: the checkbox here defines how potential empty values in the file are handled.
- If unchecked (by default), an empty value in the file will be ignored to avoid overwriting the value already existing in Actito.
- If checked, an empty value in the file will be imported and may overwrite a non-empty value previously present in Actito.
- Processing values already in the profile table: defines how the import behaves if values already exist in the profile table.
- For simple attributes:
- Replace existing values with those in the file will overwrite the existing values in the profile table (by default).
- Keep existing values will only allow adding values in place of currently empty values, but not updating an existing value.
- For multi-valued attributes:
- Add values to existing ones (by default)
- Replace existing values with those from the file
- For simple attributes:
You can choose the desired behavior field by field or apply the same rule to all fields via the first line.
Step 6: Summary
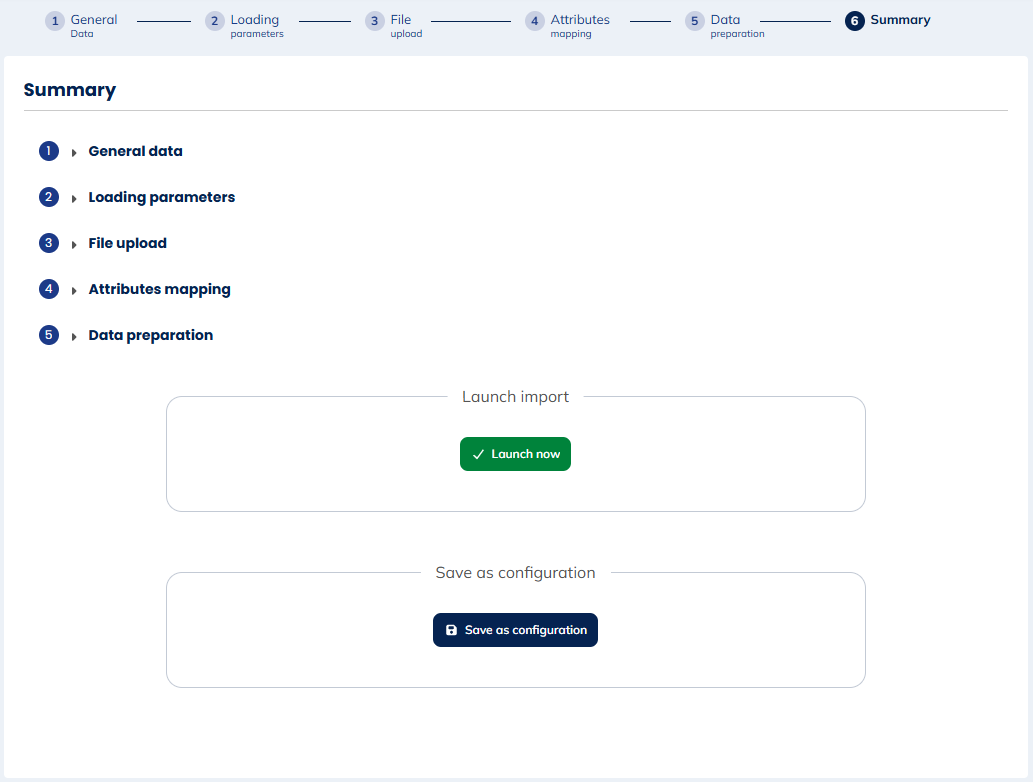
At this step, you have the summary of your import, including the data preparation step and the data transformations you might have done.
You can start the import here. After a short waiting time, which depends on the size of your import, you will be given the detailed results.
At this stage, you can also save the import configuration.
Saving an import configuration
If you want to reuse your import settings for future manual imports, you can also save an import configuration before you launch.
An import configuration keeps in memory all the import details:
- the import name (an incremental suffix will be added to it when you create new imports based on the configuration)
- the destination table and entity
- the file type and compression
- the attribute mapping
- the loading parameters
To create one, click on "Save as configuration".

You then need to give a name to the configuration, so you can find it when you select the import type.

To delete a saved import configuration, choose "Create a import" to access the configuration selection screen, and enter "Edit mode" in the top right corner.
Download the output file
In the Imports manage, you can see the result of your import in the "Finished" tab by clicking on "View execution details".
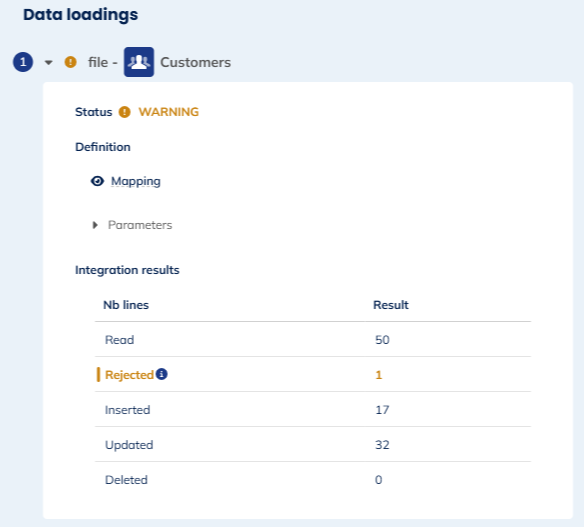
You can download the output file if you want to.
